Now that we're putting the car back together after the body shop, questions are coming up.
*The front and rear shocks should be what color?
*What brand/type of trunk paint have you found best?
*Does anyone have photos of vinyl top trim clips in place before the trim is put on?
*How is the tail lamp wire harness secured to the top edge of the trunk lid opening on the left side? Clips available?

*The front and rear shocks should be what color?
Like a dove grey
*What brand/type of trunk paint have you found best?
I used eastwoods black Aqua splatter with a mat clear coat
*How is the tail lamp wire harness secured to the top edge of the trunk lid opening on the left side? Clips available?
The harness goes along the bottom of the tail panel. It is secured with clips. It routes up the driver side on top of the wheel well. The clip get taped onto the harness cover and plug into the metal. Similar picture attached.
I should have plenty of pics in my gallery.


Thanks, Harold! Grey shocks it will be. I'll find some of the wire harness "T" clips. Eastwood sounds good for the trunk paint.
I think I found the needed info on the vinyl top trim clips. Only three studs are missing on our car--I found the holes under the vinyl. Clips slide over the studs.
Installing the short hose from the gas tank to the filler tube is a real challenge through the small opening on these cars! We got it done, but hands look like hamburger!
A couple pics during disassembly of my '68. Rear harness ran over the inner wheelhouse and under the tail light housing. If you look close where there is tape on the harness is where there are the little plastic pins which hold it in place.
http://s1376.photobucket.com/user/davids...dnefax.jpg.html Thanks
I thought somebody made the "correct" spray color for the original spiral shocks. I thought it was Eastwood's but it might be Classic Industries.
Eastwood makes it but can not find it on their site. I found it on Ames Performance site.
Ames Link
Agreed. I could not find it at Eastwood's either.
We ordered the Ames trunk paint.
Thanks for the wire harness routing info. I thought it went to the top of the rear quarter and then down to the lights. The pictures make more sense. Who sells the plastic "Tees"?
We got the bumper installed and tail lamps with restored housings, side marker lights, repaired wiring to the tail lamp sockets (metal ones).
Next step is to pull the axles and refinish the brake backing plates and axle housing cover. It's a Chev 8.5 rear end, so we need to remove the C-clips to get the axles out and backing plates off. Also need to check tooth contact on the 4.11 ring/pinion. Owner remembers the rear end whined when last driven.


How much fluid (75W90) does the rearend hold? Which limited slip additive is best?
I see Valvoline and Amsoil make differential lube with the limited slip additive already in it. I bought Valvoline, as Amsoil's prices have skyrocketed out of reach for me.
Everyone still recommends adding the additive.
Thanks, Harold, for the compliment. We have a long way to go, but it's starting to look like a car again.
Is the windshield pillar external trim piece reproduced? If not, do you know of any available used?


Also, how successful have you been on removing the rearmost bolt that holds the subframe to the body? Both sides, the rear bolt (about 5/8" or 3/4"), needs to be removed to replace a badly cracked/damaged rubber mount.
Is the bolt threaded into a typical cage nut that will spin when I try to remove the bolt, or is there a trick to getting the bolts out?
As I said on Py
soak in penertrating oil for a few days. Sprayed this one for 3 days and bolts came right out. And these were really rusted to hell.

After installing and adjusting the door windows, I found these left over. Where do they go and what do they do?
I looked under the carpet. Yes, the bolts/cage nuts are accessible from the inside. I'm soaking them with oil so we can remove them and put new rubber mounts in place. They are virtually rust-free vs. the heads underneath that look bad. Thanks for the info.

Anybody? What are these brackets for? I found them with the door hardware.

Those are the brackets that mount inside the door and the rod from the door handle to the latch fastens in them to help keep them from rattling.
Maybe I'm wrong. I tried finding a picture of them in my restoration pictures but could not find a clear picture of them.
Thanks, Harold. I thought that's what they were, too, but there are already smaller brackets in place holding the door unlock rod. I can't find another place for these other brackets. They look like they're designed to hold a rod from rattling as you said.
They would fit toward the front of each door at the top inner ledge, but the paint pattern on them would put them at the angle in the picture---and, they don't look like they belong there. If that was the location, it would be to support the door panel.


I checked my books and I don't see anything like that on the the doors or quarter area. I don't believe it is part of the door.
I don't recall a bracket like that in my convertible. So maybe it has to do with something specific to the coupe? Maybe headliner, package tray area?
I'm stumped at this point.
You know far more about these cars than we do, so we're more stumped than you. We found another single bracket like this among a box of parts taken off a junkyard Firebird coupe years ago. This one has no paint on it at all.
It's either a rod guide as you suspected or a "hook" for interior trim, judging by the design. You can see marks in the pictures on one side (the bracket on the right side of the picture above) of the small hole where the screw head contacted the bracket.
The inside door panels hang on those brackets one for each side
Thank you James.
Where on the door panel do these brackets mount? I attached them just for a picture but have no idea where they should be mounted.
it goes up at the front of the door about 3" back when i get home I will try to post a picture
It looks like you have it in the right place I cant figure out how to add a picture so I will post a link to my build .
Oh here I got it


Is those clips just for standard interior?
Is those clips just for standard interior?
I'm mot sure of that I have a 69 standard interior so your guess is as good as mine
Thanks for solving the "mystery of the brackets!" That's the only screw hole on the inner door panel that would possibly hold the bracket. This car does have the standard interior.
We get the door panels next week, so we'll trial fit them with the bracket and report back.
Applied generous amount of Eastwood interior panel rust preventive in the doors and front of quarters (below quarter window). Will do the rear part of the quarter panels (through trunk) and bottom of the panel behind the rear window, pinch weld area inside the roof next.
FWIW, replacement of the four subframe body mounts was relatively easy. Bolts came out with a breaker bar and 1" socket and new rubbers, washers went in place of the old, rotted pieces. If you do this, be sure and note the order of assembly of the rubber, washers, sleeve, and bolt. The front mount rubber is thicker than the rear.
Installed the "mystery trim clips" on both inner door panels, thanks to jamesM. Harold, now we both know where they go.
Does anyone know of a source for the heavy tarpaper-like material used in the floor pans? Ours are all good except for the driver's side. The front one has holes in it and the rear one was missing. I don't see a need to buy a complete floor insulation kit for these two pieces.
There must be some type of roofing material or ? that would work for these pieces.
I know several people in the past have posted about getting material at Lowe's/Home Depot that greatly undercut the price of Dynamat. I think those were still foil lined.
Ames does sell a kit for $55 that is supposed to be similar to the factory version.
The heavy tar paper liners are sold by all the repop houses for around $20 for a pre cut set. Match just like originals.
Windows installed!
Tires mounted!
Beginning to look like a Firebird again!


Good progress today! Got the dash finished--radio, speakers, speedometer, etc. Tested hookups by connecting battery to the wire harness. Everything works-radio, turn signals, brake lights, heater blower, and interior lights!
Got the engine nearly ready for installation--checked header clearance to oil filter, valley cover edges ground to fit intake, intake port area machined to clear rocker covers. Fitted the starter heat shield and starter brace-to-motor mount bolt. Hooked up battery to test starter to engagement with ring gear--needed four shims to achieve proper engagement. I learned today that this can be measured by using a 1/8" drill as a gage. You should be able to insert the drill bit between the ring gear teeth and the starter shaft. If it won't fit, you need more shims.


Umm, this thread needs engine pics. Which way did you go with the tar paper?
We still haven't located a suitable material for the floor insulation (tar paper). If we can't find it locally, we'll use the Lowe's or Menard's foil backed foam which is similar to Dynamat, but much less expensive.
I realize this is the body forum, but don't know of a way to keep the restoration progress reports in one thread except doing it as I've done. Any suggestions?
A few more questions came up:
*How is the positive battery cable to the starter routed? Is it run along the frame crossmember under the engine? What is used to secure it?
*We're using Doug's headers. Should we use the Ram Air starter wire shield that runs parallel with the top of the oil pan?
*For the solenoid wires (purple and yellow)--Are they routed through a tube like is done on the A bodies?
*On the spring-ring battery positive lead, where does the smaller black wire terminate and how is it routed?
*For the smaller of the two heater hoses (the one off the back of the cylinder head), what have you found to be the best method of restricting the water flow so we don't blow a heater core? The fitting supplied by Edlebrock has no restrictor. I know the originals had a spiral inside the fitting to restrict flow.
A few more questions came up:
*How is the positive battery cable to the starter routed? Is it run along the frame crossmember under the engine? What is used to secure it?
See figure 12-12 in service manual.
http://www.thefirstgensite.com/library/68sm/chaselec/chaselec.htmlSome more good illustrations.
http://thefirstgensite.com/library/partscounter/illustrated/elect/elect2.htmlHere is a thread with pics
https://firstgenfirebird.org/forums/ubbthreads.php?ubb=showflat&Number=213992&page=1*We're using Doug's headers. Should we use the Ram Air starter wire shield that runs parallel with the top of the oil pan?
That is up to you. As long as it is protected and keep as much heat away as possible. I have new wiring. The starter wire is protected with some asphalt looking insulation jacket. the wire is ran above the motor mount and is not in a tube. I could not find any reference in the service manual about that tube and I left it off. I have not issues with the wire getting hot.
*For the solenoid wires (purple and yellow)--Are they routed through a tube like is done on the A bodies?
Yes see link
http://thefirstgensite.com/library/partscounter/illustrated/elect/elect2.html*On the spring-ring battery positive lead, where does the smaller black wire terminate and how is it routed?
See Figure 12-19 in service manual
http://www.thefirstgensite.com/library/68sm/chaselec/chaselec.htmlLook for the junction block between the core and the battery on the diagram.
*For the smaller of the two heater hoses (the one off the back of the cylinder head), what have you found to be the best method of restricting the water flow so we don't blow a heater core? The fitting supplied by Edlebrock has no restrictor. I know the originals had a spiral inside the fitting to restrict flow.
I did not have any sort of restrictor so I'll watch what others say.
I was totally unaware of an OEM restrictor and did not notice one when I took my original 400 block apart. I have E-heads on my 455 and did not put something like that in.
Thanks to both of you--fantastic pictures and info! I've attached a picture of the First Generation heater hose nipple for the passenger-side head. Note there is a spiral restrictor inside to limit flow to the heater core.
I've replaced many heater cores in early GTO's due to lack of restriction in the heater coolant feed line (the small hose). I don't want to take off the RF fender on this Firebird to replace a heater core any time soon. If needed, I'll use the same idea we use on early GTO's--a 5/8" diameter cylindrical piece inserted in the hose with a 3/16" hole in the center to limit flow. Meanwhile, I'm going to call Butler to see what they've done with the E-heads.
Also need to figure out where to attach the negative battery terminal to the engine. I hate to remove one of the head bolts to replace with one with a stud to accept the cable, but there may be a better way?

A lot of people use the front lower bolt hole on the front of the passenger side head. They think that is correct so I would just use it.
That's what we will do---3/8" tapped hole on the front of the passenger side head. How do you come up with those pictures and info?
I'd like to use a spring-ring cable for the ground like the positive one we already have. I believe the positive cable is an NOS one--I bought five spring-ring cables from a dealer years ago who was purging his old Pontiac parts. One of them looks to be the right length with the protective braided sheath near the starter and has the extra feed wire for accessories.
Can you give me an idea of the length of the ground cable? Can't measure until we get the engine in and measure from where the battery will set.
Ground is around 30" in length.
This appears to be the junction block for the positive 12 volt feed off the battery cable. This one is broken. Anyone know of a source? It's on the passenger side of the core support.
I guess we could use a standard electrical two-screw terminal strip, but would like something that looks like it belongs.


Part number FM720M at Ames performance.
link
Thanks, That'll work!
I've noticed that the motor mounts have an opening big enough for the positive starter cable to fit through them. The routing of the cable along the front of the crossmember puts the cable adjacent to the motor mount. And, if routed this way, the cable is not close to the exhaust components. There appears to be no need for a tube to protect that cable if done this way. Has anyone run the cable like that? Any downside?
The last time I replaced mine, I discovered a factory clip above the mount that held the cable and minimized it contacting places it could rub against. (My engine has never been off the factory mounts.) The vendors also sell a cloth wire loom for the purpose of insulating that cable.

Ours has the braided cover over the starter end--for about 15". As I said, I think it's an NOS cable. There is no clip like yours has, however. Through the motor mount looks like a safe way to go for that cable. We have the "L" shaped tube for the solenoid wires.
Has anyone figured out a way to keep water from wicking under the vinyl top in the bottom of the rear window channel? There is no way for water to get out of that area except by evaporation. With a vinyl top, wicking is sure to occur. We plan to use rustproofing in the channel now that the windows are in place, but that won't seal the edges perfectly.
I was able to get a photo of mine. It runs abov the mount. I have the clip there that hold it in place.

Thanks, Jim & Harold. Great info! Now, I'll find a clip that'll fit on the motor mount bolt.
Will this antenna lead work with any of the available antenna bases? It appears to be stock, but I can't see how it's attached to the antenna base.


That is not like the OEM so I can't say it will fit or not. It must be a after market antenna lead .
That's what I thought. Better get the right one before we put the fender on.
Getting better all the time!! Today, hopefully, the engine goes in.
Let's see--lay the headers in the chassis, lower the engine and attach headers before engine is resting on mounts. Sound OK?
Starter shield & Solenoid wire shield look like they will fit OK.
Will I be able to get the wires on the starter/solenoid after the engine is in place?


Problem---after hanging the engine/trans at the angle in the pictures, oil is dripping out of the crankshaft seal. I was hoping it was the oil pan leaking, but it's the rear main seal.
The seal is a BOP lip seal installed by the engine shop that did the machine work and assembled the crank/rods/pistons. We'll call him tomorrow, but I'm afraid of what comes next. We have the heads/cam/timing chain/cam degreed, rockers installed & adjusted, engine primed with oil--almost ready to run.
The only good news is this is better now than after we start it up in the chassis. I'll keep you posted.
Surprisingly, the engine shop apologized and is going to fix the leak. We took the engine there 7/15. He will check to confirm the leak is from the rear seal. If so, probably replace it with a rope seal. Too many "ifs" with the lip seal. I've spoken with many people about our problem. Everyone I spoke to who has put a lip seal in a Pontiac has had at least one failure. Some have found that the seal groove is eccentric with the main bearing centerline--up to .020", which results in a tight seal on one side and no contact on the other. Also, the serrations on the crankshaft seal journal tend to wear the lip if they're too pronounced. The only failure on rope seals was one guy who packed it too tight and burned up the seal.
I'll report on what was done next week.
Meanwhile, we rustproofed the quarter panels inside the trunk, around the wheel wells, and in front of the rear wheels. We rustproofed the four sides of the trunk lid between the sheet metal and bracing. We rustproofed the rear window bottom channel in the area between the window channel and inside the trunk. We also did the drip rail area on both sides since there is no headliner in the way. Also the sail panels are off, so we did the pillar area above the weatherstrip. Both doors were done inside from top to bottom. We used Eastwood black internal panel rustproofing. Four cans so far.
Engine shop checked leak, called BOP. They said this is an extreme situation and the engine "may not leak when installed in the car and run." We installed the engine tonight and will do the absolute minimum assembly to start and run it, in case it does leak. Fingers are crossed!!.
New problem--We have a repro crossmember for a TH400. When the bolts are put in the rear mount, the crossmember is about 1 1/2" off center. In other words, on the driver's side, the crossmember laps over the framerail by about 2 1/2". On the passenger side, only about 1/2". We moved the rear of the transmission as far as possible with the front engine mount bolts loose. We still are off too far. Also, the mounting holes in the crossmember are about 3" too far forward, so they don't come close to the framerail holes. This crossmember is one sold as a "Firebird & Camaro TH400" piece. It will not work in a Firebird.
If anyone has a OEM used crossmember for sale from a '68 Firebird with TH400, we'd like to buy it.
Thanks.

Where did the cross member come from. I'm surprised that it would be that far off. Seems everyone would say it is unusable then.
Ames performance has one for Pontiac engine and a Chevy engine. Could it be for a cheby and not Pontiac? Ames crossmember part number is FR541 for Pontiac.
Reading the comments on installing the vinyl roof trim made me think I should post my experience in case it would help someone. My car had a new vinyl roof but the Stainless trim was pretty beat up. Who ever installed it had trimmed the vinyl back a little. The long pieces went on fine. However the windshield pieces refused to go on. The upholstery shop I use said the repro was contoured a bit different from the OEM pieces. I agree. However I was able to get the drivers side on by holding in place with one hand and tapping the edge over the rain gutter with a body hammer with the other hand. Came out fine. Passenger side refused the same treatment. Accordingly I took all the dents out of my OEM piece using a hammer and piece of wood I cut to fit. Next I filed down the high spots then sanded with 220 and consecutively fine grits down to 1500. Then ran if over my buffer. Came out great. Restoring Stainless that is not anodized is pretty simple. I hope this helps someone.
Doug
Harold, I think we got a BBC crossmember by accident. I found a guy that's going to Norwalk who has an original one from a '69 with TH400. I'm going to try that. I've heard even the SBC for TH400 member is not exactly right for a Pontiac.
Thanks, Doug. I am going to try to straighten the front and rear window trim as you described. Then, will try to put it on without denting it again.
Made a chevy one work on mine. Wasn't fun...
BTY, chevy engines are mounted further forward vs Pontiac.
After we get the engine hooked up and run to check for leaks, we'll be back working on the interior.
Are there any tricks installing the standard interior door panels and quarter panel pieces? Do springs go behind the window cranks and/or the door handles? Approximately where do the screws go along the bottom of the door panels to secure them?
This is the repo crossmember I used. Bought from Classic Ind. if I remember correctly, though that was a few years ago.

Thanks, Mushroombert,
I'm hoping the OEM crossmember will fit without drilling holes, etc.
We tried putting the transmission dipstick tube in last night--no way to get it in place without pulling the engine upward and forward. It didn't go nearly as well as the original engine install. Here's what we learned:
First, if using headers , don't try to pull or install the engine with the oil filter housing in place. The starter can be left in place, but if both the starter and oil filter housing are in place, it doesn't work well. If the steering box was not in place, engine/header installation would work fairly easily, but it can be done by removing the oil filter housing.
Second, you may want to install the engine before putting the wiper/washer motor in place. Valve cover interference with damage to both could be avoided.
We put some scratches in the ceramic coating on the headers because we weren't smart enough to remove the oil filter housing.
Is there something we can apply to prevent the inevitable rusting after startup? I've heard using VHT or similar product to coat the metal at the bottom of the scratches works. Any other ideas?
What is the approx. number of quarts of Dexron needed for a freshly rebuilt TH400? We have about 1 qt. in the converter. How much do we need to have on hand for startup and fill?
Is about 6 qt. OK for initial fill--adding more after startup?
Capacities

Thanks, Jimc2002,
Looks like initial fill of 8 qt. and total of 10 qt. is close.
We tried last night to install the rear window/quarter panels inside. They are PUI assembled panels.
When hung on the inner edge of the window channel, there is no room for the window to pass by. Also, the contour of the metal shell does not match the inner quarter window panel.
Has anyone experienced this? Solution? I called Ames and they want pictures, which I will send, and will replace the panels if necessary. I'm not optimistic replacements would fit.


Anybody have better luck with these panels?
I'm checking out the electrical devices before we further assemble the front end. Everything works fine except the wipers. The car has two speed wiper/washers.
If I hold the washer button in, wipers will run in either speed selected. When I let go, they stop. They will not run except in the washer mode.
If I ground the black/blue stripe terminal on the wiper motor, the wipers run and don't stop until the ground is removed.
Any ideas?
Problem with wipers was the switch. There was no ground path through the switch. I disassembled the switch and cleaned contacts and the two brass tabs that provide electrical ground through the switch body. This cured the problem.
Had this car not been an A/C car, I don't know how one would remove that switch. As it was, I removed the left dash A/C outlet and reached the switch through that hole.
As most of you know, the nut that secures the light swtich and wiper switch to the dash needs a special driver to remove it. I made one using an old 12 mm socket by grinding the face of the socket to create two tabs that engage the slots in the nut.
E-Brake light, and one directional arrow didn't work. E-Brake problem was sticky switch. Directional arrow light needed cleaning and bending the tabs on the printed circuit board under the dash. Oil warning light works fine.
I cannot get the coolant temperature light to go on. I believe coolant temperature is the green wire in the headlight harness. Grounding it should turn on the light, but it doesn't. I can see it goes through the firewall plug, then under the dash. Anyone know the color of the wire as it goes from the firewall to the PC board? The diagrams I have do not show this.
Also, how is the harness routed to the alternator and the temperature sending unit on the driver's side of the engine?
Temperature light problem was also due to the bulb holder on the PC board. The bulb was not contacting the brass tabs in the holder. I tried a different bulb and all is OK.
Checked GEN light operation by grounding the brown wire from the regulator plug. Light comes on when this wire is grounded.
I'm pleased these problems were found and corrected before getting the car running--much easier to get at the wires now.
Next step, I need to provide +12 volts switched by the ignition switch to the MSD system. I see there is a tab near the center of the fuse panel that does switch on and off with the ignition. I don't think there is a +12 source switched by ignition in the engine compartment, so will have to run a wire through the firewall. I believe #16 wire should be adequate for this.
Also need +12 for the hood tach light, also switched by the ignition switch--probably can use the same source since I need to run a wire for the tach signal from the MSD box, also.
Called MSD. The 6AL system we're using does not need a full 12 volts for the switched signal wire. It's OK to use the factory resistance coil wire. The full 12 volts is a separate 12 gage wire directly from the battery.
I need the routing of the kickdown solenoid wire from the firewall to the transmission plug. Right now, it's lying on the top of the transmission case with no clips. Anybody have a suggestion on how it should be routed/secured?
We're trying to decide whether or not to use fender shields and A-arm shields. The inners are new and have no staple holes. We are using chromed upper A-arm shafts. Tempted to go without shields considering how this car will seldom be driven in rain.
What do you think?
We tried last night to install the rear window/quarter panels inside. They are PUI assembled panels.
When hung on the inner edge of the window channel, there is no room for the window to pass by. Also, the contour of the metal shell does not match the inner quarter window panel.
Has anyone experienced this? Solution? I called Ames and they want pictures, which I will send, and will replace the panels if necessary. I'm not optimistic replacements would fit.
On the other site you mention you have the original panels. Could you use the original metal and recover them? On my deluxe panal a that is what I did.
Yes, we may do that if the replacements from Ames don't fit correctly. My only concern is how to secure the rubber window sweep to the old panel. Staples are not likely possible, but maybe pop-rivets if we go that way.
I'll report next week on the fit of the replacement PUI panels from Ames.
Can anyone tell me where the harness for the hood tach plugs in for the light? There is a plug on the harness that piggybacks a plug somewhere in the vicinity of the wiper motor, but it won't fit where there is constant +12 volts on the wiper motor.
This topic has been discussed many times here. At the bottom of the page is a search box that is easy to use. I keyed in hood tach and recieved many topics.
Here is one for instance
https://firstgenfirebird.org/forums/ubbthreads.php?ubb=showflat&Number=228927There is also a section on the hood tach in the last chapter of the service manual.
Couldn't find the info in the search mode, but he Service Manual page on tachs showed the proper connection for the tach light. It's on the fuse block labeled "LMP." You do, however, have to take off the plastic cover off the plug to get the wire through the firewall.
Thanks, this will work out just fine.
Replacement rear interior panels from PUI do not fit. The bend in the sheet metal on the original pieces is 2 1/4" from the window sweep is 3 1/4" on the repro panels. We decided to peel the vinyl off the repros and put it on the original pieces.
We peeled the vinyl off the repro and glued it on the original panel--driver's side only--the other side fits OK. FIt of the original is perfect and it looks like we're professionals. I'll call Ames tomorrow to find out what to do about the fit problem and return of the defective pieces.
The hard part was installing the staples that hold the window sweep on the metal panel. We used a 1/16" drill through the original staple holes and installed the staples, bent them with a Vicegrips. I wish we'd have done that from the start.
We also discovered that the repro window crank handles are not offset from the panel as much as the originals, so they hit on the metal trim bar. We need to fix that problem with different crank handles--originals work fine, but we want black knobs. The ones we bought were from Classic Headquarters---W926.
Here's a video of the startup on 8-30-15. It's a Butler 467 cu. in. rotating assy. in a 1972 455 block with Lunati Voodoo hydraulic roller cam, Edlebrock round-port heads, Doug's headers, MSD, Champion aluminum radiator, Flexcool '69 water pump, TH400.
We're running a '66 Tripower on the repro '66 intake. Startup was done with the center carb only--end carb locations blocked off.
http://youtu.be/8WtdTVd81T8Engine fired on first revolution. We set initial timing to 16 degrees with 34 degrees total. Idles well at 750 rpm.
The outlet line on the heater core solder joint failed so we took the core out and re-soldered the line. The factory solder joint was not good, but we got good flow and it's now secure. Not too bad a job without front fenders!
I'll post more pictures when we mount the other carbs.
Can anyone provide pictures of TH400 vacuum modulator line routing?
How about the routing of the downshift solenoid wire? How is it secured over the top of the transmission? I've got the downshift switch mounted on the intake manifold, and the wires from the engine harness fit it nicely. The black wire that goes to the trans, however is just lying on the top of the transmission.
I don't have a picture but I remember a white plastic clip held on by a single screw. The wire should go through that clip.
Was the clip attached to the body or to the transmission/engine?
And, for the headlight/parking light/alternator harness on the driver's side--there are two plastic tabs to support that harness between the inner and outer fenders. Do the tabs go into holes in the edge of the outer fender or are there holes in the inner fender to insert the tabs to hold that harness? We have new inner fenders, so I can't tell where those plastic tabs were inserted, but I noticed that there are holes through the edge of the outer fender (one near the hood hinge bolt and one 6" ahead of the front bolt that attaches the inner and outer together) that look like they are for that purpose. I'll post pictures if necessary.
Test fitted carbs, Ram Air pan, inner fenders, and finished troubleshooting the wiring so everything now works. We left the idiot lights functional, but added an oil pressure gage with the sensor in the gallery next to the distributor.
With the Tripower and TH400, it's really tight with the kickdown switch mounted in the stock location. It looks like I'll have to set the mechanical linkage up like the '66 Olds with the slotted actuating rod going to the front carb. I'll still be able to use all factory parts, however.
Here are some pictures of the work in progress.


Great job, I like the tri-power setup.
Was the clip attached to the body or to the transmission/engine?
And, for the headlight/parking light/alternator harness on the driver's side--there are two plastic tabs to support that harness between the inner and outer fenders. Do the tabs go into holes in the edge of the outer fender or are there holes in the inner fender to insert the tabs to hold that harness? We have new inner fenders, so I can't tell where those plastic tabs were inserted, but I noticed that there are holes through the edge of the outer fender (one near the hood hinge bolt and one 6" ahead of the front bolt that attaches the inner and outer together) that look like they are for that purpose. I'll post pictures if necessary.
They wiring harness tabs go into holes in the edge of the outer fender.
Looks like it going to be a nice looking engine compartment.
Thanks for the answer on the wire harness routing. I think we'll do the same on the passenger side with the MSD harness--securing it with straps/holes in the outer fender so it's out of sight.
I'm pleased the '66 GTO Ram Air carb pan and the Firebird hood pan end up at the right height to make this setup ideal for the Firebird. The only mod needed is to narrow the hole (circle) in the hood pan as it is wider than the '66 GTO carb pan--only by about 1 1/4" on each side.
It's really tricky, however, to get the mechanical Tripower linkage tucked in with the TH400 kickdown switch. Looks like it will work, though. I may have to use the '66 Olds slotted rod operating the front carb instead of fighting with lack of clearance between the kickdown switch and the throttle cable tower.

Do the transmission cooling lines have a clip to hold them to the frame crossmember? If so, where can I get a clip or clamp to fasten them?
If they're attached to the frame, there would be movement there so some type of insulation (rubber?) would be needed to allow movement without abrasion.
We tweaked the Tripower linkage; vacuum for the trans, heater controls, and power brakes; bent a transmission vacuum modulator line, fit the carpeting, finished the rear quarter panel trim around the door jambs.
I modified the idle circuit further in the the center carb to work better with the Lunati cam. We had nozzle drip at idle before the mods, but we're still more than 4 turns out on the idle adj. screws. I used throttle plates with holes in the center carb only like the factory did on automatic cars. Engine idles at about 700 rpm with 15" vacuum, but is very lopey.
Here's how I finally fitted mechanical linkage and fuel lines.
Because of the kickdown switch, there is no room for the slotted rod and lever on the rear carb, so I reversed the carbs and ran the slotted rod to the front carb. A lot of tweaking was needed with the throttle cable tower to get full throttle opening, but we finally got it exactly right!
The Ram Air pan would not clear the special fuel fitting for the front carb fuel block, so I ran the '64/'65 style 3/8" fuel line with the distribution block turned upside down compared to the '66 Tripowers. It makes access to the fuel filter more difficult, but that won't be changed more than every few years anyhow.
Had one hiccup with the rear carb needle sticking, but a sharp tap with a screwdriver handle fixed that. Idles really well at about 700 rpm with 15" vacuum. Power brakes should work fine.


Balanced driveshaft ready to install. I painted it with Rust-O-Leum stainless wheel paint. Finally, we'll be able to move the car under its own power.
Here's the back seat, trim installed. We are waiting to put the front buckets in until we get the antenna wire from Ames. It's a lot easier to get under the dash without the seats in place.


Was the clip attached to the body or to the transmission/engine?
And, for the headlight/parking light/alternator harness on the driver's side--there are two plastic tabs to support that harness between the inner and outer fenders. Do the tabs go into holes in the edge of the outer fender or are there holes in the inner fender to insert the tabs to hold that harness? We have new inner fenders, so I can't tell where those plastic tabs were inserted, but I noticed that there are holes through the edge of the outer fender (one near the hood hinge bolt and one 6" ahead of the front bolt that attaches the inner and outer together) that look like they are for that purpose. I'll post pictures if necessary.
The clip was on the passenger side of the transmission.
Driveshaft in!! It moves under it's own power--first time in 28 years!! Now, for the finishing touches under the hood so we can put the front sheet metal on.
Robert--Kickdown wire clip attached to the trans or to the body?
We did really well this weekend. Got the Flowmaster X pipe 3" system in place--ready for welding to header extensions. Trying to decide whether to leave the tailpipes as shown on the picture or add splitters. There is very little room between the body and leaf springs for the 4" pipes---3/8" max on each side of the pipe. The splitters would give us more "wiggle room." For you that have installed aftermarket exhaust, what do you do with the e-brake cable where it crosses over the X pipe?
Got the interior done, including the seat belts from Ames( awesome factory duplicates, but the anchor holes are .500" instead of .560" to accept factory bolts.
Front fenders and bumper nearly ready to install.


Sorry, I can't get these pictures to post upright. They are correct on my computer screen but when posting, they're upside down. I tried inverting them in my picture files and they still post upside down. Sorry.
How can I paint/protect the door hinge bolts from rust--and make them look decent? They are 5/16" hex head bolts with integral washers, but not painted or plated. I've considered removing half of them, plating black zinc or black oxide treatment and re-installing--then removing the other half and treating them. Best solution would be body color for all the bolts, but short of a paint brush and a lot of patience, I don't know how to do that.
Any ideas?
First of all I would apply a generous amount of lithium grease to the threads, as for the head you have a few options. Stock was the "zink" steel color...you can get a small touch up paint brush and brush the heads a zink or body color. You can also brush clear coat on them. All depends what you're after...stock, rust prevention, looks... They are not very visible so unless you're building a show car, I would recommend using the body color.
You're saying that the hinge bolts were not body color off the assy. line? I thought they were body color like on the GTO's. If they were zinc plated, I'll remove them as described above and get half of them plated and do the other half when re-installing the plated ones.
I think the doors were painted off the car before assy line install, which would indicated the bolts were unpainted. Maybe someone else can confirm.
Hinge bolts were body color. You can stick them in a cardboard lid. Spay with a paint gun.
If It was me and I left those pipes, I would cut the end on the angle on the quarter panel. Like the factory were. They were also squeezed in to make it slimmer and more oval at the end.
If you used the factory style extension they might not fit a 4" pipe.
Hinge bolts were body color.
I agree with Harold.
I suspect the factory had the hinge halves mounted on the doors and jambs when they painted them separately so the hinge, bolts, pins/roller, and springs all got body color. During assembly they probably pulled out the loose pin, put the doors on, and pushed the pins back in and crimped the bottom of the pins.
Yes, I've decided the best way to color the bolts on an assembled car is to paint the heads with a brush after careful cleaning/degreasing. I'm going to try that before we put the fenders on.
Does anyone have a suggestion on how to flatten the tailpipes where they pass between the leaf spring and the body? I'm still considering the splitters with the 3" inlet, 2 1/2" outlet pipes, but may leave the pipes as is if I can figure out how to duplicate the look of the flattened factory tailpipes--even though they are 3" instead of 2". I remember they were flattened with straight lines, but the narrow portion of the OD retained the original curve of the pipe.
"flattened factory tailpipes"? I don't recall ever seeing that. I have seen a flattened spot on the factory splitters. Is that what you mean?
This was how Gardner made their ends which are suppose to be the way the factory did it. It is flattened sort of. Not round like the upper part of the pipe. It made more space between the springs and the quarter.

Thanks. Never seen or heard of that before. Have no idea what my originals looked like. They were at least 4-5 tail pipes ago and I can only recall cylindrical.
I can't tell what shape the Gardner pipes are from the photo. Can you post another view? I don't want to have them look like I just crushed them in a vise.
Thanks.
Sorry, I had them cut and put the extensions on and I no longer have access to them.
Not as clean as Harold's but here is another angle of Gardner.
Gordy

Harold and Gordy, Thanks for the info on the tailpipes. We haven't decided which way to go yet. If we could duplicate the shape of the flattened pipes, that's the way I'd go without extensions. We'll check with a local muffler guy who has a good reputation and see if he can do it.
Here's how our system looks so far. I hope the pictures post upright. There is about 3/8" clearance on each side of the tailpipes when centered in the opening.
Tomorrow, the front fenders are going to be mounted. We're done under the hood. Notice the safety chain on the driver's side in case of motor mount failure.
The hood-mounted Ram Air pan needed some mods to fit the Tripower pan, but that's just about done. As soon as we have that, we'll cut the hood brace to fit the pan--nervous. .


Thanks for the pics. Nice car.
While a friend is welding the header collector flange to the downpipe, we decided to put he fenders on.
About five hours work, but decent result. We needed .750" of shims on each side where the rear of the fenders sit on top of the firewall. I've never seen that amount of shimming on any car I've worked on, but we did achieve proper alignment with that much shimming. Wow, it takes some convincing to get the proper profile of the fenders to match the doors. Those bottom shims at the dogleg really change that a lot, but judicious prying with a padded 2x4 was needed to move the fender as needed.
The black strips on the driver's side near the emblem is from Eastwood Rust Encapsulator that leaked through the holes when I sprayed the inside of the fenders. That is a really nice product--seeps into the seams very well.


Nice car!
I have pics to share ... I still have the original muffler & pipes.
Have you thought of using stock spliters?
Also some pics of my Tri-Power for 65 Catalina


Thanks for the tailpipe pictures. I cannot use stock splitters as the pipes are 3" and the input to the splitters is only 2 1/2" or maybe 2 1/4".
I like the way the original pipe was bent flatter to clear. We're trying to figure out how to do that.
Gus68, we have the tube in place to protect the starter wiring. It's not as long as the one you used, but goes from the bottom edge of the valve cover to the solenoid connections--from the backside of the engine. I didn't take pictures before we put the headers on, so you can't see the tube.
A friend of a friend has a pipe bender, and bent the last 6" of the tailpipes so they measure 2 1/2" across at the point where they pass between the leaf springs and the quarter panel.
Another friend welded the downpipes-to-header adaptor flange. He did a great job as you can see from the pictures. It's hard to tell where the seam is.
Both turned out really well and I now have the exhaust mounted except for the tailpipe hangers which should be welded to the pipes. I may use a 3" muffler clamp to hold them temporarily to make sure we have enough clearance throughout.
I had to move the air shock filler valves since we had them mounted directly above the tailpipes which would have melted the plastic lines.


What have you found to be the best coating for the hood hinges? Seems to me they should be dark gray. Rustoleum Stainless Steel wheel paint seems about he right gloss & color. Ideas?
One corner of my deck lid is above the quarter panel by about 3/16". Is there a way to correct this without major surgery?
Also, what is the proper way to shim the cowl panel in front of the windshield so it's the same height as the fender tops? Ours is about 3/16" low.

Several people use zinc phosphate.
http://www.eastwood.com/eastwood-zinc-phosphate-aerosol.htmlMake sure you have the back down all the way by loosing bolts to fender and left up on the hood nose to force the back down then tighten bolts. Also make sure the middle fender hood bumpers are not to fat. I had to shave some of the rubber to make thinner.
If all that fails. Some slot the rear hinge holes some to make the back lower.
Harold, I think you misunderstood my question. I was referring to the right front corner of the deck lid being too high. We don't have the hood installed yet.
Also, we can't ID the piece pictured. It's fiberglass and about 4 feet long with three mounting holes. Is this from a '68 Firebird? I think the bodyshop painted this and gave it to us from another customer's car.


We put the lower sheet metal shroud in place that holds the parking lights. That went on just fine. The reproduction parking lights we bought from Ames, however, are a problem for three reasons.
1. The three sheet metal screws that hold the housings to the lower shroud will not clear the holes in the plastic lenses. The holes in the plastic are not large enough. I tried putting the lenses over the housing and putting that same three screws over the lenses as you can see in the pictures, but I know that's not right. Enlarging the holes in the plastic lenses is a possibility, but once I do that, return would be unlikely. Also I'd be worried about the drill catching and destroying the lens. If I do enlarge them, I'll find a hole saw that size to lower the risk of damage.
2. The electrical connections for the parking light socket are unique. I've never seen a plug that would fit over the prongs behind the socket. If such a socket is not available, I'll have to use stab-on connectors and waterproof the rear of the socket as well as possible. Not a good solution.
3. The bulb sockets are for 1157 bulbs. It is nearly impossible to put the bulb in and turn it to lock it in place. I was able to get a bulb in one of the sockets, but not the other. This may be OK if I apply dielectric grease to the bulb base and socket to lower friction.
I'll call Ames tomorrow to see if they have any answers for the parking lights. It's disappointing that parts that cost so much don't fit.


The red part pictured is not from a '68 'bird. The screws you used for the front housing are not correct. Those should be round head sheet metal screws. Likely why the holes are too small. The bulb socket looks correct (from my old memory), but I may not be right on that one. the front screws that mount the lens to the housing are shoulder bolts.
Thank you. I'll return the piece to the body shop--it's probably off someone's Corvette.
Yes, I will find some round-head sheet metal screws the of the same thread size as the hex-head ones in the picture. That will definitely work.
A forum member recognized the sockets from his '68 GTO. He sent me a pair with pigtails so I can splice them into the front harness. I believe Tempest's/GTO's used these from '68 thru '70. I don't know about the '69 Firebird.
Here's the pair of socket connectors I got today for the parking lights. How would we restore our cars without help from other forum members?
Now, to figure out the best splice into the front harness. I like using the crimp connectors with shrink tubing over about 2" of the splice area.
Thank you.


Solder the wire and then use shrink tube to seal it. Crimp suck. Leak, corrode and then disconnect.
Shrink tubing and solder took care of wiring the parking light sockets to the harness. Even though the ones I got were from a '68 GTO, the wire color codes were the same as Firebird.
The reproduction parking light housings and lenses are a real challenge to install. We spent five hours today trying different things to get a decent fit into the openings on the body. Both sides fit poorly even after enlarging the holes in the housings and the lenses. This is a case where original pieces would have been a boon!!
We took a drive around the block and discovered that the right rear tire contacts the rear upper corner of the fenderwell (where the trim is attached). When measuring, we see that that side of the rear axle is 1/2" further back than the other side. You can see the difference in the two pictures of the rear wheel wells.
What locates the rear axle onto the leaf springs? Can the axle be moved forward and back? I thought there was a pin or locator to insure the axle is in the right location. I do, however, see a lot of Novas and Camaros dogtracking because the axle is not straight.
We're going to test fit the hood tomorrow--hood hinges are done. Eastwood Zinc Phosphate is a really nice product for this unique finish. I hope we don't have to jockey the fender positions too much to get the hood aligned properly.


We took a drive around the block and discovered that the right rear tire contacts the rear upper corner of the fenderwell (where the trim is attached). When measuring, we see that that side of the rear axle is 1/2" further back than the other side. You can see the difference in the two pictures of the rear wheel wells.
What locates the rear axle onto the leaf springs? Can the axle be moved forward and back? I thought there was a pin or locator to insure the axle is in the right location. I do, however, see a lot of Novas and Camaros dogtracking because the axle is not straight.
This is intersting that you bring this up as I have this same problem with my rear end. I have about 3/4 of an inch difference from the left to right side and have never been able to figure out the problem or find anyone who knows why this is. Would be interesting to figure this out or if this is just how the cars came out from the factory. Has your car ever been hit? I thought that might be my problem since mine was hit prior to me owning it but everything seems to measure out correctly. I have heard of a couple of other folks saying they have the same problem but nothing to explain it all. I even loosened up the U-bolts and tried straightning the axle in the wheel well, but only got a little bit of movement to take it to 3/4 inch difference. Would be interesting to hear from someone who had this problem and figured it all out.
There is a slot in the bottom leaf spring/shock support bracket. A "nipple" welded on the bottom center of leaf spring goes into slot in bracket thus providing proper alignment.
So, you could grind it off and weld on another "nipple" if you determine it's located wrong?
There is a slot in the bottom leaf spring/shock support bracket. A "nipple" welded on the bottom center of leaf spring goes into slot in bracket thus providing proper alignment.
I know my problem is still there even with these (nipple and hole) aligned properly, that is the reason I can only get a little movement out of rear end when trying to adjust the forward and aft alignment.
Would it be possible to grind off the "nipple" on the bottom leaf and relocate a welded "nipple" to the right spot? In my case, it would be 1/2" further toward the front of the car to move the axle forward.
Have you compared the leaf springs to see if they are the same?
I got curious and checked mine. The distance between the tire and lower quarter point is the same (approx) 3". F70X14s.
We drove the car around the block and discovered that the 255-70r15's contacted the wheel well on both the driver's and passenger side. This is with air shocks pumped to 100 psi. The approx. 1/2" difference between the two sides is there, but the 29.1" OD is too much.
We returned the tires to the dealer and had him mount 255-60r15's. These are 27" OD and, in spite of more than 9" tread on the ground, clear everything by at least 1".
We don't like losing the OD with the 4.11 gearing. This combination puts us at 68.4 mph at 3500 rpm. It's OK, but not ideal for freeway cruising. We are not going to do anything about the axle offset at this time. Depending on how the ratio works out, we may end up with a different rear end--maybe 9" Ford with gearing in the low 3's. With the power of this engine combo, this 8.5" unit may not survive very long. Will keep you posted on that.
The surprising thing with these tires is that the dealer took the tires back for full credit and only charged for mounting and balancing. This in spite of the fact that we bought the tires in March. The dealer is Baumgardt Tire in Appleton, Wisconsin. The owner is a Pontiac nut, which may be why this worked out.
We mounted and aligned the hood. The rear corners of the hood were too high, which was panic time until we remembered that shimming the front bolts that attach the hood to the hinges lowers the rear of the hood. After a few hours of jockeying the front fender mounts, core support, and hinges, the hood alignment is good. We will have to remove the hood one more time to cut the passenger side hood bracing to fit the Ram Air pan.
Front bumper will be the last step of assembly for this project. It's assembled and ready to mount.


Forgot to mention--Note that the driver's side windshield wiper is angled downward toward the center of the car. Has anyone figured out how to correct this? I tried the other wiper arm, but the result is the same. Bending the top part of the wiper arm is the only way I can see this could be fixed.
Maybe rotate the arm up a tooth or two on the mounting stud?
The convertibles have a .25 inch shorter left arm and it does not appear that tilted.
Maybe rotate the arm up a tooth or two on the mounting stud?
I agree with Harold. They should sit up a bit higher when parked. (level with the chrome, about an inch and one half above the top of the chrome)

With the power of this engine combo, this 8.5" unit may not survive very long. Will keep you posted on that.
I highly doubt that
I personally built 8.5's that were in cars with big blocks and 400+ of nitrous that are just fine.
Thanks for the info. I'll move the wiper one notch higher, which will get it more parallel to the chrome.
We'll soon know how the 8.5 survives. Can't wait to open those end carbs for the first time! The trip around the block revealed a little of how this thing will run. With the 3500 rpm converter and the 4.11 gears, just a slight blip of the throttle (on just the center carb) chirps the tires.
Wipers moved--looks a lot better.
Here's our progress from yesterday--Ram Air pan mounted on hood after cutting the brace, rocker panel moldings, front bumper assy.
Took it for a drive--the torque and response of the engine is more than we had hoped for. Tires will break loose anytime you punch it--even at 40 mph. Idles at about 700 rpm and sounds awesome!
Now, however, we have a slight front tire rub on the passenger side with the 214-70r15's. The rub is at the 10:00 position. As you can see in the side photo, there appears to be enough clearance, but it's not enough. Has anyone seen this change with front end alignment. That's not yet been done.


Dick,
The pan looks great! Now, cutting the bracing wasn't all that scary, was it?
Looks like your getting done just in time for the snow to fly. Fantastic job!
Here's the 'Bird going home. This is my grandson's first ride in his dad's Firebird. It has been parked since before 1994, but now has new life!!.
How do you like the sound? I think the 3" Magnaflo system sounds pretty healthy.
https://www.youtube.com/watch?v=fwf5F1wl1-4https://www.youtube.com/watch?v=yOpJQrcXox0
Very nice sound, some lope but not overpowering. Just right!
Now, the bad news. The hood Ram Air pan fit perfectly, foam seal and all. Cutting the hood brace took only a few minutes.
Upon attempting to close the hood, however, I discovered that there NO CLEARANCE between the front of the carb pan and the hood pan. They touch at the very front of the carb pan with the hood closed. The rear of the carb pan clears by about 1", which is just about right to compress the foam and make a seal.
Now, I need to figure out how to lower the front of the carb pan by about 1" so there is room for the foam to seal, but no contact between the two pans. I can see that about 3/8" could be removed from the plastic carb pan at the front carb air horn location and about 3/16" off the carb pan at the center carb air horn location. This would give more than 3/8" of clearance at the front of the pan due to the geometery, but I don't know if that would be enough. I'm going to try it. If not successful, I'll cut the top off the carb pan and cut a wedge-shaped section out of it to lower the top of the pan. It will take adhesive and body work to make it look nice, but the end result will be worth the effort.
If any of you have ideas or know of a carb pan that is lower than the one I have, please let me know. Mine is as a plastic carb pan and I suspect they are all the same. When I set it on a table, there is 3 5/8" from the top of the pan to the bottom of the front air horn connection.


Dick, a couple of thoughts.
I was thinking the same as you, cut a wedge and weld it back together. But then I read that your pan is plastic.
This still can be done depending on the type of plastic. If it is a thermoplastic, one you can reshape with heat, that may be an option. How much clearance do you have from the pan to fuel lines/linkages? You could remove the foam seal, install the filters to keep everything in place, make a "U" shaped wood form to press evenly around the pan, then heat the pan (with a heat gun) in the front lower portion. It doesn't look like you have much clearance between the pan and the top of the front carb, so that may not even be an option. It could turn out to be unpleasant to look at too!
If it were me, I'd make a cut the height of the back corner wall just below the radius. Take that cut forward around the front to the opposite back corner. Lower the pan to the level you want overlapping the sections and use a plastic adhesive to glue together. If you can plastic weld, that's an option too. It will probably take some heat to get the two to align well.
You know, it's always something! Makes it all that much more enjoyable once you get to use it.
Good luck,
Terry
I'm hoping I can lower the top of the pan enough just by removing material off the carb connections--center and front only.
I called Ames today and they measured the plastic and metal aftermarket pan height--they're both 3 5/8" like mine, so buying one that will fit is not an option.
I'll try the carb connection method first and report on results. Does it seem reasonable to operate with about 1" of clearance between the hood and carb pans? Or could I get by with less? The stock foam is 1 3/4" thick, so 1" of clearance would compress it less than 2X.
An inch should be fine, until a motor mount lets go!
An inch should be fine, until a motor mount lets go!
No worry there. We have a 8000 lb. proof safety chain tying the front of the engine to the frame with zero slack. The engine cannot move even 1/8".
If that pan was metal I would cut a pie shape piece from back to front and do some welding . I would use tape to keep the lines strait. Mask off so you could scribe a cut line.
Since the pan is plastic I don't have a good suggestion. Is it plastic or fiberglass? I have not heard of a good plastic welder. The eastwood one has not had the best reviews.
Do they make metal pans?
The carb pan is plastic, not fiberglass. Your idea with the wedge is right on, and would work for sure without sacrificing clearance between the top of the carbs and the bottom of the pan. However, since the sides are tapered, there would be a step on the inside and outside. I've heard this type of plastic can be heated and formed quite easily, but I fear if I try that I'll end up with an ugly plastic lump.
Yes, they make metal pans. The plastic one is $130, metal $369. When they're painted black, there is no way to tell if it's metal or plastic.
I'm hoping someone knowledgeable of working with this type of plastic would chime in and give me some ideas.
Tonight, I'm going to cut the bottom carb connections as described earlier. I'll report back on how much clearance this creates.
Did you ever try the idea of flipping the pan around?
We actually tried the fit with the pan turned around, and gave that up because with the foam in place, the hood wouldn't close. I found a picture of a '66 GTO with Ram Air and see that the pan IS SUPPOSED to be on with the low part in front (the pointed end).
I'm going to try the fit again with no foam in place and measure the hood clearance again. We used crumpled up balls of tin foil set on top of the pan to measure clearance. We had about 3/4" in the rear with the pan installed the wrong way and zero in the front. We may be OK with cutting the high end (rear) of the pan "funnels" as discussed above.
Will report on results soon!


I was able to add 1" more clearance for the front of the pan to the hood pan. We had zero. I also cut down the rear carb funnel as lowering the front raised the back.
At this point, no more clearance could be created by modifying the carb "funnels" because if I cut the center carb funnel any more, the diameter will change since it's now cut to the flat portion. Also, there is very little clearance for the choke linkage under the pan.
Since the foam measures 1 3/4" high, and we now have 1" clearance all around the pan, I believe it will now work as intended. Note that the '66 GTO Ram Air pan will work on the First Gen Firebird only if installed "backwards". This is due to much less clearance toward the rear of the hood than the GTO offers.
Will report success or problems as soon as we try it on the car.
Will report


Wow! That upside down problem is irritating. Only on this site do some of my pictures do this. Sorry.
Here's the pan ready to put on. I added drain hoses for the pan like the '69 and later cars had.
I think we'll run the longer drain hose toward the driver's side routed with the wire harness from the alternator.

Wow! That upside down problem is irritating. Only on this site do some of my pictures do this. Sorry.
I just turn off the auto-rotate function on my tablet, works out okay.
We ran into an unexpected glitch with the front alignment. The shop (a very reputable local shop), says GM cars with the stub frame like this '68 have a common problem with the stub drooping due to supporting the weight of the front end for so many years. In our case, on the right side, he says there is a 2 3/4" error in alignment due to this "droop." Yes, that's 2 3/4"! He says he can correct it with hydraulic equipment to bend the frame. We know this car had front right collision damage many years ago which could have bent the frame.
There is a tire rub problem on the right side with the T/A 215-70r15 tires now in place. I've seen other First Gen Firebirds with this size tire and no rub problem.
As you may guess, I'm leery of the diagnosis, but know there is something not right due to the tire rub. The big issue is body panel alignment. We spent a lot of time getting it right, but I'd guess bending the frame to correct the problem would destroy panel alignment.
What are your thoughts? Could the problem be the aftermarket tubular A-arms? Why only on the right side?

How bad was it to do the panel alignment.
Usually if the frame is bent that much there would have to be a crazy amount of shims used and even swimming of the body mounts.
I would get a second opinion or set the car up on stands and level the car side to side and front to back and take measurements.
If it checks out OK Check the springs all around.
I forgot to mention we put new bushings in the four front stub mounting locations before any sheet metal was put on.
Front fender alignment to the doors was not difficult, so I'm leery of frame problems. The question remains--why only is the right side tire rubbing?
The alignment shop was emphatic that "these cars" have problems with drooping of the subframe itself in the arced area where the front suspension is located. He said he could bend this area to correct the problem. But, as I said in the OP, how can this be done without affecting body panel alignment.
Start measuring the sub frame for squareness. But the alignment shop should be able to print out the distance from the center of rear wheel to the center of the front. Would indicate the subframe mis alignment or bent control arms.
This reminds me of my car. I have rub on one side also. I measured my subframe and found one side to be 1/8 off. I also didn't know enough at the time to measure that its square. The front frame horn is bent in on one side (didn't know until I was putting it together). The bumper and hood don't fit right and it drives me nuts. I also run big 235/15 tires so no room for error.
I have considered getting a brand new OEM frame for around $1000 bucks but I would have to go through the panel alignment like you said. But I don't think the panel alignment would be all that bad. Three of the 4 points are all on the firewall piece. If you keep your shims all organized you shouldn't have much problem.
Its all the other crap with changing it out that really make me shudder. gas and brake lines, swap the motor, do the "Guldstrand" mod again, swap the suspension.
I feel for ya it sucks.
The alignment guy says he can fix it. He claims he has fixed Camaros and Novas with the same problem. How he can do this without body panel shift is a mystery to me.
Also, once we get the alignment problem resolved, the body stiffener and traction bars will be installed. We already have Assassin traction bars, but need more info on various body stiffeners. Some bolt on and some are welded.
I've seen how flexible the mounts are that secure the front frame stub. When you jack up the car, the panels move quite a lot.
Anyone on this board have a preference from experience with various styles available?
When you jack up the car, the panels move quite a lot.
Wow, what points are you jacking at? I've never seen body panels on my 'birds move when jacking...
Body panels move on all cars when jacking or driving. According to A.O. Smith engineering, a typical full sized GM body flexes up to 4" from one corner to another during normal driving. Yes, that's four inches!
If you jack the Firebird at the rear of the frame stub, the top of the fender-to-door gap widens and the bottom of the gap narrows. Not a lot, but it is enough that the door may hit the fender if opened when jacked up like this.
Same on my GTO--when jacking the frame under center of the door, the front fender-to-door gaps behave like the firebird. The rear of the door gap widens on top, narrows on the bottom.
The movement is minimized on any car if you jack near the front or rear suspension locations.
In anticipation of my '68 being released from paint jail soon I was reading through your assembly post today. I had a similar experience with the rear end being out of kilter. After pulling it all back apart I could find no cause other than the housing had slipped on the polyurethane spring cushions. I wanted to stiffen up the shackle flex so I elected for an aftermarket polyurethane kit. In addition to the shackle bushings, I also installed the spring cushions but left the front spring eyes rubber. Until this build I had always used GM spring cushions and never experienced any problems.
Enclosed photo is what I found upon disassembly so I elected to purchase some of GM's finest as they are still available, part number 3930052 for multi-leaf springs. The aftermarket cushions do not have the molded in metal support for the spring pilot pin like the GM cushions do. I don't know if the aftermarket cushions were the cause or not but after 4 years with the GM cushions the rear end is still located perfectly.
Your problem could be something entirely different. Just something to check. I've never read or heard anything bad about polyurethane spring cushions but mine moved. Nothing else but the cushion was changed in the assembly to fix the problem.
Thanks
.jpg "Assembly 8-26-12 2012-08-26 011 (800x598).jpg")
Thanks for posting that Dennis. I'm going to check that on our car and will likely find the same thing. Do you think any of the aftermarket poly cushions have metal inserts?
I don't know, my only experience with aftermarket cushions. These were Energy Suspension pieces. I've never had a problem with their other components. I'm wondering if the poly cushions just don't compress as much leaving the pilot pin disengaged?
Thanks
I called Ames and found out their spring pads do not have metal inserts--neither the rubber ones nor the urethane ones.
I think we'll go with urethane ones unless we can find some of the OEM ones. We have to remove the spring "U" bolts anyhow to install the traction bars. I hope we find the same thing Dennis did on his. That's an easy fix for the crooked rear axle.
What is the correct headliner color for a black interior with Solar Red exterior?
Also, which material is correct--Bedford, Impala, perforated, or which?
Thanks
We have most of the problems worked out except for a puzzling one. The front tires, 215-70r15 on Rally II wheels rub on the wheel opening when turning.
The alignment shop said First Gen Firebirds & Camaros have a problem with the subframe collapsing downward due years of supporting the engine, resulting in the wheels tilting inward--negative camber. He said ours is beyond correction by removing alignment shims. He said he could bend the crossmember in the subframe to correct the problem.
I've noticed there are offset a-arm rods to correct this problem.
I'm having trouble seeing how negative camber results in the wheels hitting the fenderwells. Wouldn't this problem move the wheels further away from the fenders?
Wouldn't this depend on where in the wheel wells the tires are hitting? I think we all assume that it is the outer lip because we generally put too large a tire in the wheel wells.
How low is the front of the car? I have 225/70/15 without any problems.
Pretty near stock height. Tire hits at about 10 o'clock on passenger side, 2 o'clock on driver's side.
I need to check rim offset--maybe set out too far?
What about subframe crossmember sag? Alignment shop claims this is common.
I need to check rim offset--maybe set out too far?
What about subframe crossmember sag? Alignment shop claims this is common.
Even if you had sag and had to use the offset upper shafts it would put the tires where they should be after an alignment.
How are the body bushings? If those were shot and compressed it would bring the whole subframe up.
We put new bushings between the body and subframe during restoration.
Looking back, I wish we'd have put a new subframe assy. in place of the old one. They are available with disc brakes, tubular A arms, etc. It would have been a lot less work to replace instead of adding disc brakes, new springs, A arms, etc.
Finally put the car in a show yesterday. A lot of attention due to the Ram Air and Tripower. Many questions on whether Firebirds were built with Tripower!
Question on Alternator warning light.---It's on at idle and goes off at about 2000 rpm. Lights normally with key on and engine off. Any clues as to what may be wrong? I've jumpered the field lead and it charges strongly. Also tried new regulator with no change in symptoms.


The 4.11 rear gear ratio is not compatible with our planned usage of the car. Most major shows are several hours from our location in Wisconsin. We will run the car at least once this spring at our local drag strip--Kaukauna.
The rear end is quiet and the posi works great. We're thinking 3.23 would work with the 3500 converter, but allow highway speeds when traveling to shows.
What are your thoughts?
Back in the day ... my buddy had 4.11's and i had 3.3? /w both Safetrack. He did bunny hops in his and he came with me when we drove to Montana for skiing. Mine was fine on highway.
BTW,
I'm putting in tri power in my 65 Pontiac Cat /w 389. Got "boat" loads of room so she will be a sleeper!


Nice Tripower setup! I don't know the altitude where you are in Alberta, but if it's not really high, the accelerator pumps on the end carbs should be in the forward holes to give you a better shot of gas when hitting the end carbs.
So, you think 3.23 would be good?
3.23 should work real nice, if you can find one. (The 2.7x I have is kinda high.)
Won't the 3.23 gears fit the carrier that now has 4.11?
Why can't I attach pictures any longer? When I click on select a file, nothing happens.
Worked for me. Use the "attachment manager" at the bottom of the reply box under "Use Full Editor"
Why can't I attach pictures any longer? When I click on select a file, nothing happens.
I logged in as you and used Full Editor and it worked on my mobile phone using Safari. Let me know some details such as web browser and such to see if I can recreate issue.
I get to the "Select a File to Attach" and select that picture in my photo file. When clicking on "Select a File to Attach," the file does not appear on that screen. I've also attempted to drag the file from the file window to the attachment window without success.
This seems strange since I've attached many pictures using the same method in the past.
Won't the 3.23 gears fit the carrier that now has 4.11?
Bocoogto, I got to wondering about this. And it looks like bop 10 bolts had three carriers.
One for 2.76 and lower. One for 2.94 to 3.23. And one for 3.31 and higher.
That's from Hemming Motor news.
Ron
CME469
As I said, the ring gear looks really thick compared to a factory one. I suspect someone put aftermarket 4.11 gears in a factory rearend that may have had 2,93m 3,08, or 3.23 gears in it.
Is there any way I can ID the carrier to see if 3.08 or 3.23's will fit?
bocoogto, You might be able to I D the carrier by the housing (if its the stock carrier) by checking the numbers that should be near the rear and center
of the drivers side axle tube. The left backing plate should also have a number on it.
But to be sure, look for a number on the carrier. You'll have to take it out anyway.
I assumed you were working on a bop 8.2. If its a GM 8.5 I think the number is on the right side.Not sure.
I would be interested in what you find out!
Ron
It's a GM 8.5, which means it was not original to this '68. I will look for a casting number on the housing.
Thanks.
Sorry, I didn't have access to the car since the last post.
For the different ratios offered in the 8.5 rearend---was the housing always the same, with the differences being in the carrier?

You sure it's not a 8.2?

Here is a picture with the cover on. It's definitely a 8.5.

I notice today the read count is 86,928. Is this an actual number? If so, why is it so high? No other threads are anywhere near that many reads.
Here is the finished product leaving a car show yesterday in Kaukauna, Wisconsin. Two happy campers!!
https://youtu.be/BrJw9eHPop0
Can someone help me with drag slick/wheel possibilities? I have two 15X7 Rally II's I could use or various 14X6 steel rims with various offsets.
This car should have at least 9" tread on the ground and about 27" or more diameter due to the 4.11 gear.
It's been 40 years since I researched buying drag slicks for my GTO. I had good luck with Firestone 9" wide x 28.5 diameter X15 rims. I wish I had those to check clearances.
I have cheap steel wheels from summit. 15"×8" with 4 1/2" backspace and I'm using 28"×9" slicks, can fit a 10" slick no problems. I have a chevy 12 bolt rear that's 62 1/2" wide axle flange to axle flange.
Hope that helps
Thank you. 15X8" wheels should be no problem. Now, if I can find a pair of slicks at a reasonable price.


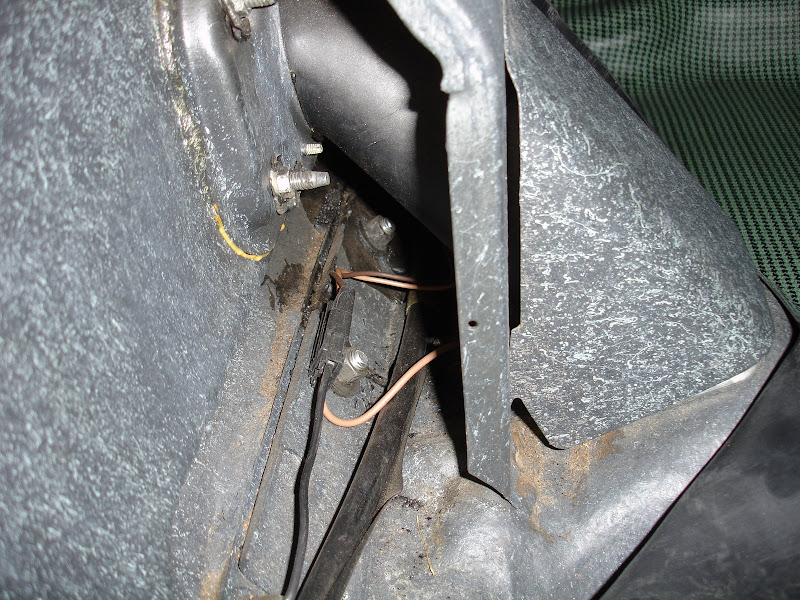


.JPG "Firebird Engine Painted (4).JPG")

.JPG "Firebird Engine Painted (2).JPG")


