|
|
Joined: Aug 2008
Posts: 50
Member
|
|
Member
Joined: Aug 2008
Posts: 50 |
I am getting ready to buy parts for my A/C and don't know where to start! I already have the suitcase (hope it's the right one), the evaporator, and the compressor.
I just ordered my heater core for a/c and now I'm a little lost. I know I need a POA valve and a condenser, but I hear talk of a Schrader valve(?) and other such parts. Can anyone steer me in the right direction as to what else I will need? Also, any links would be helpful and/or prices on the items I'll need.
Also, how am I going to get all of the A/C lines needed for the car? And when putting the suitcase together is there any type of special seals, or foam tubing that goes around lines coming from the suitcase?
I would love some pictures of A/C setups on-car, off-car, etc.
Thanks for the help as usual!
Mark D.
|
|
|
|
|
Joined: Mar 2004
Posts: 302
Member
|
|
Member
Joined: Mar 2004
Posts: 302 |
I have a 67 too, and the front end of mine is completely apart at the moment. I can take pictures of the various pieces and help you narrow down what is missing.
The main parts under the hood are:
compressor with clutch and pulley,
manifold/muffler assembly (bolts to the back/side of the compressor)
condenser (in front of the radiator)
receiver/drier (next to the condenser)
evaporator (fits in the suitcase)
TxV valve (connected to the evap)
POA valve (connected to the evap)
crank pulley for A/C
various hoses, brackets, and spacers
There are 2 schrader valves. One is part of the muffler assy (high pressure port) and one is on the POA valve (low pressure port). These are used to measure the pressure when the system is operating and to add refrigerant.
I can provide links to some of the parts that are available. Some are available through parts houses, some are on eBay. Some parts are very hard find.
Do you have the ducting for the interior?
Pete
|
|
|
|
|
Joined: Mar 2004
Posts: 302
Member
|
|
Member
Joined: Mar 2004
Posts: 302 |
Something else with a lot of information - go to the Library on Vikki's First Gen Site and get the 1B Custom Air Conditioner section of the 1967 Firebird Manual Supplement. Link to Custom Air Conditioner pdf. It has a lot of detail on the A/C components, wiring, interior controls and ducting. Pete
|
|
|
|
|
Joined: Aug 2008
Posts: 50
Member
|
|
Member
Joined: Aug 2008
Posts: 50 |
Thanks Pete! Are you getting ready to put your A/C back in soon? If so any pictures would be of a great assistance.
I do have the duct work except for the bottom center portion that comes below the ashtray (I think that is what it is).
Any pictures on how the duct work is set up? I was curious about that also.
Thank you so much for all the help and information! It is really going to help me out when it comes time to put everything together properly.
|
|
|
|
|
Joined: Mar 2004
Posts: 302
Member
|
|
Member
Joined: Mar 2004
Posts: 302 |
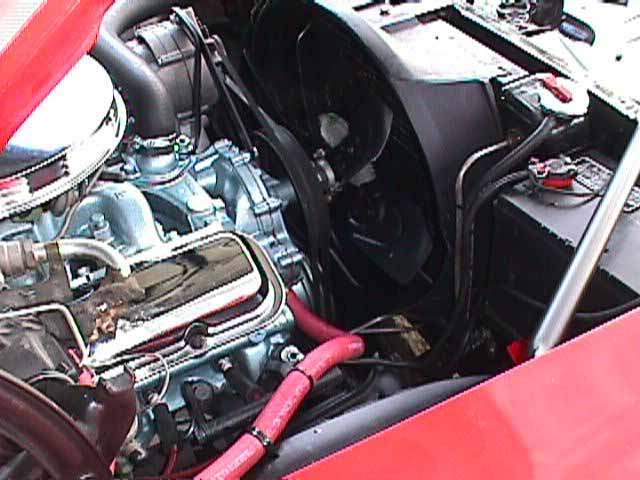
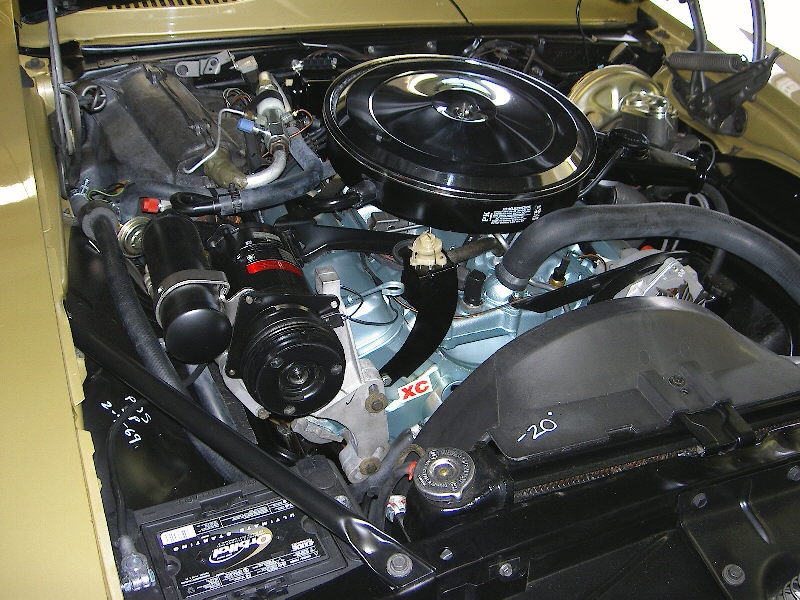
Realistically, I'm probably about a year away from getting my car together again. With the car apart, I can get good shots of the parts and brackets for you. When assembled, the engine bay is so crowded it is hard to get good shots of everything. I do have some pictures that I've pulled off the internet. They may even be from FGF members cars. Here are two to get started.
You can see the compressor with the manifold/muffler attached to it. You can see the POA valve on top of the suitcase. The U shaped tube from the POA valve into the suitcase is part of the evaporator. the U shaped tube from the POA valve toward the back near the firewall is a separate piece you will need to get.
There are 4 brackets used to attach the compressor to the engine. You can see two of them here. The large bare aluminum bracket bolts to the front of the compressor and to the front of the block. There are two large spacers between the bracket and the block where the slotted holes are. There is also a V shaped bracket from the back of the compressor to the intake manifold. Again, there are two spacers, one between the bracket and compressor and one between the rear bracket arm and the intake manifold. One caution about the V bracket - there was a subtle change to the shape around 1970 or so, subtle enough that it is hard to tell the two styles apart. If you have a later intake manifold you will need the later bracket. I can get pictures showing the difference in the intake manifold mounting points.

|
|
|
|
|
Joined: Mar 2004
Posts: 302
Member
|
|
Member
Joined: Mar 2004
Posts: 302 |
As I said in the previous post, there are 4 brackets attaching the compressor to the engine. Here are pictures and drawings detailing them. I think the long thin bracket just below the V bracket was only used for the 69 year. It is a brace from the lower rear of the compressor to the cylinder head. I'm not sure that 67s and 68s had that bracket. These brackets can be found on eBay from time to time. They are listed now. Or another listing. Another seller, MotorCityMuscleCar on eBay sells bolt and spacer kits to mount the brackets. This is a link to the complete kit. There is also a guy ThePartGuy that has many Pontiac / Firebird A/C parts. He sells from the website and on eBay. His stock varies so you will need to check back from time to time. Pete
|
|
|
|
|
Joined: Aug 2008
Posts: 50
Member
|
|
Member
Joined: Aug 2008
Posts: 50 |
Awesome info/links, Pete!
I have always wondered how the duct work gets to the vent balls? Is there some kind of flexible plastic tubing that extends from the duct work to the vent balls? I have never seen anything for sale or available for this purpose.
Also, is there a seal for the suitcase that is sold, can silicone be used, or is there no seal at all?
I have also seen some pics of some kind of foam wrap that goes on some of the hard lines coming from the evaporator on some cars. What is this if you happen to know?
Keep the info and pics coming! Any more info would be appreciated as this is helping me out more than you can imagine!
Thanks again for going to all the trouble, Pete!
Mark D.
|
|
|
|
|
Joined: Mar 2004
Posts: 302
Member
|
|
Member
Joined: Mar 2004
Posts: 302 |
Mark, thanks for the thumbs up! I'd like to use this thread to document the entire A/C system as best I can and cover all the components, ducting, controls, baffles/filler panels, wiring, etc. Hopefully, it will become "the ultimate A/C thread". It may take a while to post it all and it will have a slant toward 67s. 68s are pretty similar and 69s have some extra vacuum controls that I'm not as familiar with. My thought was to cover in the order of: the compressor and brackets, condenser, receiver/drier, evaporator and suitcase, expansion valve (TxV) and POA, interior ducting, controls and vacuum lines, and wiring. I'll try to answer any questions as they come up so I don't loose track of them. There are 2 outlets on the interior ducting that connect to the vent balls with flexible hose. I'll post pictures when I get to the interior ducting. Many parts houses sell a 3" hose as correct for firebirds, but the right size is 2 3/4". Ames Performance sells the right hose as part number FP562DM. Rick's Camaro sells a 3-piece evaporator case half seal set. Part #AC-51 I haven't bought it, so I'm not sure what it is made of. I was planning on using 3M Strip-Calk to seal the case halves and the case to the firewall. There is also 2 seals where the evaporator tubes exit the suitcase. Rick's sells this as part #AC-53 The foam wrap is used to wrap and insulate a sensor coil on the expansion valve to the upper evaporator tube. More pics of this when I cover the evaporator. Ricks sells it as Part #RC-206. Ames has it for less as part #FP321TK. Disclaimer - I'm posting links to parts as examples only, and not meant to be the best deal. Do your homework and shop around the various parts places. Pete
|
|
|
|
|
Joined: Mar 2004
Posts: 302
Member
|
|
Member
Joined: Mar 2004
Posts: 302 |
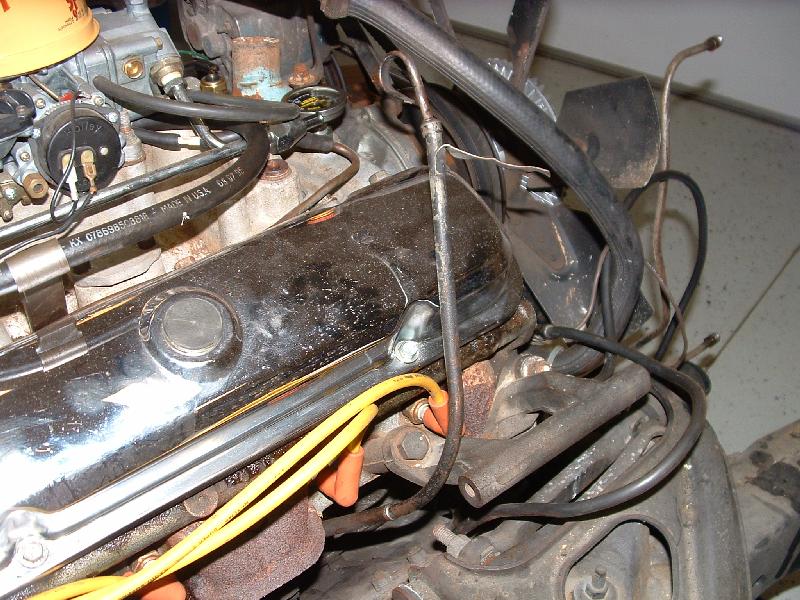
A comment on the previous drawings that show the mounting of the black painted cast iron bracket. The drawings show the bracket being mounted with bolts to 2 cast tabs on the cylinder head. In reality the bracket mounts using the cylinder head bolts. I haven't removed the bolts to verify, but I think they must be longer than the other cylinder head bolts to account for the thickness of the bracket. The front-most one has a threaded stud on the end that the battery ground cable attaches to.
Also note that the A/C cars have a long upper dipstick tube that curves over the valve cover. It goes between the valve cover and the compressor when the compressor is in place. The one in the picture has a tab in the wrong location. The tab should be lower down on the tube and attaches to the front valve cover bolt.
Pete
|
|
|
|
|
Joined: Mar 2004
Posts: 302
Member
|
|
Member
Joined: Mar 2004
Posts: 302 |
If you need information on pulleys, look at the Illustrated Parts Index 1973 on Vikki's site and click on the Pulleys and Belts link. Scroll to the diagram that matches your engine (6 or 8 cyl) and accessories. I have a 67 8 cylinder with A/C and power steering. According to the diagram, the crank pulley is #22, an 8", 3 groove pulley. My car actually has the setup listed for a '68 cyl with A/C and power steering. Also listed as #22, it shows a single 7 5/16" pulley for the A/C and an 8" 2 groove pulley for the other accessories. I don't know if mine has been changed, or what. There is a thick rubber ring that fits between the single and double pulley, presumably to dampen vibrations. Pete
|
|
|
|
|
Joined: Aug 2008
Posts: 50
Member
|
|
Member
Joined: Aug 2008
Posts: 50 |
Pete, the wealth of information you are posting is truly amazing! This will help me so much, as well as others, in the search for the A/C parts needed to complete this daunting part of the rebuild. Keep documenting and I'll keep reading!  Thanks again so much! Mark
|
|
|
|
|
Joined: Mar 2004
Posts: 302
Member
|
|
Member
Joined: Mar 2004
Posts: 302 |
I mentioned earlier that there were 2 versions of the bracket from the compressor to the intake manifold. This High Performance Pontiac Article compares different intake manifolds. Photo 11 shows the 2 brackets together. Starting in 73, the front mounting boss on the intake manifold was moved outward and the front arm of the bracket was shortened. If you are using a later intake or an aftermarket intake, you might need the later upper bracket. Here are some pictures of an early style bracket. The first one shows the bracket next to a 67 intake manifold. The bracket holes align with the bosses. The second picture shows the bracket next to a Edelbrock Performer intake. You can see the front mounting boss has been moved toward the edge of the manifold. Pete
 Early bracket and 67 intake Early bracket and 67 intake
 Early bracket and Edelbrock Performer intake Early bracket and Edelbrock Performer intake
|
|
|
|
|
Joined: Mar 2004
Posts: 302
Member
|
|
Member
Joined: Mar 2004
Posts: 302 |
Firebirds used the A6 compressor. The manifold/muffler assembly bolts to the back of the compressor and is also held by a bracket at the front. The port on the left (closest to the engine) is the input, coming from the POA valve. The outlet feeds into the muffler and then on to the condenser. There is an overpressure relief vent at the back of the compressor, and the high pressure port (schraeder valve) on the back of the muffler. At the front is the pulley and the electric clutch.
The bulge on the bottom of the compressor in the second picture is the oil sump and the bolt is a drain plug. This should not be opened if there is still refrigerent in the system.
The third picture shows the pivot bracket part number is 9789228.
The fourth picture shows the original label on the compressor. Firebirds took 3.75 lbs of R12.
|
|
|
|
|
Joined: Mar 2004
Posts: 302
Member
|
|
Member
Joined: Mar 2004
Posts: 302 |
|
|
|
|
|
Joined: Mar 2004
Posts: 302
Member
|
|
Member
Joined: Mar 2004
Posts: 302 |
67s have a different receiver/drier and mounting bracket than 68-69s. The 67 receiver/drier is short/fat and mounts next to the condenser. In 68-69 the receiver/drier is taller and narrower and was moved to the passenger fender well. If the system has been open or discharged for any length of time, the receiver/drier must be replaced. There is a desiccant bag inside that absorbs moisture. If open to the air, the desiccant will be come saturated. New receiver/driers do not look the same as the original GM units. If originality counts, there are some A/C shops that can cut open your original, replace the desiccant bag and weld it back up. Note - I read in these threads AC Hose Clamps and Sealing Barrier Hose with Clamps on the Automotive AC Information forum http://www.autoacforum.com/ that the barbed hose fittings and worm drive hose clamps can leak if using the newer barrier hose (for R134a). There is a nylon liner inside the barrier hose that is not as compliant and does not seal as easily as the older style hose. I have not gotten my A/C running, so I haven't tried any of the proposed solutions in the threads. In picture 1, you can see part of the rubber filler piece "masticated filler" that helps seal off the gap between the bumper bracket and the core support. Picture 2 shows the receiver/drier and its mounting bracket. Picture 3 shows the receiver drier and hoses from a different angle. The hose on the lower left comes from the compressor muffler and the hose on the upper left goes to the expansion valve at the evaporator. There is a foam sleeve over the lower hose to protect it from rubbing against the bumper bracket. Pictures 4 and 5 show how the hoses are routed from the core support around to the engine bay. The lower hose is wedged against the bumper bracket and core support and the foam sleeve protects it. Pete
 Receiver/drier and rubber filler Receiver/drier and rubber filler
 Receiver/drier and mounting bracket Receiver/drier and mounting bracket
 Receiver/drier and hoses Receiver/drier and hoses
 Hose with foam sleeve Hose with foam sleeve
 Hose routing to engine bay Hose routing to engine bay
|
|
|
|
|
Joined: Mar 2004
Posts: 302
Member
|
|
Member
Joined: Mar 2004
Posts: 302 |
Here is an "overview" shot. I probably should have taken this pic and posted it earlier to give a big picture of the system.
I lined the components up as they are located in the car. The condenser would be in front of the core support. The compressor would be mounted to the engine, and the evaporator would be inside the suitcase on the firewall.
Also attached to the evaporator is the expansion valve (with the small coiled lines) at the front/center, and the POA valve at the top.
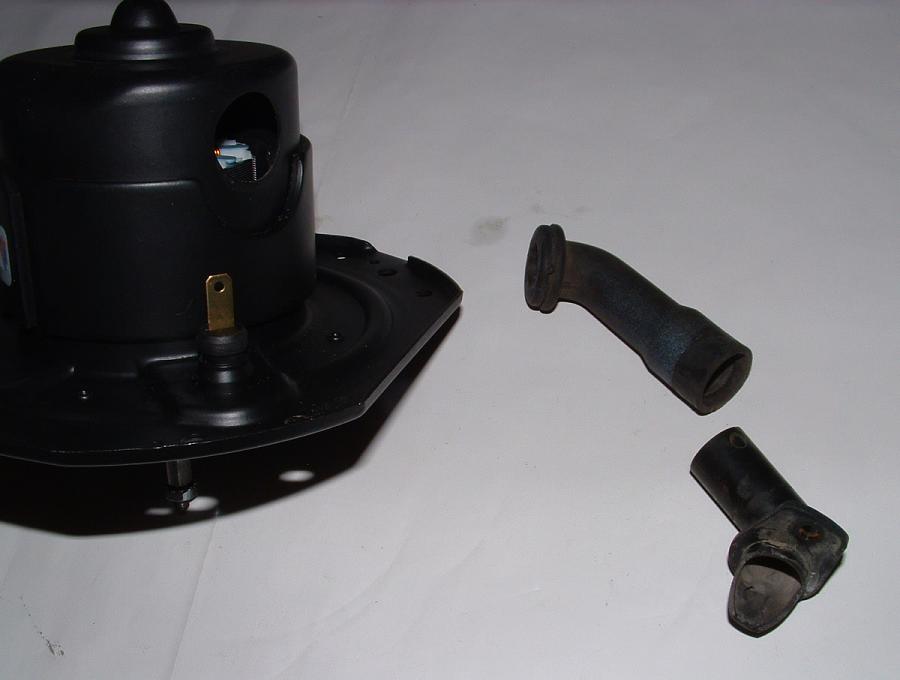
The output line at the bottom of the compressor muffler would connect to the hose that is laid next to it. This is the hose that connects to the condenser. The other hose, coming back from the receiver/drier has a hard line crimped to it (see the second picture for a close up). The hard line goes into the expansion valve. The output of the expansion valve screws into the evaporator inlet (the tube going to the bottom of the evaporator). The evaporator outlet tube, at the top, goes to the POA valve. The shiny U-shaped tube at the POA outlet would connect to a hose going back to the manifold inlet. In the picture, this hose is missing and the barbed end of the manifold inlet tube is broken off.
Pete


|
|
|
|
|
Joined: Mar 2004
Posts: 302
Member
|
|
Member
Joined: Mar 2004
Posts: 302 |
|
|
|
|
|
Joined: Mar 2004
Posts: 302
Member
|
|
Member
Joined: Mar 2004
Posts: 302 |
|
|
|
|
|
Joined: Mar 2004
Posts: 302
Member
|
|
Member
Joined: Mar 2004
Posts: 302 |
|
|
|
|
|
Joined: Mar 2004
Posts: 302
Member
|
|
Member
Joined: Mar 2004
Posts: 302 |
|
|
|
|
|
Joined: Dec 2007
Posts: 10,338 Likes: 3
Premium Member
|
|
Premium Member
Joined: Dec 2007
Posts: 10,338 Likes: 3 |
I think once you guys get your cars back together, this thread needs to go into the hall of fame for the good documentation!
I used to be indecisive. Now I'm not sure. I feel like I am diagonally parked in a parallel universe. 1968 400 convertible (Scarlet) 1976 T/A - 455 LE (No Burt) 1976 T/A New baby, starting full restoration. 1968 350 - 4 speed 'vert - 400 clone (the Beast!) 1968 350 convertible - Wife's car now- 400 clone (Aleutian Blue) (Blue Angel) 2008 Durango - DD 2008 GXP - New one from NH is AWESOME! 2017 Durango Citadel - Modern is nice! HEMI is amazing! 1998 Silverado Z71 - Father-daughter project 1968 400 coupe - R/A clone (Blue Pearl) (sold) 1967 326 convertible - Sold  1980 T/A SE Bandit - Sold
|
|
|
|
|
Joined: Mar 2004
Posts: 302
Member
|
|
Member
Joined: Mar 2004
Posts: 302 |
Here are some pictures of the heater core case that is inside the car under the passenger side dash. There is a foam rubber seal around the edge of the case to seal it to the firewall. There is also a dense foam seal that goes over the heater core tubes. I haven't been able to find reproductions of these seals anywhere.
The inlet tube is the smaller of the two heater core tubes. The factory inlet tube is crimped down at the open end. This is to restrict the flow somewhat and to prevent a high pressure surge from blowing out the core when the engine is revved.
There are three mounting studs on the heater box that go through the firewall - one next to the heater core inlet tube, and two on the opposite side of the heater box.
|
|
|
|
|
Joined: Mar 2004
Posts: 302
Member
|
|
Member
Joined: Mar 2004
Posts: 302 |
Inside the heater case are some air control flaps and plastic diverter pieces. The larger flaps have a rubber seal at their outer edges. The 2 small flaps have a thin (1/8" or so) layer of foam glued to them. In the pictures, the foam is crumbling and has partially fallen off.
Heater cores for A/C cars are different than the non A/C version. The A/C core is 2.5 inches thick. Some vendors sell a core that is only about 2" thick (a Camaro version?) and is too small for the mounting brackets.
Pete
|
|
|
|
|
Joined: Mar 2004
Posts: 302
Member
|
|
Member
Joined: Mar 2004
Posts: 302 |
I forgot - I wanted to include a picture of the heater core and one of the hold down brackets.
|
|
|
|
|
Joined: Aug 2008
Posts: 50
Member
|
|
Member
Joined: Aug 2008
Posts: 50 |
Pete, you have gone above and beyond the call of duty and I must salute you! I cannot believe the amount of valuable information you are supplying. Every day it is something new it seems!
I do have a question. Does the box that houses the heater core fit up against the firewall insulation pad, or is it cut out around the box for the seal to properly seat against the metal of the firewall?
Keep the info rollin'!
Thanks again,
Mark
|
|
|
|
|
Joined: Dec 2007
Posts: 10,338 Likes: 3
Premium Member
|
|
Premium Member
Joined: Dec 2007
Posts: 10,338 Likes: 3 |
.. Another case of Minnesota nice!
I used to be indecisive. Now I'm not sure. I feel like I am diagonally parked in a parallel universe. 1968 400 convertible (Scarlet) 1976 T/A - 455 LE (No Burt) 1976 T/A New baby, starting full restoration. 1968 350 - 4 speed 'vert - 400 clone (the Beast!) 1968 350 convertible - Wife's car now- 400 clone (Aleutian Blue) (Blue Angel) 2008 Durango - DD 2008 GXP - New one from NH is AWESOME! 2017 Durango Citadel - Modern is nice! HEMI is amazing! 1998 Silverado Z71 - Father-daughter project 1968 400 coupe - R/A clone (Blue Pearl) (sold) 1967 326 convertible - Sold 1980 T/A SE Bandit - Sold
|
|
|
|
|
Joined: Oct 2009
Posts: 1,363
Premium Member
|
|
Premium Member
Joined: Oct 2009
Posts: 1,363 |
One thing I know for sure, when I dive into getting my AC working, this thread will be a lifesaver. A future thank you.
Larry
1967 Sprint Convertible
|
|
|
|
|
Joined: Mar 2004
Posts: 302
Member
|
|
Member
Joined: Mar 2004
Posts: 302 |
Thanks for the props and encouragement!  (What's the Minnesota expression for "Aw, shucks"?) Since I got my bird 7 years ago with the A/C disconnected and some pieces missing, I've been researching and reading to find out what I have and what parts are missing. Now that I have the car apart to fix a bunch of stuff, it is time to finally collect the remaining pieces so I can get the A/C working again. Since the car is apart, it is much easier to document the system. Mark - excellent question about the firewall pad! I wondered about that too when I took my heater box off, removed the firewall insulation, and was looking to buy a replacement firewall pad. My pad stops just short of the heater box, but the replacements I see cover the whole firewall. I don't think anyone had ever had the heater box off of my car before so I think my pad is untouched, but I can't be sure. The pad stops just before the heater box and the right edge looks relatively crisp, straight, and "factory" so I don't think there was a section behind the heater box that fell off or was torn off. Also, there is the thick rubber gasket that goes around the outer edge of the heater box. It makes sense to me that the rubber gasket would seal against the firewall metal. Maybe the replacement pads extend behind the heater box and can act as gasket in case the original rubber gasket is too far gone? It would also add a bit more heat and noise insulation. Here is a picture of my original pad next to a replacement pad. I still haven't decided whether I will install the whole pad, or if I will cut it at the heater box. I ended up returning this pad (the Ames more expensive molded one). Even though it was advertised as for 67-69, the fuse block shape is different for 67s and 68-69. The 67 fuse blocks are tall rectangular shape with mounting screws at the upper left and lower right. 68-69 fuse blocks are more square with mounting screws at upper right and lower left. It just wouldn't work for me. Some brands of pads are cut for 67s, some are cut for 68-69, and some are scored for both and you remove the cutout shape you need for your car. I ended up buying an unmolded "Re-pops" brand with the correct cutout for my 67. Pete
 Original Firewall Pad Original Firewall Pad
 Old and new pads Old and new pads
 Fuse block different shapes Fuse block different shapes
|
|
|
|
|
Joined: Mar 2004
Posts: 302
Member
|
|
Member
Joined: Mar 2004
Posts: 302 |
Here are the pieces that make up the air duct distribution system under the dash. This is for a 67. 68 and 69 are slightly different in some areas. The Air Conditioning section of the 1973 Illustrated Parts Index has a good diagram showing all the parts and differences from year to year. In the first pic, from top to bottom: .......................Defroster Duct (Y shaped piece) ....Defroster End Duct -- Defroster Distributor -- Heater Case Left Dash Outlet -- Lower Center Outlet -- Main Duct -- Right Dash Outlet .................Left Hand Outlet Duct -- Center Dash Distribution Duct ....................Center Dash Outlet with chromed deflector The second picture shows the Lower Center Outlet attached to the bottom of the Defroster Distributor. The Lower Center Outlet pushes into a clip at the back of the Defroster Distributor (at the bottom in the picture) and is held at the front with 2 screws. The Illustrated Parts Index shows a different part number for the Defroster Distributor for each year, with 69s having a vacuum actuator. Picture 3 shows the Defroster Distributor and Lower Center Outlet attached to the left side of the Heater Case. Picture 4 - The Y-shaped Defroster Duct is mounted to the inside firewall. When the Heater Case and Defroster Distributor are in place in the car, the louvered opening on the top of the Defroster Distributor lines up with the bottom of the Defroster Duct. The gap is exaggerated in the picture. The Camaro heater seal kits come with a foam gasket to seal the Defroster Duct to the Distributor, and 2 seals that go between the defroster outlets and the underside of the dash. The Firebird parts manuals don't show these seals. Picture 5 - The Defroster End Duct is attached to the left side of the Defroster Distributor. The outlet of this duct points down toward the driver's footwell. The Illustrated Parts Index shows the Defroster End Duct as a 67 only part.
 Ducting Parts Ducting Parts
 Defroster Distributor and Lower Center Outlet Defroster Distributor and Lower Center Outlet
 Defroster Distributor and Lower Center Outlet attached to the Heater Case Defroster Distributor and Lower Center Outlet attached to the Heater Case
 Defroster Distributor and Defroster Duct Defroster Distributor and Defroster Duct
 Defroster End Duct on Defroster Distributor Defroster End Duct on Defroster Distributor
|
|
|
|
|
Joined: Mar 2004
Posts: 302
Member
|
|
Member
Joined: Mar 2004
Posts: 302 |
|
|
|
|
|
Joined: Mar 2004
Posts: 302
Member
|
|
Member
Joined: Mar 2004
Posts: 302 |
Here are pictures and a description of operation of the control assembly and cables.
Picture 1:
The top-most lever controls the mode and temperature:
OFF - Outside air, compressor off, blower off
VENT - Outside air, compressor off, low speed blower
COLD - (Above and slightly left of COLD) Recirculated air, compressor on, low speed blower
COLD - (Above and slightly right of COLD) Outside air, compressor on, low speed blower
As the temperature lever is moved from COLD towards HOT, some air is sent through the heater core. Midway between COLD and HOT, the compressor turns off.
HOT - Outside air, all directed through the heater core.
Although the service manual states that the blower will be on low speed in any position other than OFF, my control assembly does not have the blower switch to activate the low speed mode. The blower is completely controlled with the FAN switch.
The middle lever controls the outlets:
UPPER - All air is directed to the dash outlets (center outlet and left and right ball outlets)
LOWER - All air is directed to the heater outlets (lower outlets and defroster outlets)
The lower lever controls the defroster outlet:
OFF - All air is directed to the lower outlets
DEFROSTER - Air is divided between the lower outlets and the defroster outlets
DE-ICE - All air is directed to the defroster outlets.
Picture 2 shows the levers and control cables from the underside of the control assembly.
Picture 3 show the control assembly and cables connected to the heater case and ducting.
The upper (temperature) cable is 44 1/2 inches long and connects to the temperature door arm at the right/rear corner of the heater case. The temperature cable is also attached with a clip at the left end of the defroster distributor.
The middle (diverter/outlets) cable is 36 inches long and connects to the diverter door arm at the front/center of the heater case.
The lower (defroster) cable is 29 inches long and connects to the defroster door arm at the back of the defroster distributor.
Picture 4 is a close-up of the defroster cable, taken from the back.
Picture 5 is a close-up of the diverter outlet cable (on the left) and temperature cable (on the right). Note that each of these cable mounting brackets have slotted holes so that the cable position can be adjusted. I adjusted mine so that the doors just reaches the end of their travel when the associated lever is in the left-most (OFF or UPPER) position. Also note that each cable end should have a round cable retaining nut to keep each cable on its arm, as is shown in picture 2.
Pete
 Control Assembly Control Assembly
 Control Cables Control Cables
 Cable Routing Cable Routing
 Defroster Cable and Defroster Door Arm Defroster Cable and Defroster Door Arm
 Diverter and Temperature Cables Diverter and Temperature Cables
|
|
|
|
|
Joined: Mar 2004
Posts: 302
Member
|
|
Member
Joined: Mar 2004
Posts: 302 |
Fresh air / recirculated air doors
A/C cars have a slot in the cowl which holds the cowl fresh air vent door. There is also a small bracket on the back of the cowl / upper firewall area.
The cowl vent door assembly drops down into the slot and is held down with 5 screws and a healthy dose of seam sealer. There are strips of foam on the front and back edges of the vent door assembly which seal against the front of the cowl, and against the side of the bracket on the back of the cowl.
With no vacuum applied, the vent door is held in the horizontal or open position by a spring. When vacuum is applied to the actuator, the door is pulled closed and blocks the fresh air inlet to the blower.
|
|
|
|
|
Joined: Mar 2004
Posts: 302
Member
|
|
Member
Joined: Mar 2004
Posts: 302 |
Picture 1 - The passenger kick panel holds the recirculated air door and actuator. A spring holds the door closed when no vacuum is applied to the actuator. (Note that the spring in the picture is a generic spring from a hardware store. )
The default vent mode uses outside air with the cowl vent open and the kick panel vent closed. When the temperature control lever is above and slightly left of the COLD position (recirculated air conditioning mode), vacuum is applied to both the cowl and kick panel vacuum actuators, closing the cowl fresh air door and opening the kick panel recirculation door. (More on vacuum lines and operation coming soon.)
Picture 2 - The back side of the kick panel has a small piece of jute padding glued to it and a large amount of putty/sealer to seal the panel to the car.
Picture 3 - The kick panel and actuator in place.
Picture 4 - The actuator cover in place. Please ignore the mis-matched and missing screws.
Pete
|
|
|
|
|
Joined: Mar 2004
Posts: 302
Member
|
|
Member
Joined: Mar 2004
Posts: 302 |
|
|
|
|
|
Joined: Mar 2004
Posts: 302
Member
|
|
Member
Joined: Mar 2004
Posts: 302 |
|
|
|
|
|
Joined: Feb 2010
Posts: 424
Member
|
|
Member
Joined: Feb 2010
Posts: 424 |
A comment on the previous drawings that show the mounting of the black painted cast iron bracket. The drawings show the bracket being mounted with bolts to 2 cast tabs on the cylinder head. In reality the bracket mounts using the cylinder head bolts. I haven't removed the bolts to verify, but I think they must be longer than the other cylinder head bolts to account for the thickness of the bracket. The front-most one has a threaded stud on the end that the battery ground cable attaches to.Pete You are correct on the bolt length being longer. I couldn't remember removing this bracket when I removed the head bolts. I couldn't figure out why I had two bolts that were about an inch too long! It just didn't make sense that the factory would design a bracket that goes under a head bolt, IMO. I figured it out with the help of you guys. Also, I put the studded bolt in the second postion, but this puts the dipstick in the way of screwing on the nut that holds the battery cable. Is this pic an original? I think it makes more sense to put the stud in the front position like yours. Larry
Larry
Current Project: 69 Camaro Z/28 Resto Mod
|
|
|
|
|
Joined: Apr 2010
Posts: 6,758
FGF Premium Member
|
|
FGF Premium Member
Joined: Apr 2010
Posts: 6,758 |
Awesome doc & pics. I captured it all into a pdf file should anyone want to download it. pdf file of thread
|
|
|
|
|
Joined: Mar 2004
Posts: 11,905
Valued Mentor
|
|
Valued Mentor
Joined: Mar 2004
Posts: 11,905 |
The link isn't working for me.
|
|
|
|
|
Joined: Mar 2004
Posts: 302
Member
|
|
Member
Joined: Mar 2004
Posts: 302 |
Also, I put the studded bolt in the second postion, but this puts the dipstick in the way of screwing on the nut that holds the battery cable. Is this pic an original? I think it makes more sense to put the stud in the front position like yours. The pictures in the post that you quoted are of my engine. They show the stud in the front position, but I'm pretty sure a previous owner took the heads off, so I'm not sure that they put the stud back in the original spot or not. If the dipstick tube interferes with the stud in the second position, maybe the front position is the way to go. I found another picture of a different car that also shows the stud in the front spot, but again, I don't know if it is original. Pete
|
|
|
|
|
Joined: Mar 2004
Posts: 302
Member
|
|
Member
Joined: Mar 2004
Posts: 302 |
Thanks for bumping this. I need to get off my butt and finish it. I still want to post some info on the electrical wiring, and something on the A/C baffles and radiator rubber filler pieces. Is there anything else missing that would be good to put in here?
Thanks,
Pete
|
|
|
|
|
Joined: Apr 2010
Posts: 6,758
FGF Premium Member
|
|
FGF Premium Member
Joined: Apr 2010
Posts: 6,758 |
Hi Pete, I have factory A/C now and it's a mess. First thing I need to do is cleanup the wiring. I have not found a decent wiring diagram for the heater controls from interior to the engine area. Do you have any?
Engine Test Stand Playlist: https://www.youtube.com/playlist?list=PLwoxyUwptUcdqEb-o2ArqyiUaHW0G_C88restoring my 1968 Firebird 400 HO convertible (Firedawg) 1965 Pontiac Catalina Safari Wagon 389 TriPower (Catwagon) 1999 JD AWS LX Lawn tractor 17hp (my daily driver) 2006 Sequoia 2017 Murano (wife's car) 202? Electric car 203? 68 Firebird /w electric engine 2007 Bayliner 175 runabout /w 3.0L Mercuiser__________________________________________________________
|
|
|
|
|
Joined: Nov 2003
Posts: 6,160 Likes: 51
Administrator
|
|
Administrator
Joined: Nov 2003
Posts: 6,160 Likes: 51 |
If it would help, I have this '68 Firebird AC diagram with the vacuum lines and wiring. Let me know if you want a better resolution one. This does not come out well crushed down. 
Last edited by Jimc2002; 09/03/11 01:53 PM.
Jim
'68 400HO Conv.
|
|
|
|
|
Joined: Mar 2004
Posts: 302
Member
|
|
Member
Joined: Mar 2004
Posts: 302 |
I only have the same diagrams as Jim posted. I know the A/C wiring changed over the years so I don't think my 67 wiring would be a match for your 68.
Pete
|
|
|
|
|
Joined: Oct 2009
Posts: 1,363
Premium Member
|
|
Premium Member
Joined: Oct 2009
Posts: 1,363 |
Look in the 1967 Supplemental manual for the Firebird. Its on Vikki's site.
Larry
1967 Sprint Convertible
|
|
|
|
|
Joined: Apr 2010
Posts: 6,758
FGF Premium Member
|
|
FGF Premium Member
Joined: Apr 2010
Posts: 6,758 |
The wiring was fried at the suitcase. Bypassed the unit and went direct to the fan. Just needed fan to prove I could run defrost for the inspection.
Is the 67' A/C system pretty close to the 68' configuration?
Anyone rebuilt their compressor before?
Engine Test Stand Playlist: https://www.youtube.com/playlist?list=PLwoxyUwptUcdqEb-o2ArqyiUaHW0G_C88restoring my 1968 Firebird 400 HO convertible (Firedawg) 1965 Pontiac Catalina Safari Wagon 389 TriPower (Catwagon) 1999 JD AWS LX Lawn tractor 17hp (my daily driver) 2006 Sequoia 2017 Murano (wife's car) 202? Electric car 203? 68 Firebird /w electric engine 2007 Bayliner 175 runabout /w 3.0L Mercuiser__________________________________________________________
|
|
|
|
|
Joined: Oct 2009
Posts: 1,363
Premium Member
|
|
Premium Member
Joined: Oct 2009
Posts: 1,363 |
Never heard of anyone rebuilding their own compressor bu I am sure someone has done this. WRT the wiring diagrams, both the 67 and 68 are available on Vicki's site. They are similar but not exact. The 68 is in the wiring diagrams, the 67 is in the Supplemental manual.
Larry
1967 Sprint Convertible
|
|
|
|
|
Joined: Apr 2010
Posts: 6,758
FGF Premium Member
|
|
FGF Premium Member
Joined: Apr 2010
Posts: 6,758 |
Never heard of anyone rebuilding their own compressor bu I am sure someone has done this. WRT the wiring diagrams, both the 67 and 68 are available on Vicki's site. They are similar but not exact. The 68 is in the wiring diagrams, the 67 is in the Supplemental manual. I mean has someone done it themselves or had it done for them. For starters I want to confirm the parts so I will check out Vicki's site.
Engine Test Stand Playlist: https://www.youtube.com/playlist?list=PLwoxyUwptUcdqEb-o2ArqyiUaHW0G_C88restoring my 1968 Firebird 400 HO convertible (Firedawg) 1965 Pontiac Catalina Safari Wagon 389 TriPower (Catwagon) 1999 JD AWS LX Lawn tractor 17hp (my daily driver) 2006 Sequoia 2017 Murano (wife's car) 202? Electric car 203? 68 Firebird /w electric engine 2007 Bayliner 175 runabout /w 3.0L Mercuiser__________________________________________________________
|
|
|
|
|
Joined: Jan 2010
Posts: 145
Member
|
|
Member
Joined: Jan 2010
Posts: 145 |
how is this post not in the hall of fame. a/c cars are few, but out there. this is the largest gathering of info I have seen, and with pics . I found it looking for a/c core shield pics on the third page of google, so please to the powers that be, save it, and make it easier to find. thanks
|
|
|
|
|
Joined: Oct 2009
Posts: 1,363
Premium Member
|
|
Premium Member
Joined: Oct 2009
Posts: 1,363 |
The search feature Geoff put together works really well (I assume you did it Geoff). If you open up the dates and play with both the title and body you will find a huge amount of info out there over the past 10+ years. Also play around with the quotation marks. Unlike Google where you get 100,000 hits of garbage most of which have nothing to do with FGFs.
Larry
1967 Sprint Convertible
|
|
|
|
|
Joined: Dec 2015
Posts: 4
New Member
|
|
New Member
Joined: Dec 2015
Posts: 4 |
Hello all, I also have a 67 Firebird with A/C, and I have a question as well, what I am in need of is where the vacuum source is for the Vacuum Canister on the Firewall, behind the Left Fender? I have figured out all the other Vacuum Lines, have everything ready, but do not know where the original vacuum source hook up is on the engine for the Canister, my car is a Convertible 400cid, 400THM, NON Power Brake car, I have a Carb bolt that has a vacuum port on it that I assume is for manifold vacuum, I have the port on the front right side of the Carb for the Vacuum Modulator on the Trans, and I have one last port on the front bottom left side of the Carb that I assume is for my Distributor Advance, the port at the base of the Carb that would be for the Power Brakes? has a plug in it. The A/C Vacuum line to the Canister was removed before I owned the Car, and I have just finished redoing all my A/C stuff and looking for the final piece to the puzzle on it, I am not sure if the Carb Bolt Vacuum Port is for the Canister, or if I have to put some sort of screw in port in the base of the Carb for the Canister. If anyone has any Idea of where it should go, that would be great. Thanks for your time.
|
|
|
|
|
Joined: Jan 2016
Posts: 12
Member
|
|
Member
Joined: Jan 2016
Posts: 12 |
I posted a general discussion on this but got no replies. I really could use some opinions from firebird owners. I am reconditioning my 69 firebird that has factory AC. I took the compressor and brackets out 20 years ago (kept all parts but hoses leaked) and parked the car a few years later. I finally got around to working on it and am having the 350 engine rebuilt, better cam, lifters, rockers, valves, pistons, ignition and adding 4 bbl. Trying to keep it as original as possible. Now...I have many friends telling me to put in vintage air or some other after market type. Newer, more dependable etc. But I hate to spend $1500 when I have all the original parts. Aren't the original good enough and upgradeable enough to serve my purpose? I'm not looking to sell the car, leave it to my son and grandson, so value isn't my motive. Really could use advice from you Firebird folks mot just on the AC but everything in general when ? restoring, reconditioning?. Appreciate any opinions. Thanks, Tork
|
|
|
|
|
Joined: Dec 2007
Posts: 10,338 Likes: 3
Premium Member
|
|
Premium Member
Joined: Dec 2007
Posts: 10,338 Likes: 3 |
I have never owned a classic car with A/C, but if it were me, I'd ALWAYS vote for stock over aftermarket.
I used to be indecisive. Now I'm not sure. I feel like I am diagonally parked in a parallel universe. 1968 400 convertible (Scarlet) 1976 T/A - 455 LE (No Burt) 1976 T/A New baby, starting full restoration. 1968 350 - 4 speed 'vert - 400 clone (the Beast!) 1968 350 convertible - Wife's car now- 400 clone (Aleutian Blue) (Blue Angel) 2008 Durango - DD 2008 GXP - New one from NH is AWESOME! 2017 Durango Citadel - Modern is nice! HEMI is amazing! 1998 Silverado Z71 - Father-daughter project 1968 400 coupe - R/A clone (Blue Pearl) (sold) 1967 326 convertible - Sold 1980 T/A SE Bandit - Sold
|
|
|
|
|
Joined: Jan 2016
Posts: 12
Member
|
|
Member
Joined: Jan 2016
Posts: 12 |
Thank you for your response! Over the next summer I'll probably be relying a lot from input from members about my car. The information I've seen posted by Pete67400 (another Minnesotan) about the AC system is unbelievable, what a wealth of knowledge he has! As I get into this hopefully I'll find out what components of the system will need to be replaced, both for upgrading to the R134A or due to the years of exposure to the air with the hoses off. So anyone reading this, please help if you can. I read that there is a good possibility of mouse nests in the suitcase, especially since mine sat covered outside for years, so I'll need to figure out how to disassemble that and check it. But anyway, thank you again and I'll be appreciative of any help I get!
|
|
|
|
|
Joined: Apr 2010
Posts: 6,758
FGF Premium Member
|
|
FGF Premium Member
Joined: Apr 2010
Posts: 6,758 |
Mine has stock A/C and I'm rebuilding it. Thing I dislike about the aftermarket A/C is they do not bring in fresh air. 100% recycled ... yuck! Stock does...
Engine Test Stand Playlist: https://www.youtube.com/playlist?list=PLwoxyUwptUcdqEb-o2ArqyiUaHW0G_C88restoring my 1968 Firebird 400 HO convertible (Firedawg) 1965 Pontiac Catalina Safari Wagon 389 TriPower (Catwagon) 1999 JD AWS LX Lawn tractor 17hp (my daily driver) 2006 Sequoia 2017 Murano (wife's car) 202? Electric car 203? 68 Firebird /w electric engine 2007 Bayliner 175 runabout /w 3.0L Mercuiser__________________________________________________________
|
|
|
|
|
Joined: Jan 2016
Posts: 12
Member
|
|
Member
Joined: Jan 2016
Posts: 12 |
Thanks Gus68, full disclosure...snowbirding too. Gathering info for my wrenching return to northern MN from AZ in April (if ice is off). Didn't know that about no fresh air, very good reason to keep original too!
|
|
|
|
|
Joined: Dec 2007
Posts: 10,338 Likes: 3
Premium Member
|
|
Premium Member
Joined: Dec 2007
Posts: 10,338 Likes: 3 |
I used to be indecisive. Now I'm not sure. I feel like I am diagonally parked in a parallel universe. 1968 400 convertible (Scarlet) 1976 T/A - 455 LE (No Burt) 1976 T/A New baby, starting full restoration. 1968 350 - 4 speed 'vert - 400 clone (the Beast!) 1968 350 convertible - Wife's car now- 400 clone (Aleutian Blue) (Blue Angel) 2008 Durango - DD 2008 GXP - New one from NH is AWESOME! 2017 Durango Citadel - Modern is nice! HEMI is amazing! 1998 Silverado Z71 - Father-daughter project 1968 400 coupe - R/A clone (Blue Pearl) (sold) 1967 326 convertible - Sold 1980 T/A SE Bandit - Sold
|
|
|
|
|
Joined: Jan 2016
Posts: 12
Member
|
|
Member
Joined: Jan 2016
Posts: 12 |
|
|
|
|
|
Joined: Dec 2007
Posts: 10,338 Likes: 3
Premium Member
|
|
Premium Member
Joined: Dec 2007
Posts: 10,338 Likes: 3 |
Ah, you won't need A/C way up there...  Just mosquito netting...
I used to be indecisive. Now I'm not sure. I feel like I am diagonally parked in a parallel universe. 1968 400 convertible (Scarlet) 1976 T/A - 455 LE (No Burt) 1976 T/A New baby, starting full restoration. 1968 350 - 4 speed 'vert - 400 clone (the Beast!) 1968 350 convertible - Wife's car now- 400 clone (Aleutian Blue) (Blue Angel) 2008 Durango - DD 2008 GXP - New one from NH is AWESOME! 2017 Durango Citadel - Modern is nice! HEMI is amazing! 1998 Silverado Z71 - Father-daughter project 1968 400 coupe - R/A clone (Blue Pearl) (sold) 1967 326 convertible - Sold 1980 T/A SE Bandit - Sold
|
|
|
|
|
Joined: Aug 2005
Posts: 1,923
Member
|
|
Member
Joined: Aug 2005
Posts: 1,923 |
I have factory AC in mine as well (though it's not completely finished yet.)
I plan to replace the compressor (and hoses) with a newer unit, but the rest of the system is stock.
|
|
|
|
|
Joined: Jan 2016
Posts: 12
Member
|
|
Member
Joined: Jan 2016
Posts: 12 |
Thank you! I get confused, at a car show yesterday, a firebird guy said that he thought when you upgrade to R134a, you need to replace your evaporator and the valve. Another said you can get better efficiency if you replace the compressor also with a more modern one. I'm sure someone out there has actually done theirs. Like to hear from you.
|
|
|
|
|
Joined: Mar 2012
Posts: 1,538 Likes: 41
Member
|
|
Member
Joined: Mar 2012
Posts: 1,538 Likes: 41 |
I have done quite a few of these systems from using all factory parts A6 compressor...etc to vintage air. If you don't care about originality vintage air is the way to go if you want ultimate cooling. The factory ducting is not quite that efficient with cooling. But mind you this is where it gets to 116 out here in AZ. It may be fine in other parts of the country where the outside Temps don't get as high.
It also helps to have a bigger condenser when switching to R134 and all the baffles up in front of the car.
Last bird I did was a 67 with an aftermarket under the dash unit with the sanden compressor and R134. It cools good enough when it's above 90 degrees here.
Pontiac power
|
|
|
|
|
Joined: Oct 2014
Posts: 4
New Member
|
|
New Member
Joined: Oct 2014
Posts: 4 |
What an awesome and informative thread. I'm installing an original A/C system in my 67 that came with factory a/c. I had some original parts, but had to piece together almost everything. That would have been enormously difficult without this thread, so many thanks to everyone who contributed.
I have a question, does anyone know if the compressor label on page 2 is reproduced? My original label is identical to that one and I can't find one anywhere.
Once again, thanks for this priceless library of information!
|
|
|
|
|
Joined: Jul 2013
Posts: 461
Member
|
|
Member
Joined: Jul 2013
Posts: 461 |
We were able to find a replacement compressor. I am not sure about the decal and I do not have the car to check. I believe that we got it from Global Parts? I will check that name for you. Cal Edit - Global Parts Distributers http://www.globalpartsdist.com/catalog/
Last edited by Cal H; 07/13/16 10:59 AM.
|
|
|
|
|
Joined: Oct 2014
Posts: 4
New Member
|
|
New Member
Joined: Oct 2014
Posts: 4 |
Thanks for the response Cal. I actually had the original compressor and decided to re-seal it myself. The internals were almost new as it was removed sometime in the late seventies (I know the history of this car since 1969).
So it's all done & painted and ready to go, but I was looking for the correct decal.
If I did it right, there should be a picture of the original decal currently on the compressor, which I painted around.
By the way, if you search on YouTube, you can find the tips needed to do a rebuild on your own, if you have the few tools required.
Thanks again,
Sam
 Original A/C Compressor Decal Original A/C Compressor Decal
|
|
|
|
|
Joined: Aug 2011
Posts: 1,170 Likes: 1
Member
|
|
Member
Joined: Aug 2011
Posts: 1,170 Likes: 1 |
Has anyone ever replaced the evaporator box seal that seal the 2 suitcase halves? I need all the seals and gaskets that go inside the box and can only locate the 2 that fit around the tubes. Any help would be appreciated.
|
|
|
|
|
Joined: Oct 2014
Posts: 4
New Member
|
|
New Member
Joined: Oct 2014
Posts: 4 |
I looked for these as well and was unsuccessful. I reused the evaporator to case seal as it's heavy and was in good condition. For all other seals, there's a vendor that sells a sheet of 3mm thick dense foam material on e bay, that's 17" wide and sold by the foot. I cut my own gaskets and attached them to one side of all mating surfaces and then screwed the halves together. You wuold have to make all the cutouts for screw holes, etc., but it worked out well for me.
Good luck.
|
|
|
|
|
Joined: Mar 2012
Posts: 1,538 Likes: 41
Member
|
|
Member
Joined: Mar 2012
Posts: 1,538 Likes: 41 |
Try an auto body supply store.
I use this a non hardening caulking putty that comes in a 1/4" diameter ribbon.
Pontiac power
|
|
|
|
|
Joined: Aug 2011
Posts: 1,170 Likes: 1
Member
|
|
Member
Joined: Aug 2011
Posts: 1,170 Likes: 1 |
Thanks all, I found some HVAC foam tape I'm going to try.
|
|
|
|
|
Joined: Jul 2018
Posts: 1
New Member
|
|
New Member
Joined: Jul 2018
Posts: 1 |
This has to be one of the most helpful forums on this website, but one quick question. I am having a difficult time finding the silver case that fits between the heater core and the black heater box, would you have any idea where i could find one? This post is the first time I’ve seen one yet.
|
|
|
|
|
Joined: Mar 2012
Posts: 1,538 Likes: 41
Member
|
|
Member
Joined: Mar 2012
Posts: 1,538 Likes: 41 |
This has to be one of the most helpful forums on this website, but one quick question. I am having a difficult time finding the silver case that fits between the heater core and the black heater box, would you have any idea where i could find one? This post is the first time I’ve seen one yet. Are you talking about the A/C evaporator?
Pontiac power
|
|
|
|
|
Joined: Feb 2017
Posts: 677 Likes: 1
Premium Member
|
|
Premium Member
Joined: Feb 2017
Posts: 677 Likes: 1 |
If you are talking about the evaporator I have one, and most of the other parts.
|
|
|
|
|
Joined: Oct 2014
Posts: 4
New Member
|
|
New Member
Joined: Oct 2014
Posts: 4 |
I believe the part you're talking about fits inside of the heater core box. You can try the guy below, I've used him before http://thepartguy.com/index.htmlGood luck
|
|
|
|
|
Joined: Sep 2015
Posts: 11
Member
|
|
Member
Joined: Sep 2015
Posts: 11 |
Hello Pete67400, All I can say is WOW!!!!!!!!!! probably the best description of a a/c rebuild out there. I would like to know where to get my evap box that goes under the passenger side dash reconditioned like the one in your pics? Thank you Joe Cuyler. [email protected] is my email. 67 Original regimental red, automatic,p/s,p/b,a/c. Original smog motor and two speed trans. Only thing not original on this car is where someone cut holes to fit rear package tray speakers Built in lords town oh. sent to san louie obispo, Ca.
|
|
|
|
|
Joined: Mar 2004
Posts: 302
Member
|
|
Member
Joined: Mar 2004
Posts: 302 |
Hi Joe! I don't know where you could go to get the heater box reconditioned. I took mine apart to clean and repair it. I bought new foam door gaskets from one of the usual Firebird/Camaro parts places. I painted the housing, but probably should have left it with the bare fiberglass gelcoat for correctness.
Pete
|
|
|
|
|
Joined: Sep 2015
Posts: 11
Member
|
|
Member
Joined: Sep 2015
Posts: 11 |
Hello Pete, Are you still around? Long time no speak!!!! I see your ac had a three prong resistor on top of the suitcase. Shouldn't that be a 4 plug connector? I read somewhere that tree was for non ac cars. However, my donor car had ac and had the three prong resistor. Would it be that I have a smog pump from california? I wouldnt think so. I also need a wiring diagram for the ac. I have a 12 gauge wire coming from relay that has a 20 amp fuse. Does that go to alternator? I have some extra parts from the donor if needed. Thanks again Minnesota nice.
|
|
|
|
Forums57
Topics35,545
Posts298,893
Members8,865
| |
Most Online19,810
Feb 1st, 2026
|
|
|
1 members (Geoff),
34
guests, and
17
robots. |
|
Key:
Admin,
Global Mod,
Mod
|
|
|
There are no members with birthdays on this day. |
|
|
|