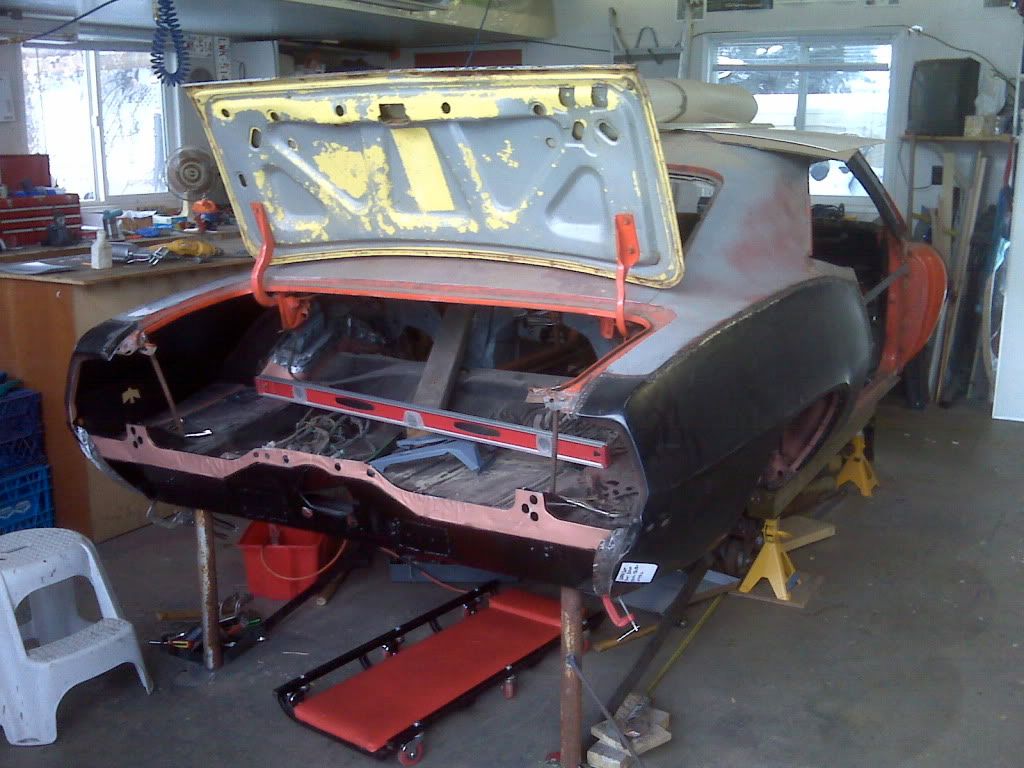
after 25 years, the bird finally gets a new quarter (drivers side is next). I decided to save the body lines and just patch below and to the inside of the lines. just need to do the final trimming and weld/grind. (lower lip in front of the tire is sticking out because I didn't remove the old piece yet).
thanks. First time doing this. It took me a while (and a few Vcrans) to build up the guts to do it but no turning back now. It was an 80% panel from NPD, paid around $170. so it didn't include the door jamb and upper sail panel areas. After looking at it carefully, I started to see the body lines weren't as crisp as the factory originals (I have heard this from other people too). I'm sure they could be massaged with bondo or whatnot to make them look great but I don't have that kind of skill so I decided to cut the new panel just below the horizontal body line and to the left of the door jamb foldover (look real close at the photo you can see). Also in the back, I cut as close to the edge as possible. So at this point I just laid the new panel on top of the old one (most is still on the vehicle, but I did cut out all the rot). If you were to look behind the new panel, you would see the old panel overlap approx 2-3" all around. Now I plan to cut through, both the new panel, and the old panel (approx 1" away from the body line (keep it close to not cause warpage). This way you butt weld it, and use a thin cutting disk so the gap is minimal. This way you ensure a consistent cut. Just tack as you go every inch or so as you cut with a MIG. Then go back and fill it in little by little. I've never done this before but everything I read, looks like this method will work (I'm sure there are many). I'll post photos when finished. Also, I think just the skin would have got me the same area of metal for less $$$. Probably will do that for the drivers side.
That sounds like a good method. I've got to do both quarters and a friend of mine just suggested to do it the same way. Seems like a good way to get an accurate cut. But why do you have to tack it as you cut? Don't you have to wait till its all cut to remove the dropoff before you can weld on the new piece?
I think you can get to that from the inside. thats just the way I read somewhere. never did it though, will let you know if it works. Otherwise it will be rattling around like a tin can
it is possible to remove the trunk drop off from the inside after welding however it will be easier to do so befor you do the 1/4. more access and much more room to move to work with tools. just measure your old drop off's position befor removing to ensure accurate replacement after you install the 1/4. you can install it after if you desire but removal is definately easier before!! also where r you in michigan? im not far from coldwater,mi. about an hour south.
Andy
due to budget cutbacks, the light at the end of the tunnel has been disconnected for non payment.
ok so does this sound ok ? First, cut all around through both the old and new panel (as close to the body lines as possible ~ 1") no welding yet. This way the gap is consistent. Then after it is all cut, remove all the old dropoffs, and line the panel up and start tacking it. Were in Wayne, MI. probably a couple of hours, do you come up to the Woodward cruise ?
Question, how do I cut all around the panel without it staying in place when I'm finished ? Should a tack it in a few spots as I go ?
Last edited by 69birdinamillionpieces; 04/20/1002:21 PM.
So far I've heard of about three ways to go about trimming the replacement skin for a butt weld.
1) The cut through method that your looking into: The more we hash it out the less I like this way. No matter how you "slice" it there is going to be at the very least 1/8" of material missing (thickness of the cutoff wheel). And like you said, how do you keep the replacement panel fixed to the car as your cutting?
2)Trim the replacement panel first. Estimate how much of the panel you'll need, trim it,screw it or cleco it to the car and then trace outer edge of the panel onto the car. Then carefully cut on that line and you should have an exact replacement panel.
3)Trim the car first. Layout what you would like to remove out of the quarter panel, cut that off the car, and then screw the replacement skin to the outside of the car. You can then trace from the inside of the car, onto the inside of the replacement skin what you would like to remove.
I havent done it yet, ive just been researching like you. On my quarters I plan to butt weld and so far am leaning towards either #2 or #3. I think my car was hit from the rear and the very rear edge of the passenger quarter panel is wrinkled ( as well as about 6" of the upper quarter panel body line-or "hip" as I call it.) Right now my car has skins on it that are rotted out and the last guy just overlapped them. There's maybe 2" of original meat left from the body line down. I plan to cutt 1" down from the "hip" and have my seam there, until I get to the bad portion in the rear. Then i'll utilize the 1" lip the quarter skin has from there on back. So my seam will travel along the side of the car (1" down from the hip, and then jump up to the top of the car for the last foot or so).
I dont know if I communicated all that right, but I cant think of another way to say it.
Junior, sounds like your car has the same damage ours did.
Final panel fitting led to cutting back up across the top line in front of the antenna hole due to distortion from the collision damage. You'd never know it's been worked on from the outside now.
Vikki 1969 Goldenrod Yellow / black 400 convertible numbers matching
Lookin good ! I also think maybe #2 or #3 is the best way. I suppose a fine tip white paint pen would do the trick, might take a bit more time to trim and grind a bit but I think the butt weld seam will be better, I always have trouble trying to make up that 1/8", probably end up burning it with a cut through.
Ok, once you all figure this out, come to my house and replace my rear QPs for me. I'll buy all thats needed, pay you top dollar, and wine and dine ya as well.
'68 428 HO M3 Monster, 4-on-the-floor! Need I say more?
I cut through both panels with a body saw, the cut was thin and was a perfect gap for the butt weld. I had my old quarters cut like yours with about 2" down from the top body line and the same back from the door jamb. I trimmed the new panel and fit it overlapping so that it was about 1/4" below the body line (and same back from jamb) then I put in about 5 sheet metal screws to hold it in place with the screws barely on the edge of the new panel. I started the cutting through both panels about 1/2" below the body lines and after about 8 or nine inches I put a tack weld to mate up the edges and continued cutting and tacking every 4" or so until I reached a screw and then removed the screw and continued on past it. This method left a narrow waste strip of 1/4" wide on the outside of the panel and a wider waste strip on the inside of the trunk which I pulled out later. The waste strip on the inside along the doorjamb I pulled out through the inside of the rear window cavity. The rear of mine at the tailpanel was smashed and rusted badly so I did use the rear portion of the replacement panel and matched it up in the trunk gutter.
sweet ! glad to see I'm on the right track. I don't have a body saw but have a cut-off wheel (pneumatic). those disks are pretty thin (1/16"), I think it will be ok for the butt weld. I will follow your procedure with the screws and tack weld.
If you have air maybe try to pickup a body saw at harbor freight or such only around $60-$80. I tried my cut off saw with a 1/16" wheel and found that unless you have an unbelievably steady hand the short cuts with a wheel result in a gap wider than the 1/16". I used an old cutoff saw blade ahead of my cut to hold the gap apart while I tack welded. The repop panels are a little lighter steel than the originals and I found some burn through (on the repop side) with a bigger gap. You can turn you heat down on the mig to bridge a wider gap but I found that more heat and a narrower gap leaves less overall distortion around in the joint and leaves a better penetration with less grinding afterward.
Just my experience using a Lincoln mig on gas (75/25 Argon/CO2) with 0.023 wire (tried a flux core setup before and had poor results)
ok, sounds like the body saw is the way to go. I'll look and see what harbor freight has. I have a Miller MIG w/ gas and 0.023 wire so should be good there. I wasn't clear about the cutoff saw blade ahead of the cut to hold the gap apart. Did you do this with the body saw method ? thanks again !
how about this body saw from Harbor freight ? metal saw
Last edited by 69birdinamillionpieces; 04/24/1012:18 PM.
Sorry about that, I meant to write "use an old body saw blade" (not a cut off blade) to keep the gap open while tack welding. That saw you show is basically the same one I used, cheap foreign stuff but how much is a guy going to use it anyway. Buy an extra pack of blades and go at it!
I had my rear quarter skins done at a body shop quite awile back, car has been in my garage since but started I to notice bubbles. I also noticed the bodyline looked funny so I took a sander to them and found about 1/2" of filler and the skins had been done so poorly that my 12 year old could have done them. I read the thread but think I am going to try the full quarters and do it myself, got one of the old one almost off. Not as bad as I thought. If all goes well should have one done by next weekend. I had about $1000 in it the first time now that again, like the saying goes "if you want it done right...."
Jerry Tallman 69 455/4sp Windward Blue, deluxe parchment bench seat, under major restoration je_tallman@yahoo.com
I thought about doing the whole quarter but my big concern was lining up all the seams (i.e. door jamb, trunk jamb). I know that would be a pain especially for a rookie like me. I'm so far pleased with the results of the method I'm using and others here have taken. Maybe it won't be as bad as I think to line all a full quarter, but hopefully the route I take doesn't end up with a 1/2" of bondo LOL... I'm on hold right now, moved to the engine assembly temporarily. post photos !!!
This is my first time, but after seeing what the body shop did I felt I had to try this myself.I have no choice on the full quarters since they cut mine up so bad, so far the hardest part is getting their welds cut out. I have big hopes of a factory look when I'm done and not be able to notice the panels were changed
Jerry Tallman 69 455/4sp Windward Blue, deluxe parchment bench seat, under major restoration je_tallman@yahoo.com
that was the other thing with me, more time consuming, costs more, and difficult to reproduce the factory spot welds but like you said, you had no choice. I bet it will turn out very nice, just take your time.
I did my quarters like you are doing them back in 83. I'm cutting them out and putting in full qtrs this time. Too much bondo and the rear end was too wide so the bumper went around it but you could mount the brace. I will put some pics up soon. It's totally gutted except steel dash. Left the windows on to keep the body from twisting.
I will have to replace: both qtrs, inner & outer rear wheelhouses, front inner fenders, full floor & trunk pan with frame, LH full rocker, LH full cowl, firewall, upper cowl, floor ext to firewall, trunk lid and beef up the frame mounts. Doors, 400 hood and fenders are good.
Looking forward to the project just don't know if I can afford it!
You think the Yearone guys want a real beater to fix?
Engine Test Stand Playlist: https://www.youtube.com/playlist?list=PLwoxyUwptUcdqEb-o2ArqyiUaHW0G_C88 restoring my 1968 Firebird 400 HO convertible (Firedawg) 1965 Pontiac Catalina Safari Wagon 389 TriPower (Catwagon) 1999 JD AWS LX Lawn tractor 17hp (my daily driver) 2006 Sequoia 2017 Murano (wife's car) 202? Electric car 203? 68 Firebird /w electric engine 2007 Bayliner 175 runabout /w 3.0L Mercuiser__________________________________________________________
")


.JPG "P1010197 (Small).JPG
Views: 1044
Size: 0 Bytes")


![[Linked Image from hosting.photobucket.com]](https://hosting.photobucket.com/albums/ss328/alvey_john/john-alvey-1968-Firebird-oct2012-2.jpg)