|
|
Joined: Apr 2007
Posts: 28
Member
|
|
Member
Joined: Apr 2007
Posts: 28 |
I like the thought of returning to the original parts setup as long as there is not a distinct advantage with the 11-bolt pump (it sounds like there is not). I like to attempt to maintain a "near original" look. Having said that I have an offenhauser intake manifold and an edelbrock 4-barrel carb on it mostly becuase that is what it came with and I havent found a good reason to change back to the OEM parts yet. So when you change from an 8-bolt pump to an 11-bolt pump do you have to drill 3 more holes in your block? Is changing back to an 8-bolt going to be problematic?
|
|
|
|
|
Joined: Oct 2006
Posts: 2,421
Member
|
|
Member
Joined: Oct 2006
Posts: 2,421 |
You have to change the timing chain cover, no drilling, the TC mounts to the same block holes. I'm not sure if your pulleys and Alternator bracket are correct or not based on the pics.
I have a lot of the parts, 8 bolt cover, think I have a divider, also have a 68 400 4 barrel intake. I might have an alternator bracket as well.
Never thought about selling it, but I might if you wanted it all.
I have a race next week, it'd take me until the week after to round everything up.
Then you get to explain they new CC bill to your wife.
Wanting a Custom fit in an off the rack world. I don't have time for a job, I just need the money. 
|
|
|
|
|
Joined: May 2001
Posts: 3,615
Premium Member
|
|
Premium Member
Joined: May 2001
Posts: 3,615 |
Rockman, IMHO, I'd use what you have for a base. Keep the 11 bolt set up. There are far more options available to you....and you'll save some $$$.
Once you get everything tweaked, it should work fine. Lots of help available here.
I'm a hobbyist. Not a professional. Don't be hatin'!
|
|
|
|
|
Joined: Apr 2007
Posts: 28
Member
|
|
Member
Joined: Apr 2007
Posts: 28 |
Fellas, after a slight delay I got that stainless cover removed and took some more pics. You can see the fan setup a lot better. The fan is pretty clearly too far forward and smaller than it should be. Also note that the fan pulley appears to be about 1/4 to 3/8 of an inch too far forward and so doesnt line up with the other two pulleys... Lots of work to do.. http://s963.photobucket.com/albums/ae115/Micas_Bird/firebird%20july%202010/
|
|
|
|
|
Joined: Aug 2006
Posts: 1,458
Member
|
|
Member
Joined: Aug 2006
Posts: 1,458 |
For a 69 11 bolt waterpump there is two different ones ,one has a long shaft and the other shorter.Which style do you have long or short? how does the waterpump pulley line up with the crank pulley. there shouldn't be a spacer on the alternator bracket.something is out of whack
Harry 69 Firebird   _________________________________________________ 1969 firebird 350/auto 2012 mustang v6 (wifes car) 2012 jeep compass (winter vehicle) 2008 dodge ram 4x4 Hemi
|
|
|
|
|
Joined: May 2001
Posts: 3,615
Premium Member
|
|
Premium Member
Joined: May 2001
Posts: 3,615 |
I believe that 1/4" difference is also the diff between the long and short 11 bolt pump. Based on your photos, looks to me that you need a short shaft pump...and a shorter fan spacer. BUT, I am not familiar with the '69 set up.
I'm a hobbyist. Not a professional. Don't be hatin'!
|
|
|
|
|
Joined: Mar 2004
Posts: 11,905
Valued Mentor
|
|
Valued Mentor
Joined: Mar 2004
Posts: 11,905 |
too long a spacer, long pump.
Take the fan and spacer off and put a straightedge along the face of the fan and crank pulleys. See how far forward you are. My guess is that the shorter pump will bring you rather close.
|
|
|
|
|
Joined: Apr 2007
Posts: 28
Member
|
|
Member
Joined: Apr 2007
Posts: 28 |
All, just a quick update.. After shipping various parts back and forth to NH I think I finally got the correct water pump, backer plates, etc. I found myself with about an hour today (my 4-year old actually took a nap for the first time in 2 years) so I dug into it a little bit. I emptied the rad and took the hoses off top and bottom and took the Tstat back out. I was looking to signs of goop in the block so I stuck a rag in the hole where the Tstat goes to see how much crud came back out. I got a fair bit of rust-brown goopy sediment. Not good.. I am going to flush the block and see if I can get some of that crud out. I took the old water pump off. The internals where covered with greenish brown sediment but worked just fine (see pics). The old pump and backer plate were all glued together with red gasket cement which made disassembly a pain. Is this cement necessary? http://s963.photobucket.com/albums/ae115/Micas_Bird/firebird%20july%202010/The old pump was definitely the long shaft 11-bolt as you can see in the picture with the old (blue) and new (black) side-by-side. I wont know if the pulley alignment will be right on until I put everything back together (likely next weekend) but I expect that alignment will be improved. I will take more pics after I get everything back together and get the mess cleaned up! I was very careful to drain the radiator into a bucket but didn’t think to have a bucket under the water pump when I took it off.. Splat! I am definitely going to replace the fan with the correct one since I have it all apart. I doubt I will be able to get the whole assembly back in though as the old one with the little fan was a bear to get out around the shroud. I guess I will have to take that off too..
|
|
|
|
|
Joined: May 2001
Posts: 3,615
Premium Member
|
|
Premium Member
Joined: May 2001
Posts: 3,615 |
Rockman, detatch the shroud from the radiator, then remove. This will give you enough room to work. Get it out of the way.
After you re-install the waterpump, put the shroud back in place but, do not re attach to rad. Just let it sit there, then re-install the waterpump pulley and fan. Just push the shroud toward the engine to give yourself some room to work. After this, re attach the shroud to the rad.
You get it?
I'm a hobbyist. Not a professional. Don't be hatin'!
|
|
|
|
|
Joined: Oct 2006
Posts: 2,421
Member
|
|
Member
Joined: Oct 2006
Posts: 2,421 |
What's with all the spacers on the Alternator?
Looks like you need to work on getting all the pulleys and parts mounted correctly and inline.
Wanting a Custom fit in an off the rack world. I don't have time for a job, I just need the money.
|
|
|
|
|
Joined: Apr 2007
Posts: 28
Member
|
|
Member
Joined: Apr 2007
Posts: 28 |
yup. Gotcha. I was trying to avoid removing stuff that I didnt need to. Less bolts and stuff to keep track of and less reassembly. The shroud will have to come off to re-install though. When I was taking stuff apart I noticed that the shroud was cracked on one side too so eventually I will need to replace it. I have blown my parts budget for this quarter though so it will have to wait..
There are a bunch of 1/2-assed spacers on the alternator (both top and bottom) that the previous owner stuck on there in an attempt to get the pulleys to line up better. I pulled them all off and am hoping that everything lines up better with the short shaft water pump I am adding. I am afraid that alignment will still be off but I wont know until I get everything back together. I think that the main drive pulley and the fan pulley will line up great but my suspicion is that the alternator pulley will still be off because the alternator just looks too far back after I took the spacers off. I am wondering of the alternator is the wrong one or maybe the mounting brackets were bent by the previous owner to try to get everything to line up. I am really hoping alignment will be right on as I dont really want to buy another alternator...
Last edited by Rockman; 08/09/10 06:17 PM.
|
|
|
|
|
Joined: Oct 2006
Posts: 2,421
Member
|
|
Member
Joined: Oct 2006
Posts: 2,421 |
This (pic) seems to be the most common bracket used with the 11 bolt pump even if you don't have power steering.
I'm not sure what the "correct" one looks like for a single belt FGF V8.
Pulley's are a PITA, lots of different con-founder-ations. Most run a two groove crank and WP since you have more options. With your single grove set up you might have some fun finding the correct ones if yours don't line up.
Wanting a Custom fit in an off the rack world. I don't have time for a job, I just need the money.
|
|
|
|
|
Joined: Apr 2007
Posts: 28
Member
|
|
Member
Joined: Apr 2007
Posts: 28 |
Hey all.So I took a day off work to try to get everything back together. I have a car show next weekend I'd like to go to so I need to get things wrapped up. I got the block and rad flushed. Lots of goop. I flushed both in every way I could think of until I got clean water coming out. Than I put in the new 11-bolt short shaft water pump and the new fan. The pulleys for the water pump and the drive line up perfectly. But now the pulley for the alternator is about 3/8 of an inch off. The alt pulley is further forward than the water pump and drive pulleys.. I ordered a new alternator bracket to replace the cobbled together home built bracket and all the spacers that were on there before. I guess I am not done yet..
|
|
|
|
|
Joined: Apr 2007
Posts: 28
Member
|
|
Member
Joined: Apr 2007
Posts: 28 |
correction: I canceled the brachet order from ames because the only bracket they carry is for a 400 with power steering which I dont have. They couldnt tell me if their bracket would work for a non-power steering car so I canceled it.
|
|
|
|
|
Joined: Apr 2007
Posts: 28
Member
|
|
Member
Joined: Apr 2007
Posts: 28 |
Group, I finally got the bird on the road today to try out all the changes I made (with all your help!). The car ran much much cooler and I believe much smoother. During about 25 minutes of cruising around town and some idling at stoplights the temp stayed between 180 and about 200. Even after I shut it down in the garrage the temp only climbed to about 205ish and dropped immediately to 180 as soon as I started it. It seems to like running at 180-190 better than 200-220. I am curious to see how it performs on the highway. I dont know which was the single greatest inprovement between flushing the block and rad, replacing the water pump, replacing the fan, or replacing the Tstat. Belt alignment is much better but still off most likely due to the wierd homebuilt bracket on the alternator. But it is good enough for now!
Thanks all for your help and advice! I am sure I will be hitting up the forum for advice in the future (when my parts budget gets refreshed)! I have a long list of firebird projects to keep be busy.
Happy Cruising!
-Rockman
Last edited by Rockman; 08/13/10 10:21 PM.
|
|
|
|
|
Joined: Nov 2004
Posts: 3,114
Senior Member
|
|
Senior Member
Joined: Nov 2004
Posts: 3,114 |
Congrats, glad to hear it is running better for you. Keep your eyes out on ebay for the brackets. There is a guy in Columbus Ohio who manufactures the two brackets that you need. Last I saw, he was charging $10 for each. They look just like the originals. for the price you can't go wrong. edit: Yep, he still has them: Bracket 1 Bracket 2
Last edited by catalina; 08/13/10 10:36 PM.
68' Firebird 400 convertible, numbers matching, solar red w/ deluxe parchment interior. 66' Pontiac Ventura Hardtop 66' Pontiac Catalina Convertible
|
|
|
|
|
Joined: Apr 2007
Posts: 28
Member
|
|
Member
Joined: Apr 2007
Posts: 28 |
Catalina, thanks for the line on the brackets! Do you know if this bracket would work in a car without power steering? I hope so. I like the price!
|
|
|
|
|
Joined: Nov 2004
Posts: 3,114
Senior Member
|
|
Senior Member
Joined: Nov 2004
Posts: 3,114 |
I am not sure, but if I had to guess, probably not. Maybe someone else here with manual will chime in with confirmation either way. I think the lower aluminum bracket that is common between the alternator and the power steering pump makes the line different. 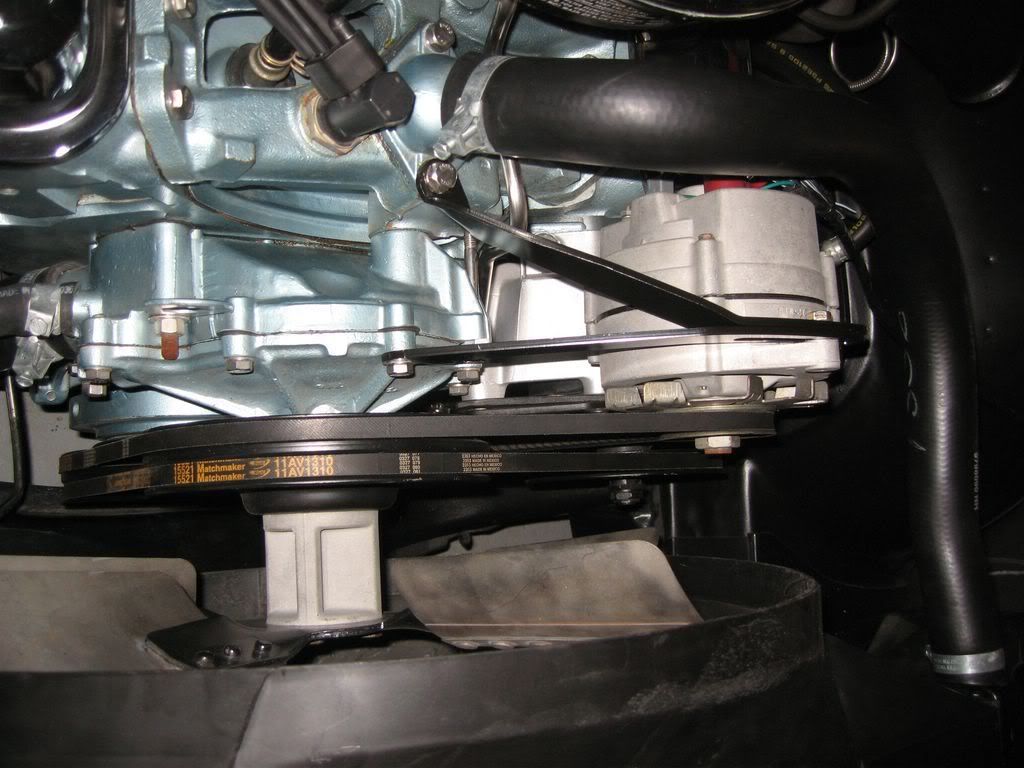 
Last edited by catalina; 08/13/10 11:38 PM.
68' Firebird 400 convertible, numbers matching, solar red w/ deluxe parchment interior. 66' Pontiac Ventura Hardtop 66' Pontiac Catalina Convertible
|
|
|
|
|
Joined: Aug 2010
Posts: 8
Member
|
|
Member
Joined: Aug 2010
Posts: 8 |
i had 1 do that and it was the water pump impeller rotted away. i went thru 3 pumps from napa before i got one the correct length to make the pulleys line up (all the same part #) so dont throw out anything until you're sure its right. and YES flush everything...block, radiator, and heater core
|
|
|
|
|
Joined: Apr 2007
Posts: 28
Member
|
|
Member
Joined: Apr 2007
Posts: 28 |
Group,
So after all the improvements I put in my 68' still runs hot, better than before but still hot. I took it out to the carshow at the front range airport on Saturday (good show!). On the way down to the show at 6:30am (air temp of maybe 65 deg) I could run at about 70-75 before the temp exceeded 220 which is a slight improvement. On the way back in the afternoon I had to keep it under 60 to keep the temp under 220 degrees. Granted the air temp in the afternoon was in the 90s but 60 on the highway! Is this typical of 68 400?
I’d think this car would run cooler after all the tweaks I have done. The only things I can think of to try now are swapping the current nearly new brass/copper 4-core rad for a 4-core aluminum rad and cutting the hood intakes out. Or maybe it is too much to expect to be able to do more than 60 on the highway on a hot day without overheating? The aluminum radiators seem like they should be more efficient. They have something like 18 fins per square inch vs 12 with my current brass rad and I believe they hold more fluid so more thermal mass to transfer heat out of the engine. But they are spendy!! ($400 bucks from Ames). Does anyone have experience with the aluminum rads? Do they help substantially or not so much? Any other tweaks anyone can think of that might help with the temp issue? So far I have done the following:
New 4-core rad.
Swapped out the 195 tstat for a 180 tstat
Replaced the water pump with a 11-bolt short shaft
Replaced the fan with a 19.5” flex fan
Flushed the block and rad and replaced the fluid with the correct mixture.
Adjusted the fan position. The fan isn’t quite half in/half out but it is close. I need a 3.25” spacer which isn’t stock and kinda tough to find.
Thanks in advance for any ideas!
-Rockman
|
|
|
|
|
Joined: Nov 2006
Posts: 6,341
Power Member
|
|
Power Member
Joined: Nov 2006
Posts: 6,341 |
Without going through the whole thread again, are you running a 19.5" flex fan or 19.5" 7-blade clutch fan?
Also, there were several tests done by HPP magazine a while back, where they tested 4-core stock copper/brass rads against some high end alum rads. In ALL tests, the stock rad out performed the alum rads over and over again. I wouldn't count on an alum rad solving your problems it didn't do a thing for me. Also, opening the scoops on the hood will do little to nothing for hot issues.
Do you have ALL the fillers up top, fender gussetts, 400 X-fillers, masticated rubber fillers in front of core support on each side, lower baffle etc.? Without ANY of the above mentioned pieces, you are going to have issues. Each one on their own will not solve Hot issues, but ALL combined will.
All of these filler panels, baffles etc. are designed to force the air coming in through the grills THROUGH the rad. Not under it, around it, over it etc. You want ALL air directed and forced through the rad. Air, like most anything else will take the path of least resistance. That's why typically, if you have a "hot" issue when sitting still, you have a water flow (ie: water pump, pulley size, wrong/bad thermostat etc.) or fan issue (too small, not enough blades, bad clutch). If you have a "hot" issue when the car is moving, you have a air flow issue/problem (meaning you are missing some of the pieces designed to force air through the rad. ie: lower baffle, 400 fillers etc.).
Last edited by Earlybird; 08/23/10 03:16 AM.
|
|
|
|
|
Joined: Jun 2003
Posts: 1,534
Member
|
|
Member
Joined: Jun 2003
Posts: 1,534 |
Are you running vacuum advance with your ignition? Have you verified it's working? What's your initial timing, and how much do you have with centrifugal (and when does it come all in)?
Too much, or not enough timing can increase temps at cruising speed.
|
|
|
|
|
Joined: Apr 2007
Posts: 28
Member
|
|
Member
Joined: Apr 2007
Posts: 28 |
I am running a 19.5" flex fan (non-clutch). The fan has the stock 8" pulley on it. I read about folks putting smaller pulleys on the fan so that the fan turns faster which would help with a standard fixed blade fan. But I dont think a smaller pulley would help with a flex fan as the blades are designed to flatten out at higher speed to take load off the engine. So turning a flex fan faster just flattens the blades out right?
I thought I had all the filler panels in place but now I am not so sure. I have the two top panels in place as well as the big one piece bottom panel. I dont honestly know if I have the other fillers that you mention (400-X, etc.). I was hoping to find a correct 68 400 at the car show on saturday so I could take pictures of the engine bay for comparison but mine was only 1 of 2 FGFs there. The other car was a 69 and the owner didnt open the hood. Pretty amazing that there were only 2 FGFs in a 400+ car show! I will dig through my service manual tonight to see if I am missing any fillers. It wouldnt suprise me to find that I am missing some of them.
My heat issue is definitely at speed. The temp came down into the 205-210deg range within a few minutes of getting off the highway on sat afternoon and eventually dropped to about 200 sitting in the driveway in the shade.
Good info on the aluminum rad. Thanks! I am glad I didnt pull the trigger and drop $400 bucks on that al rad! I like the stock look better too.
FirebirdMike, You are talking a bit beyond my current mechanical abilities. I dont know the answers to your questions but they are on my list to checkout!
Thanks for all the leads!
-Rockman
Last edited by Rockman; 08/23/10 12:24 PM.
|
|
|
|
|
Joined: Aug 2006
Posts: 1,458
Member
|
|
Member
Joined: Aug 2006
Posts: 1,458 |
[quote=Rockman] But I dont think a smaller pulley would help with a flex fan as the blades are designed to flatten out at higher speed to take load off the engine. So turning a flex fan faster just flattens the blades out right?
If the flex fan flattens out at higher speeds then it is also moving less air,I would pick up the correct clutch fan.
Harry 69 Firebird _________________________________________________ 1969 firebird 350/auto 2012 mustang v6 (wifes car) 2012 jeep compass (winter vehicle) 2008 dodge ram 4x4 Hemi
|
|
|
|
|
Joined: Sep 2007
Posts: 312
Member
|
|
Member
Joined: Sep 2007
Posts: 312 |
This might help to explain. Yes it does affect engine temperature both at idle and cruise. BTW the Tony who wrote this is not me. My engine is modified to some extent, but I am running about 50 degrees at cruise and 30 degrees at idle on vacuum advance. Temps about 175 degrees normal driving. Get yourself a dial timing light.
TIMING AND VACUUM ADVANCE 101
By Tony (formally from GM)
- 1 -
The most important concept to understand is that lean mixtures, such as at idle
and steady highway cruise, take longer to burn than rich mixtures; idle in
particular, as idle mixture is affected by exhaust gas dilution. This requires that
lean mixtures have "the fire lit" earlier in the compression cycle (spark timing
advanced), allowing more burn time so that peak cylinder pressure is reached
just after TDC for peak efficiency and reduced exhaust gas temperature (wasted
combustion energy). Rich mixtures, on the other hand, burn faster than lean
mixtures, so they need to have "the fire lit" later in the compression cycle (spark
timing retarded slightly) so maximum cylinder pressure is still achieved at the
same point after TDC as with the lean mixture, for maximum efficiency.
The centrifugal advance system in a distributor advances spark timing purely as
a function of engine rpm (irrespective of engine load or operating conditions),
with the amount of advance and the rate at which it comes in determined by the
weights and springs on top of the autocam mechanism. The amount of advance
added by the distributor, combined with initial static timing, is "total timing" (i.e.,
the 34-36 degrees at high rpm that most SBC's like). Vacuum advance has
absolutely nothing to do with total timing or performance, as when the throttle is
opened, manifold vacuum drops essentially to zero, and the vacuum advance
drops out entirely; it has no part in the "total timing" equation.
At idle, the engine needs additional spark advance in order to fire that lean,
diluted mixture earlier in order to develop maximum cylinder pressure at the
proper point, so the vacuum advance can (connected to manifold vacuum, not
"ported" vacuum - more on that aberration later) is activated by the high manifold
vacuum, and adds about 15 degrees of spark advance, on top of the initial static
timing setting (i.e., if your static timing is at 10 degrees, at idle it's actually around
25 degrees with the vacuum advance connected). The same thing occurs at
steady-state highway cruise; the mixture is lean, takes longer to burn, the load on
the engine is low, the manifold vacuum is high, so the vacuum advance is again
deployed, and if you had a timing light set up so you could see the balancer as
you were going down the highway, you'd see about 50 degrees advance (10
degrees initial, 20-25 degrees from the centrifugal advance, and 15 degrees from
the vacuum advance) at steady-state cruise (it only takes about 40 horsepower
to cruise at 50mph).
When you accelerate, the mixture is instantly enriched (by the accelerator pump,
power valve, etc.), burns faster, doesn't need the additional spark advance, and
when the throttle plates open, manifold vacuum drops, and the vacuum advance
can returns to zero, retarding the spark timing back to what is provided by the
initial static timing plus the centrifugal advance provided by the distributor at that
engine rpm; the vacuum advance doesn't come back into play until you back off
the gas and manifold vacuum increases again as you return to steady-state
cruise, when the mixture again becomes lean.
The key difference is that centrifugal advance (in the distributor autocam via
TIMING AND VACUUM ADVANCE 101
By Tony (formally from GM)
- 2 -
weights and springs) is purely rpm-sensitive; nothing changes it except changes
in rpm. Vacuum advance, on the other hand, responds to engine load and
rapidly-changing operating conditions, providing the correct degree of spark
advance at any point in time based on engine load, to deal with both lean and
rich mixture conditions. By today's terms, this was a relatively crude mechanical
system, but it did a good job of optimizing engine efficiency, throttle response,
fuel economy, and idle cooling, with absolutely ZERO effect on wide-open throttle
performance, as vacuum advance is inoperative under wide-open throttle
conditions. In modern cars with computerized engine controllers, all those
sensors and the controller change both mixture and spark timing 50 to 100 times
per second, and we don't even HAVE a distributor any more - it's all electronic.
Now, to the widely-misunderstood manifold-vs.-ported vacuum aberration. After
30-40 years of controlling vacuum advance with full manifold vacuum, along
came emissions requirements, years before catalytic converter technology had
been developed, and all manner of crude band-aid systems were developed to
try and reduce hydrocarbons and oxides of nitrogen in the exhaust stream. One
of these band-aids was "ported spark", which moved the vacuum pickup orifice in
the carburetor venturi from below the throttle plate (where it was exposed to full
manifold vacuum at idle) to above the throttle plate, where it saw no manifold
vacuum at all at idle. This meant the vacuum advance was inoperative at idle
(retarding spark timing from its optimum value), and these applications also had
VERY low initial static timing (usually 4 degrees or less, and some actually were
set at 2 degrees AFTER TDC). This was done in order to increase exhaust gas
temperature (due to "lighting the fire late") to improve the effectiveness of the
"afterburning" of hydrocarbons by the air injected into the exhaust manifolds by
the A.I.R. system; as a result, these engines ran like crap, and an enormous
amount of wasted heat energy was transferred through the exhaust port walls
into the coolant, causing them to run hot at idle - cylinder pressure fell off, engine
temperatures went up, combustion efficiency went down the drain, and fuel
economy went down with it.
If you look at the centrifugal advance calibrations for these "ported spark, latetimed"
engines, you'll see that instead of having 20 degrees of advance, they had
up to 34 degrees of advance in the distributor, in order to get back to the 34-36
degrees "total timing" at high rpm wide-open throttle to get some of the
performance back. The vacuum advance still worked at steady-state highway
cruise (lean mixture = low emissions), but it was inoperative at idle, which caused
all manner of problems - "ported vacuum" was strictly an early, pre-converter
crude emissions strategy, and nothing more.
What about the Harry high-school non-vacuum advance polished billet
"whizbang" distributors you see in the Summit and Jeg's catalogs? They're JUNK
on a street-driven car, but some people keep buying them because they're "race
car" parts, so they must be "good for my car" - they're NOT. "Race cars" run at
wide-open throttle, rich mixture, full load, and high rpm all the time, so they don't
TIMING AND VACUUM ADVANCE 101
By Tony (formally from GM)
- 3 -
need a system (vacuum advance) to deal with the full range of driving conditions
encountered in street operation. Anyone driving a street-driven car without
manifold-connected vacuum advance is sacrificing idle cooling, throttle response,
engine efficiency, and fuel economy, probably because they don't understand
what vacuum advance is, how it works, and what it's for - there are lots of longtime
experienced "mechanics" who don't understand the principles and operation
of vacuum advance either, so they're not alone.
Vacuum advance calibrations are different between stock engines and modified
engines, especially if you have a lot of cam and have relatively low manifold
vacuum at idle. Most stock vacuum advance cans aren’t fully-deployed until they
see about 15” Hg. Manifold vacuum, so those cans don’t work very well on a
modified engine; with less than 15” Hg. at a rough idle, the stock can will “dither”
in and out in response to the rapidly-changing manifold vacuum, constantly
varying the amount of vacuum advance, which creates an unstable idle. Modified
engines with more cam that generate less than 15” Hg. of vacuum at idle need a
vacuum advance can that’s fully-deployed at least 1”, preferably 2” of vacuum
less than idle vacuum level so idle advance is solid and stable; the Echlin #VC-
1810 advance can (about $10 at NAPA) provides the same amount of advance
as the stock can (15 degrees), but is fully-deployed at only 8” of vacuum, so
there is no variation in idle timing even with a stout cam.
For peak engine performance, driveability, idle cooling and efficiency in a streetdriven
car, you need vacuum advance, connected to full manifold vacuum.
Absolutely. Positively. Don't ask Summit or Jeg's about it – they don’t understand
it, they're on commission, and they want to sell "race car" parts.
__________________
hope this helps
|
|
|
|
|
Joined: Apr 2007
Posts: 28
Member
|
|
Member
Joined: Apr 2007
Posts: 28 |
Thanks Tony. Great info! I have to admit that I didnt know what vacuum advance did other than it was some kind of emissions thing. Lots of fun stuff to do this weekend starting with a good excuse to go buy a timing light!
|
|
|
|
Forums57
Topics35,546
Posts298,894
Members8,865
| |
Most Online19,810
Feb 1st, 2026
|
|
|
There are no members with birthdays on this day. |
|
|
|