Soak (and I do mean SOAK) all the bolts with some kind of pentrating oil (PB Blaster) overnight. You can get to the front 4 bolts from the top, the rear 2 are a little more difficult.
Do a search here for body bushings. There's tons of discussion, a lot were answers to my questions when I was doing it then advice I provided based on my experience. Take your time and be careful not to drop the car on yourself. Use a bunch of jack stands and a couple of floor jacks. If you take out the front seats you can reach the rear nuts for penetrating oil. You will also have to do something with the steering so you can separate the frame enough to get the new bushings in, either disconnect the rag joint or loosen the column and the steering box bolts so they can move around.
I read all these about 4 times and Charlie (CDJr) was very helpful in convincing me I could do it. Without this site I would have never even thought of trying it.
I have been soaking them for a week and a half now for good measure; luckily I have the interior pulled out so I can access them easily. I just hope they break free and not off. I am lucky because when the front end was re-built the front ones were replaced I am going to borrow a few extra jack stands from my buddy, 6 should do the job don’t you think?
Do you think I should dis-assemble the rag joint? I read to do it on one but on all others it wasn’t mentioned.
Do you do welding? I understand there is often rust under the old bushings that requires a reinforcement to be welded in. When mine was done, a couple needed welding work for rust enlarged frame mounting holes. Jim
Unfortunately I don’t, any suggestions? I was thinking that if needed I would just cut up a piece of metal and sandwich it in (if there is enough metal to sandwich it to), then have it properly fixed at a later date. I am crossing my fingers.
I don't think you need to disassemble the ragjoint. Just remove the pinch bolt so the box can slide down if it has to. Maybe loosen the box mounting bolts too....
I highly recommend using solid mounts. I went with DSE\'s 1/2" drop body mounts. They have regular height too. They inter-lock so it helps you keep the body straight on the sub frame.
I did it when the motor was out so the front was a lot lighter. Use a lot of jack stands as mentioned and do one side at a time. Also make note the tallest ones go under the firewall and the thinest go at the rad suport.
When I put the car-in-a-box together, the first time, I used salvage parts. Because the subframe was already out of the car I was putting together, I had planed on installing a complete subframe with suspension, engine, and transmission intact. As mentioned, the subframe looked cherry, but as I unbolted it, one side of broke away from the car before I got it unbolted, because the mounting areas on the subframe had rusted so bad that it just fell off the car, leaving the body bolts in place.
When I finished the car, I had a pro install the bushings adn I was his gopher. He loosened up one side, leaving one bolt loose but threaded and removed the other bolt. We used a couple of bf prybars and wooden wedges, slid the bushings/washers in place, bolted it in loose, then moved on. We didn't mess with the rag joint, and it was a fairly challenging job.
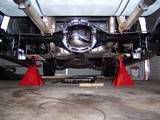
Success!!! All done and it only took 2.5 hours. It couldnt have gone any smoother than it did, however, the driver side bushing bolts were in there hand tight! I wish I knew that before driving around in the car for 4 months. Fortunately, the pass side was tight. I did need to POR15 the mounts though, they were showing signs of surface rust and just did this for good measure. These however were not the original bushings, they had to be replaced before because there were repair panels welded in on the mounts. Dont know how old they were, but the bushings were shot! I didnt dis-assemble the rag joint, I just dropped the steering wheel down from the dash to allow it to move with the body, this worked really well. Thanks for everyones help in here, I couldnt have done it without you. I will post picutres Monday or Tuesday. Once again, thanks a million, you all rock!!!
68 blkbrd, that looks familiar , we did that on a friends car here in Houston last january, 14 mo ago.....I do have some pics of that , I think...if you want to compare notes send me an email, I`ll forward my pics (cant post here) my email is bsefeldt@mhinc.com
If you look at them and they're all dried and cracked, you should change them before they fall apart. If they already fell apart, you should still change them
They measure 3/4 inch new, mine were anywhere from 1/4 to 1/2 inch and all mushy. See the pictures that I posted with the bushings, if they look like this they need to be replaced. If you are thinking of doing it let me know and I will send you some info about it.
Tried using a special Craftsman tool to remove the bolt, that didn't work, tried drilling the bolt entirely out, that didn't work. I ended up cutting the exposed bolt off and prying the caged nut "holder" up on one side and removing the cage nut with trapped bolt. The bolt had completely fused with the caged nut. Tried heat/cold cycles, penetrating oil, even welding a nut onto the bolt with the cage in a vise. I ended up drilling out the bolt center. Currently I'm just using a Grade 8 bolt, washer, locker washers with a nut. It's not pretty but it will work until I have the body work done. I will then have a new caged nut welded in.
")