Concours/original folks need not read further. But those who just want your taillight bulbs to light consistently, with all the exact same brightness, 100% of the time...read on...
As we all know, these tail lamps are chassis grounded, which can sometimes be an inconsistent annoyance depending on paint, rust, socket fit, fasteners, pinched gaskets, age, etc, etc.
When I plugged in my brand new repro wire harness to brand new bulbs, into my freshly restored and properly installed taillamps, I was greeted with one bright bulb and 3 dimmer bulbs. Wiggle/waggle action would make them change around at will. No amount of cleaning connection points seemed to get things consistent. So I re-engineered it a bit.
I know others here have utilized a "Ford/mopar" style metal socket for better grounding, which I feel is a good idea. Since I had brand new sockets, I didn't see much reason to go shopping again. And no matter which sockets you utilize (metal or plastic), I still feel a dedicated ground wire, securely bolted to a clean metal portion of the chassis (or direct to battery if feasible), is the ONLY way to properly ground any circuit.
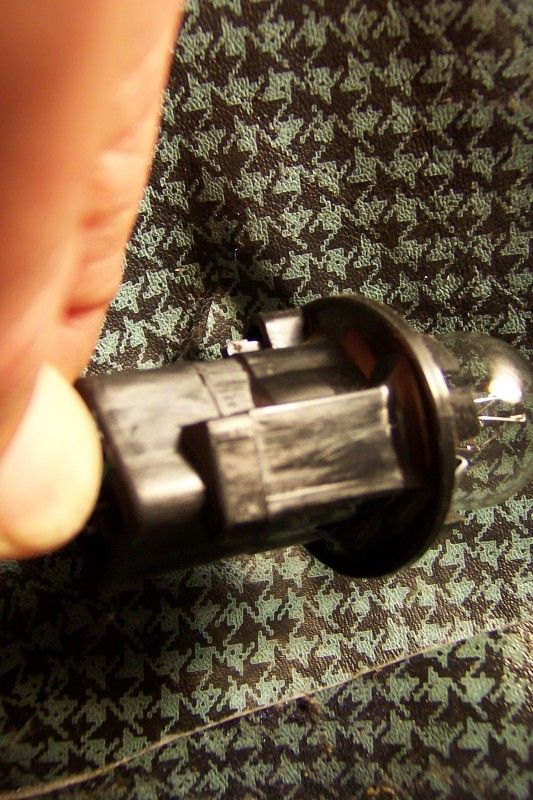
So the following 3 photos show how I took an original (repro) plastic Pontiac style taillamp socket, and quickly modified it to accept a dedicated ground wire.
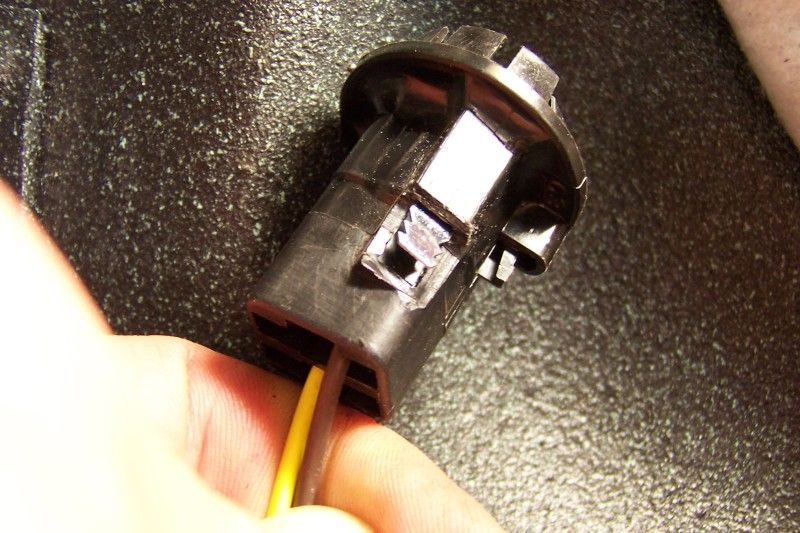
1. Unmolested socket. 2. Use utility knife to cut away the plastic to expose the retainer stub for the metal socket insert. Bend it out a little bit from the socket with small screwdriver/pliers. 3. Add a ground wire to this stub with a spade connector. Just crimp down the spade connector a little with pliers for a very tight fit, so the connector can't slip off.
I just linked the socket tabs all together with short wire runs, quality crimps at each spade connector, and 14 gauge wire, and then grounded that end wire to the chassis somewhere in the trunk with a good ring terminal, to a bolt that's perfectly clean and solid for a high quality ground. I worked my sidemarker lamps into this ground line also, just utilizing ring terminals on one of the attaching bolts for each lamp.
It all worked exactly as I hoped it would. I now have perfect and evenly bright taillights, with no more need to do a wiggle/waggle dance with the sockets every time the lights decide to do funny things...cuz they won't do funny things no more...
I just thought a few others here might be interested in a relatively easy fix for a common annoyance.
2012 Mustang Boss 302 #1918, Competition Orange. FGF replacement 2006 Mustang V6 Pony, Vista Blue. Factory ordered. 2019 BMW X3 (Titled to the wife, but I'm always driving it for her. So I'm claiming it) Old projects, gone but not forgotten: 1967 FB 400, original CA car. After 22 years of work, trashed by the guy who was supposed to paint it. I had to sell it. 1980 Turbo Trans Am 1970 Mustang fastback, 351C 4Bbl, auto 1988 Mustang GT, 5 speed 1983 F-150 4x4, built 302 1994 Chevy K2500 HD 4x4, 454 TBI
I think I should add something here for anyone who decides to follow me off this cliff...one possible minor challenge/disadvantage?
Remember when you expose that tab, you are also removing 50% of the retaining strength that holds the metal insert inside the plastic socket. So when bending the tab out, you need to give some of the strength back to that connection, to keep the socket insert fully seated. With this in mind, make sure you create a nice clean bend as far up the tab as possible, make sure the socket insert is stuffed as deep as possible while making the bend, and bend it out far enough that the new bend is actually providing the strength needed to keep that socket insert bottomed in the plastic socket (it seems to me that about a 45 degree bend is best...a little more bend than shown in my "finished" photo above, which wasn't really finished at all because I hadn't heat-shrinked the crimp connection yet...also highly recommended). If you let the metal insert walk up too high and leave it loose, you run the risk of losing connection for the 2 electrical contact points at the bottom of the bulb because the bulb will sit too high.
A nice tight spade connector shoved on as far as humanly possible also contributes to keeping the socket insert bottomed tight.
And I still may dab that connection in liquid electrical tape or silicone or similar which probably would add a little more security. Or I may not. It is a dry connection in a protected area...not worried about corrosion.
I believe it will hold very well indefinitely, unless wiring is bumped or manhandled repeatedly inside the trunk. But obviously you're going to need to check back with me in about 10 years for a longevity report...since my crystal ball is in the shop right now...
AND...for someone who REALLY wants security, it would take about 5 minutes to drill a small pilot hole thru electrical connector/tab and into the plastic socket body, and run a short screw into the hole, inteconnecting all three, to make this a truly secure electrical connection AND keep the socket insert bottomed fully forever, which will also resist all accidental trunk-bumps...in fact I am very likely to do this before messing with liquid electrical tape or sillycone...screws are cleaner and easier to remove if future disasssembly is needed.
And keep in mind...if this whole project doesn't work for someone else for whatever reason, or you screw one up while cutting/bending it? Replacement sockets are what, 5 bucks? I don't see a lot of risk here other than slicing tendons in half with your utility knife while whiddling the plstic...be careful!!!
2 of my 4 taillight sockets are rusted. One I am afraid to bend because I think it will crumble, the other I could probably sand down real good. Do you have a link where I can get new ones? Even if it includes the plastic housing.
Since we are talking about "non concourse", thought I'd add this..learned from Bjorn many years ago, did both of my 'birds with them, tail lights not working have been non issue since... readily available from local parts store
2 of my 4 taillight sockets are rusted. One I am afraid to bend because I think it will crumble, the other I could probably sand down real good. Do you have a link where I can get new ones? Even if it includes the plastic housing.
Just Google "68 Firebird Tail light socket" and you'll get hundreds of hits. And they can be found a local auto parts stores too...they are a pretty universal part. Roughly $3 to $8 each depending on where you buy.
I agree the metal ones like shown above would be a better choice for functionality, if being perfectly original is not critical.
Is there any difference between the inner and outer taillight socket? I wanted to go by the local autoparts store and don't have a chance to go take a look at my 69 firebird vert 350 to see if all 4 taillight sockets are the same
Honestly the metal ones bite better than these...I think these are a poor design and the cause of many problems. But I'm not sure if your goal is originality or not.
If diameter is about the same and they accept 2 filament 1157 bulbs, the metal ones designed for Ford/Chrysler often work better if you find those instead.
Since we are talking about "non concourse", thought I'd add this..learned from Bjorn many years ago, did both of my 'birds with them, tail lights not working have been non issue since... readily available from local parts store
glad you did Kel...they staty grounded and stay in place, never fall out!
But what if the housing it goes in to offers a poor ground? I was going to try crazecars method of adding a ground wire circuit to all the sockets by scraping off the plastic.
But what if the housing it goes in to offers a poor ground? I was going to try crazecars method of adding a ground wire circuit to all the sockets by scraping off the plastic.
If this is your plan, then I would suggest you NOT get the factory style plastic sockets, and I highly recommend the all-metal ones like shown in the photos above that Bjorn and 68blackbird used. Then all you'd need to do is attach a ground wire to the metal, and it saves you the hassle of having to cut away plastic to expose the metal. Just use a small ring terminal and a sheetmetal screw and attach a ground wire to each metal socket. That would be easier and more secure than what I did. The only reason I did what I did was because I had already purchased a complete new replacement rear wire harness, and I thought I'd go ahead and use it. But starting the project with metal sockets would have made it easier for sure.
To make the plastic socket above more robust... could also solder some #14 wire to that exposed tab (keep the bulb in to help dissipate heat from the soldering iron) ... heat sleeve the connection and glue with black Silastic (or pot the end entirely) and crimp an inline spade on the other end of the wire, with cable ties either side if it's loomed.
I too have has some issues with the sockets and was looking at options the next time they act up... good thread!
")