I know the cost could be all over the place depending on parts used, how much would be an average complete rebuild price for a 69 400?
Every shop Ive talked to will not rebuild it without just about replacing everything, pistons etc. Any thoughts on "most recommended brand part" during the rebuild? eg. -so and so's pistons etc.
Had ours rebuilt for $2,300 long block. Internally ballanced and .060 over. Included new water pump, timing cover, New pistons, rods, rockers and cams. milled heads, Dipped, magniflux and painted.
In line with Banshee's estimate, had an engine built last fall ~$3300 including hardened seats, all guides, Ferrea valves, cam, lifters, pushrods, and full service on lower end including balance, torque plates, etc.
Vikki 1969 Goldenrod Yellow / black 400 convertible numbers matching
When I rebuilt my own engines, I replaced everything and used the best parts. I used Ferreas instead of recutting old valves.. A savings of only $50-60 for both intake and exhaustif you look at how much it costs R&R valves and resurfacing them versus buying a new piece.
I tend to spend $500-700 more on an engine build for replacing parts that could be reused. I also like to replace the rods. But that depends on hot "hot" you plan on building it.
Si Vis Pacem Parabellum
1967 Starlight black PMD Engineering 400 Auto 1968 Alpine Blue 400 4 speed 1968 Verdoro Green 400 HO 4 speed 2013 1LE 2SS/RS Inferno Orange Camaro.
Thanks as always for everyone's help and comments, Im not really sure what to do here, the shop wants $2800-$3100 for the rebuild (I havnt asked yet what parts they are using) and $1100 R and R. So I'm probably looking at $4400 total w/tax or so. Not really $$$ I'd like to spend in an economy like ours right now.
You have to be joking me. I can R&R a Pontiac motor in less than 3 hours. Just the motor and not including a box of 4 letter words. This was at a break neck pack with a novice helper to get the car to the track. It can be done at a leisurely pace if you plan it out and know what to do in 10 hours.
You can R&R a Pontiac motor yourself and is not that hard. Hell, for 1/2 that, I would drive to your house, remove, deliver, pick up and reinstall that motor...And still make a profit. I was R&Ring these motors at 16 in less than 5 hours. Those guys are insane.
Find another engine installer.
And if you stick to that guy...tell him you want an itimization of the parts being used. And the R&R price brought down to maybe AT MOST $400. $1100 is INSANE!!!!
I suggest you print this out and show them.
My friend just had his 01 T/A R&R'd. LS1 motor and trans has to be done from underneath. Cost? $730.
$1100 is unrealistic, even at his "what his book labor rates state". It can be done by a moderately skilled person in 10 from start to finish including taking the core support out and the hood.
Si Vis Pacem Parabellum
1967 Starlight black PMD Engineering 400 Auto 1968 Alpine Blue 400 4 speed 1968 Verdoro Green 400 HO 4 speed 2013 1LE 2SS/RS Inferno Orange Camaro.
He said he figured 15 hrs. @ 75.hr., Im almost ready to "bail' on the car at that price. I really like it but by the time I spend $4400. on the rebuild, $6K for paint and a few other items I might as well by one thats done. Tempted to pull it myself, but between working 11-14 hr. days and feeling the age, I sure wish I knew someone I could trust to do it.
You can remove the motor yourself. If you have never done it before, plan on about 20 hours, but it is not difficult. A-Z getting engine out. A-F taking trans off..deliver engine, engine rebuilt, F-A trans back on, Z-A engine back in car and running.
Just intimidating.
Take hood off...take core support off (another hour) if you want it easier.
Take pictures, many of them, remove the parts and label them.
I am certain that if you get stuck, there are people here that will assist.
Si Vis Pacem Parabellum
1967 Starlight black PMD Engineering 400 Auto 1968 Alpine Blue 400 4 speed 1968 Verdoro Green 400 HO 4 speed 2013 1LE 2SS/RS Inferno Orange Camaro.
Also, I am sure there are a few local knowledgable Pontiac guys around you that would put that motor in for you for less than 1/2 of $1100 and at a cash price, $400-500 is about the going rate for an off the books install.
Si Vis Pacem Parabellum
1967 Starlight black PMD Engineering 400 Auto 1968 Alpine Blue 400 4 speed 1968 Verdoro Green 400 HO 4 speed 2013 1LE 2SS/RS Inferno Orange Camaro.
Banshees 100% right...save the $ and pull it yourself...
My rebuild, with new pistons, hardened valve/seats, oil pump, chain, and all the usual...was about $2400, long block by a fairly well known (in vancouver) pontiac guy...all I had to do was install the intake manifold, clutch and tranny and in she went...
actually come to think of it...it was more like $1,950.00, as I there was an extra $450 to fix the cracked block with some sort of fancy welding shop...which I wanted to do as it was numbers matching..
Last edited by Dave's White Rock '68 Droptop; 07/05/0808:50 PM.
My dad and I, definitely novices, will be pulling the engine out of a '68 either tomorrow or Monday. We'll do a photo documentary and run the time clock. Shouldn't take more than 4 or 5 to come out, a little more going back as we're replacing parts as we go.
Also R&R labor sure as heck isn't billed at $75 an hour...certified shops in our area don't charge anywhere near that, only $55-$65 an hour for SKILLED work, grunt work runs $35-$45.
Vikki 1969 Goldenrod Yellow / black 400 convertible numbers matching
I'll drive the car up on a pair of ramps to make this job a bit easier, then lower it before pulling the engine and trans as an assembly.
It's a 4 speed car. I'll pull the driveshaft, speedo cable, fuel line, engine harness, fan, carburetor, exhaust flange nuts, battery and cables and shifter handle, then support the trans with the floor jack and a board and remove the crossmember. I'll cap the tailshaft with a heavy plastic bag and some duct tape, because I haven't yet bought a tailshaft plug. The wiper motor is already off, or I'd remove it for its safety.
From the front, we're removing the hood, fenders and core support assembly as part of disassembly so it will come almost straight out instead of up and out. If you pull the hood and radiator and tilt up and out, use a load leveler on the hoist to easily get the correct angle during removal, and be sure to remove the fan.
Tranny and engine are best installed and removed as a unit unless you have a pit or hoist and a trans jack. Otherwise you have to wrestle the beast and fit your arms into places that even I have trouble with. And I have thin arms.
Vikki 1969 Goldenrod Yellow / black 400 convertible numbers matching
That's the best way to do it. It went in as one unit from the factory. It can be done with minor difficulty without removing the sheet metal. Just be sure to plug the tranny somehow, or you'll have a mess to clean up. I speak from experience on that note.
I'll post a photodocumentary thread on removal, and put the link here. It's easy...just requires reasonable care and attention to detail, and be very sure your hoist is in good operating condition. It's no fun to drop 600# on your car, or on the ground, or on yourself.
Start now, if you're not driving the car, by spraying PB Blaster on every fastener you can find. Crossmember bolts, engine mount through bolt, core support if you're going out the front, exhaust flanges.
Vikki 1969 Goldenrod Yellow / black 400 convertible numbers matching
I pulled mine this last year. I was surprised at how easy it really was. I hadn't pulled one since the early 80's (Mopar). What was a real surprise was how much easier it went back in!
I did same basic procedure as Vikki last month EXCEPT: did not remove crossmember(TH400)... drained tranny prior to removal did not remove wiper motor front sheet metal remained on car. Only issue I ran into was the starter hanging up on the chasis motor mount. (remove starter) I removed alternator, PS pump, radiator(of course), ...
I did this with no assistance. easy job. Just take your time and be careful. I WILL have help going back in...and a load-leveler would be useful...
I'm a hobbyist. Not a professional. Don't be hatin'!
Required removals: Battery cables (attached to engine, clipped to subframe) Starter (hangs on chassis motor mount as Greg said) Exhaust system (dropped is fine) Engine harness (can pull from bulkhead connector instead of removing wires) Engine mount bolts (one large on each side) Driveshaft Trans tailshaft mount bolts (missing on ours ) Crossmember (Greg, how'd you get the trans out?) Convertible X-brace (we were missing that piece, but it would have been necessary) Fuel lines Coil and bracket, distributor cap and wires (to avoid damage) Radiator and heater hoses Hood Leakproof bag taped over tailshaft Shifter handle (4 speed)
If we had not been using a load leveler, also: carb (to avoid chain damage). If using a load leveler, be sure to attach to the hoist so that the crank handle faces the windshield of the car.
Since the car is being totally disassembled, we also pulled the core support. That allowed the engine to come nearly straight out. Two bolts on each fender, two core support to subframe bolts, loosen lighting harness clips, and tilt forward and pull out.
We unbolted the trans from the bellhousing, the bellhousing from the engine, the pressure plate from the flywheel, and the flywheel from the crank after the engine was out.
There is nothing hard or technically challenging in this series of tasks. The toughest was probably pulling the flywheel bolts. Removal of the items above followed by the engine and trans took about 4 hours. We were working at a relaxed pace and had a lot of interruptions.
Vikki 1969 Goldenrod Yellow / black 400 convertible numbers matching
If we had not been using a load leveler, also: carb (to avoid chain damage). If using a load leveler, be sure to attach to the hoist so that the crank handle faces the windshield of the car.
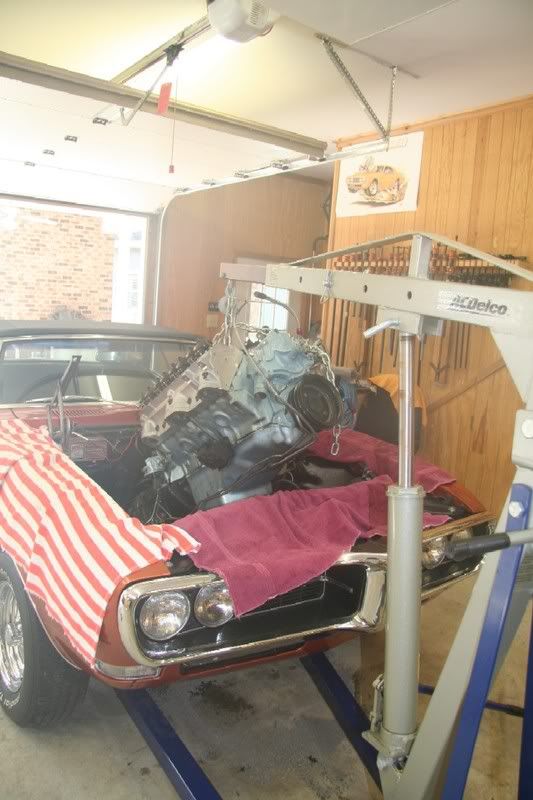
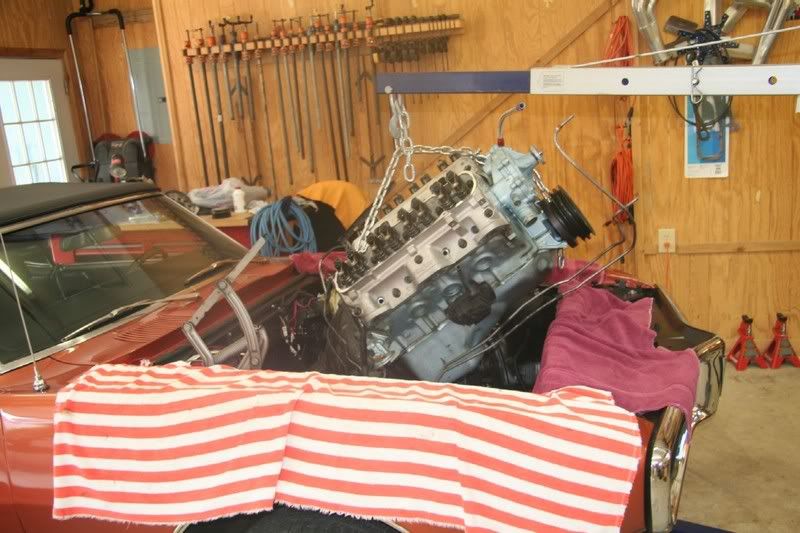
We starred in that movie! I bought the Harbor Freight load leveler when we pulled my engine. I bolted chains to four corners to make this stable. Work smart, not hard. This is not a difficult job if you use your head. I got the crank facing the wrong direction, so Yellowbird has warned you! My wife did most of the engine removal once I disconnected everything and hooked things up. She had anxiety attacks for three days before we tackled this. She was all grins when the engine was safely out. I highly recommend buying the leveler, even if you sell it later on eBay. It gives you great control over the massive weight of the engine and transmission. We pulled the engine and TH400 as a unit because I was not able to reach the cooling lines to do it any other way. I left the lines attached as it came out. To me, it is a no-brainer. Buy the leveler for $40. And face the crank so it doesn't hang up on the hoist.
Seeing a hoist that small with a load that large would give me anxiety attacks too!
I go for overkill on tools, though. I borrowed a massively rugged AC Delco model and we were able to roll the whole thing all the way back to the garage with no issues.
Vikki 1969 Goldenrod Yellow / black 400 convertible numbers matching
This crane was quite satisfactory and showed no sign of impending collapse. I did set it to only the second extension setting. It may have not been adequate on the longer setting to work on this car without the front core support removed. One needs to subtract 500 pounds from the optimistic markings on the crane.
My big complaint with the cheap crane is that the legs would not fit under the frame of the car. We had to raise the car up for this project. And I will have to remember that process in reverse unless I modify the crane design. I won't admit to undoing the engine bolts with the center crossmember sitting on a Sears jack, though there were many blocks underneath too. Here's another photos.
When we went to move the engine onto the engine stand, the crane legs got in the way. No, this crane is not a great item. You get what you pay for, or less. I would like to have bought a nicer crane, but this is all I could find without paying shipping for stuff sight unseen. This one was adequate. They are so cheap, I cut up two more of them to make my rotisserie.
The engine tilter is a no brainer. That is the point I am trying to make. Buy one of these tilteres before tackling this project unless you have lots of help and have done this before. If you've never pulled an engine with a carb plate and lots of help (like I haven't) , this is not a good place to learn. With the tilter, small ajustments and thinking replaced lots of help and great effort. My wife nudged the engine around while I followed her instructions to pump the ram.
You see in the photo a perfect example of the wrong direction to face the handle. It's easier to reach when faced that way, but later it is obstructed by the crane's arm.
There is lots of weight here. Keep it in control at all times. No Budweiser until it's all out. What a hard rule to follow!
I don't wish to hijack this one - but I have a question.
Can one really pull a V8/TH 400 combo together AND clear the radiator core support?
I pulled the old motor/tranny and installed the new ones with the front sheet metal off. I recently blew an oil pan seal and will have to pull it all out again. I really do NOT want to pull all the new sheetmetal off the front this time.
You can PM me to avoid really hijacking the thread.
I now return you to your discussion. Carry on.
2012 Mustang Boss 302 #1918, Competition Orange. FGF replacement 2006 Mustang V6 Pony, Vista Blue. Factory ordered. 2019 BMW X3 (Titled to the wife, but I'm always driving it for her. So I'm claiming it) Old projects, gone but not forgotten: 1967 FB 400, original CA car. After 22 years of work, trashed by the guy who was supposed to paint it. I had to sell it. 1980 Turbo Trans Am 1970 Mustang fastback, 351C 4Bbl, auto 1988 Mustang GT, 5 speed 1983 F-150 4x4, built 302 1994 Chevy K2500 HD 4x4, 454 TBI
Don't know about doing it with a TH 400, but I did it with my TKO 600 installed on the engine. You will have to put the front up on jack stands for the tail shaft housing to clear the ground until you can move the whole assembly back. Did this without a load leveler. Didn't know there was such a thing. guess I worked hard not smart Now I highly reccommend a load leveler! It will save you some paint and skin!
")