|
|
Joined: Oct 2014
Posts: 187
Member
|
|
Member
Joined: Oct 2014
Posts: 187 |
Now that we're putting the car back together after the body shop, questions are coming up.
*The front and rear shocks should be what color?
*What brand/type of trunk paint have you found best?
*Does anyone have photos of vinyl top trim clips in place before the trim is put on?
*How is the tail lamp wire harness secured to the top edge of the trunk lid opening on the left side? Clips available?
|
|
|
|
|
Joined: Feb 2013
Posts: 3,220
Senior Member
|
|
Senior Member
Joined: Feb 2013
Posts: 3,220 |
*The front and rear shocks should be what color?
Like a dove grey
*What brand/type of trunk paint have you found best?
I used eastwoods black Aqua splatter with a mat clear coat
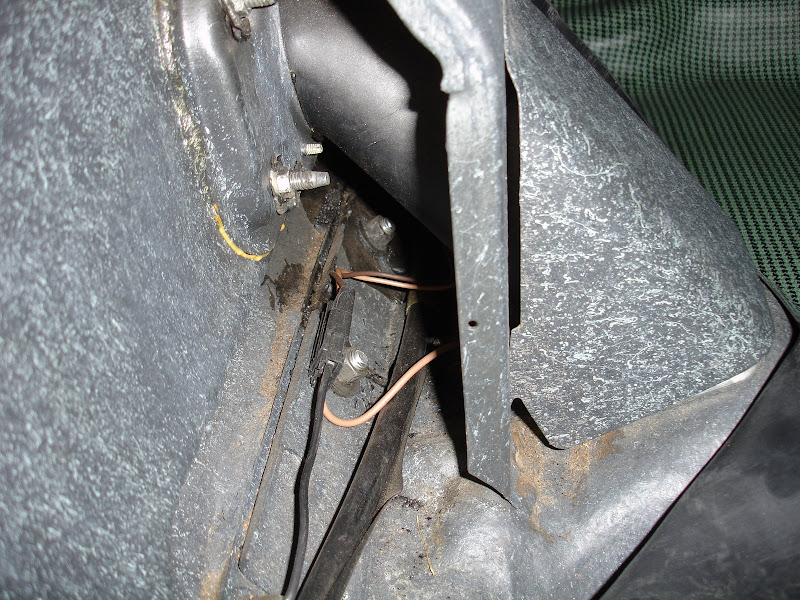
*How is the tail lamp wire harness secured to the top edge of the trunk lid opening on the left side? Clips available?
The harness goes along the bottom of the tail panel. It is secured with clips. It routes up the driver side on top of the wheel well. The clip get taped onto the harness cover and plug into the metal. Similar picture attached.
I should have plenty of pics in my gallery.
Last edited by HaroldB; 03/29/15 09:43 PM.
|
|
|
|
|
Joined: Oct 2014
Posts: 187
Member
|
|
Member
Joined: Oct 2014
Posts: 187 |
Thanks, Harold! Grey shocks it will be. I'll find some of the wire harness "T" clips. Eastwood sounds good for the trunk paint.
I think I found the needed info on the vinyl top trim clips. Only three studs are missing on our car--I found the holes under the vinyl. Clips slide over the studs.
Installing the short hose from the gas tank to the filler tube is a real challenge through the small opening on these cars! We got it done, but hands look like hamburger!
|
|
|
|
|
Joined: Oct 2005
Posts: 611 Likes: 3
Member
|
|
Member
Joined: Oct 2005
Posts: 611 Likes: 3 |
A couple pics during disassembly of my '68. Rear harness ran over the inner wheelhouse and under the tail light housing. If you look close where there is tape on the harness is where there are the little plastic pins which hold it in place. http://s1376.photobucket.com/user/davids...dnefax.jpg.html Thanks
Thanks,
Dennis
|
|
|
|
|
Joined: Jun 2010
Posts: 467
Member
|
|
Member
Joined: Jun 2010
Posts: 467 |
|
|
|
|
|
Joined: Jan 2002
Posts: 7,719
Power Member
|
|
Power Member
Joined: Jan 2002
Posts: 7,719 |
I thought somebody made the "correct" spray color for the original spiral shocks. I thought it was Eastwood's but it might be Classic Industries.
2012 Mustang Boss 302 #1918, Competition Orange. FGF replacement
2006 Mustang V6 Pony, Vista Blue. Factory ordered.
2019 BMW X3 (Titled to the wife, but I'm always driving it for her. So I'm claiming it)
Old projects, gone but not forgotten:
1967 FB 400, original CA car. After 22 years of work, trashed by the guy who was supposed to paint it. I had to sell it.
1980 Turbo Trans Am
1970 Mustang fastback, 351C 4Bbl, auto
1988 Mustang GT, 5 speed
1983 F-150 4x4, built 302
1994 Chevy K2500 HD 4x4, 454 TBI
|
|
|
|
|
Joined: Feb 2013
Posts: 3,220
Senior Member
|
|
Senior Member
Joined: Feb 2013
Posts: 3,220 |
Eastwood makes it but can not find it on their site. I found it on Ames Performance site. Ames Link
Last edited by HaroldB; 03/30/15 10:49 AM.
|
|
|
|
|
Joined: Jan 2002
Posts: 7,719
Power Member
|
|
Power Member
Joined: Jan 2002
Posts: 7,719 |
Agreed. I could not find it at Eastwood's either.
2012 Mustang Boss 302 #1918, Competition Orange. FGF replacement
2006 Mustang V6 Pony, Vista Blue. Factory ordered.
2019 BMW X3 (Titled to the wife, but I'm always driving it for her. So I'm claiming it)
Old projects, gone but not forgotten:
1967 FB 400, original CA car. After 22 years of work, trashed by the guy who was supposed to paint it. I had to sell it.
1980 Turbo Trans Am
1970 Mustang fastback, 351C 4Bbl, auto
1988 Mustang GT, 5 speed
1983 F-150 4x4, built 302
1994 Chevy K2500 HD 4x4, 454 TBI
|
|
|
|
|
Joined: Oct 2014
Posts: 187
Member
|
|
Member
Joined: Oct 2014
Posts: 187 |
We ordered the Ames trunk paint.
Thanks for the wire harness routing info. I thought it went to the top of the rear quarter and then down to the lights. The pictures make more sense. Who sells the plastic "Tees"?
|
|
|
|
|
Joined: Feb 2013
Posts: 3,220
Senior Member
|
|
Senior Member
Joined: Feb 2013
Posts: 3,220 |
Last edited by HaroldB; 03/31/15 05:52 PM.
|
|
|
|
|
Joined: Oct 2014
Posts: 187
Member
|
|
Member
Joined: Oct 2014
Posts: 187 |
We got the bumper installed and tail lamps with restored housings, side marker lights, repaired wiring to the tail lamp sockets (metal ones).
Next step is to pull the axles and refinish the brake backing plates and axle housing cover. It's a Chev 8.5 rear end, so we need to remove the C-clips to get the axles out and backing plates off. Also need to check tooth contact on the 4.11 ring/pinion. Owner remembers the rear end whined when last driven.
|
|
|
|
|
Joined: Oct 2014
Posts: 187
Member
|
|
Member
Joined: Oct 2014
Posts: 187 |
How much fluid (75W90) does the rearend hold? Which limited slip additive is best?
|
|
|
|
|
Joined: Feb 2013
Posts: 3,220
Senior Member
|
|
Senior Member
Joined: Feb 2013
Posts: 3,220 |
Last edited by HaroldB; 04/05/15 11:08 PM.
|
|
|
|
|
Joined: Oct 2014
Posts: 187
Member
|
|
Member
Joined: Oct 2014
Posts: 187 |
I see Valvoline and Amsoil make differential lube with the limited slip additive already in it. I bought Valvoline, as Amsoil's prices have skyrocketed out of reach for me.
|
|
|
|
|
Joined: Feb 2013
Posts: 3,220
Senior Member
|
|
Senior Member
Joined: Feb 2013
Posts: 3,220 |
Everyone still recommends adding the additive.
|
|
|
|
|
Joined: Oct 2014
Posts: 187
Member
|
|
Member
Joined: Oct 2014
Posts: 187 |
Vinyl top molding and front & rear window clips done. Rear wheel opening trim installed. We tried putting the drip rail molding on, but the vinyl overlapping the roof rail edge makes it impossible to install the trim. Several people suggested we trim the vinyl off the outside and top edge of the drip rail to make more room for the trim. That sounds like the best solution.
|
|
|
|
|
Joined: Feb 2013
Posts: 3,220
Senior Member
|
|
Senior Member
Joined: Feb 2013
Posts: 3,220 |
|
|
|
|
|
Joined: Oct 2014
Posts: 187
Member
|
|
Member
Joined: Oct 2014
Posts: 187 |
Thanks, Harold, for the compliment. We have a long way to go, but it's starting to look like a car again.
Is the windshield pillar external trim piece reproduced? If not, do you know of any available used?
|
|
|
|
|
Joined: Oct 2014
Posts: 187
Member
|
|
Member
Joined: Oct 2014
Posts: 187 |
We cut the vinyl off the drip rail edge and were able to put the trim on. I had a NOS set which does include all six pieces. Still tight, but doable.
Also got the master cylinder installed, lines modified, and brakes bled. We flushed out the old fluid and put synthetic in. No need to bench bleed the new master cylinder. We filled it on the car and bled the old school way with no trouble.
Installed the door windows last week along with window sweeps. Yes, as some have commented, the sweeps don't fit without mods. We had to re-drill the holes in the ends for the screws. The very sharp, rough-cut ends aren't so nice, either.
|
|
|
|
|
Joined: Oct 2014
Posts: 187
Member
|
|
Member
Joined: Oct 2014
Posts: 187 |
Also, how successful have you been on removing the rearmost bolt that holds the subframe to the body? Both sides, the rear bolt (about 5/8" or 3/4"), needs to be removed to replace a badly cracked/damaged rubber mount.
Is the bolt threaded into a typical cage nut that will spin when I try to remove the bolt, or is there a trick to getting the bolts out?
Last edited by bocoogto; 05/24/15 05:17 PM.
|
|
|
|
|
Joined: Mar 2012
Posts: 1,529 Likes: 41
Member
|
|
Member
Joined: Mar 2012
Posts: 1,529 Likes: 41 |
As I said on Py
soak in penertrating oil for a few days. Sprayed this one for 3 days and bolts came right out. And these were really rusted to hell.
Pontiac power
|
|
|
|
|
Joined: Oct 2014
Posts: 187
Member
|
|
Member
Joined: Oct 2014
Posts: 187 |
After installing and adjusting the door windows, I found these left over. Where do they go and what do they do?
I looked under the carpet. Yes, the bolts/cage nuts are accessible from the inside. I'm soaking them with oil so we can remove them and put new rubber mounts in place. They are virtually rust-free vs. the heads underneath that look bad. Thanks for the info.
|
|
|
|
|
Joined: Oct 2014
Posts: 187
Member
|
|
Member
Joined: Oct 2014
Posts: 187 |
Anybody? What are these brackets for? I found them with the door hardware.
|
|
|
|
|
Joined: Feb 2013
Posts: 3,220
Senior Member
|
|
Senior Member
Joined: Feb 2013
Posts: 3,220 |
Those are the brackets that mount inside the door and the rod from the door handle to the latch fastens in them to help keep them from rattling.
Maybe I'm wrong. I tried finding a picture of them in my restoration pictures but could not find a clear picture of them.
Last edited by HaroldB; 05/30/15 10:51 PM.
|
|
|
|
|
Joined: Oct 2014
Posts: 187
Member
|
|
Member
Joined: Oct 2014
Posts: 187 |
Thanks, Harold. I thought that's what they were, too, but there are already smaller brackets in place holding the door unlock rod. I can't find another place for these other brackets. They look like they're designed to hold a rod from rattling as you said.
They would fit toward the front of each door at the top inner ledge, but the paint pattern on them would put them at the angle in the picture---and, they don't look like they belong there. If that was the location, it would be to support the door panel.
|
|
|
|
|
Joined: Feb 2013
Posts: 3,220
Senior Member
|
|
Senior Member
Joined: Feb 2013
Posts: 3,220 |
I checked my books and I don't see anything like that on the the doors or quarter area. I don't believe it is part of the door.
I don't recall a bracket like that in my convertible. So maybe it has to do with something specific to the coupe? Maybe headliner, package tray area?
I'm stumped at this point.
Last edited by HaroldB; 05/31/15 11:15 AM.
|
|
|
|
|
Joined: Oct 2014
Posts: 187
Member
|
|
Member
Joined: Oct 2014
Posts: 187 |
You know far more about these cars than we do, so we're more stumped than you. We found another single bracket like this among a box of parts taken off a junkyard Firebird coupe years ago. This one has no paint on it at all.
It's either a rod guide as you suspected or a "hook" for interior trim, judging by the design. You can see marks in the pictures on one side (the bracket on the right side of the picture above) of the small hole where the screw head contacted the bracket.
|
|
|
|
|
Joined: Feb 2014
Posts: 140
Member
|
|
Member
Joined: Feb 2014
Posts: 140 |
The inside door panels hang on those brackets one for each side
|
|
|
|
|
Joined: Oct 2014
Posts: 187
Member
|
|
Member
Joined: Oct 2014
Posts: 187 |
Thank you James.
Where on the door panel do these brackets mount? I attached them just for a picture but have no idea where they should be mounted.
|
|
|
|
|
Joined: Feb 2014
Posts: 140
Member
|
|
Member
Joined: Feb 2014
Posts: 140 |
it goes up at the front of the door about 3" back when i get home I will try to post a picture
|
|
|
|
|
Joined: Feb 2014
Posts: 140
Member
|
|
Member
Joined: Feb 2014
Posts: 140 |
It looks like you have it in the right place I cant figure out how to add a picture so I will post a link to my build .
Oh here I got it
Last edited by JamesM; 06/13/15 01:56 AM.
|
|
|
|
|
Joined: Feb 2013
Posts: 3,220
Senior Member
|
|
Senior Member
Joined: Feb 2013
Posts: 3,220 |
Is those clips just for standard interior?
|
|
|
|
|
Joined: Feb 2014
Posts: 140
Member
|
|
Member
Joined: Feb 2014
Posts: 140 |
Is those clips just for standard interior? I'm mot sure of that I have a 69 standard interior so your guess is as good as mine
|
|
|
|
|
Joined: Oct 2014
Posts: 187
Member
|
|
Member
Joined: Oct 2014
Posts: 187 |
Thanks for solving the "mystery of the brackets!" That's the only screw hole on the inner door panel that would possibly hold the bracket. This car does have the standard interior.
We get the door panels next week, so we'll trial fit them with the bracket and report back.
|
|
|
|
|
Joined: Oct 2014
Posts: 187
Member
|
|
Member
Joined: Oct 2014
Posts: 187 |
A little more progress! Will have Goodrich T/A 255-70R15's on the back, 205-70R15's on the front. Wheels are 15X7.
|
|
|
|
|
Joined: Oct 2014
Posts: 187
Member
|
|
Member
Joined: Oct 2014
Posts: 187 |
Applied generous amount of Eastwood interior panel rust preventive in the doors and front of quarters (below quarter window). Will do the rear part of the quarter panels (through trunk) and bottom of the panel behind the rear window, pinch weld area inside the roof next.
FWIW, replacement of the four subframe body mounts was relatively easy. Bolts came out with a breaker bar and 1" socket and new rubbers, washers went in place of the old, rotted pieces. If you do this, be sure and note the order of assembly of the rubber, washers, sleeve, and bolt. The front mount rubber is thicker than the rear.
Installed the "mystery trim clips" on both inner door panels, thanks to jamesM. Harold, now we both know where they go.
|
|
|
|
|
Joined: Oct 2014
Posts: 187
Member
|
|
Member
Joined: Oct 2014
Posts: 187 |
Does anyone know of a source for the heavy tarpaper-like material used in the floor pans? Ours are all good except for the driver's side. The front one has holes in it and the rear one was missing. I don't see a need to buy a complete floor insulation kit for these two pieces.
There must be some type of roofing material or ? that would work for these pieces.
|
|
|
|
|
Joined: May 2008
Posts: 2,113 Likes: 1
Premium Member
|
|
Premium Member
Joined: May 2008
Posts: 2,113 Likes: 1 |
I know several people in the past have posted about getting material at Lowe's/Home Depot that greatly undercut the price of Dynamat. I think those were still foil lined.
Ames does sell a kit for $55 that is supposed to be similar to the factory version.
|
|
|
|
|
Joined: Dec 2007
Posts: 10,337 Likes: 3
Premium Member
|
|
Premium Member
Joined: Dec 2007
Posts: 10,337 Likes: 3 |
The heavy tar paper liners are sold by all the repop houses for around $20 for a pre cut set. Match just like originals.
I used to be indecisive. Now I'm not sure. I feel like I am diagonally parked in a parallel universe. 1968 400 convertible (Scarlet) 1976 T/A - 455 LE (No Burt) 1976 T/A New baby, starting full restoration. 1968 350 - 4 speed 'vert - 400 clone (the Beast!) 1968 350 convertible - Wife's car now- 400 clone (Aleutian Blue) (Blue Angel) 2008 Durango - DD 2008 GXP - New one from NH is AWESOME! 2017 Durango Citadel - Modern is nice! HEMI is amazing! 1998 Silverado Z71 - Father-daughter project 1968 400 coupe - R/A clone (Blue Pearl) (sold) 1967 326 convertible - Sold  1980 T/A SE Bandit - Sold
|
|
|
|
|
Joined: Aug 2011
Posts: 1,170 Likes: 1
Member
|
|
Member
Joined: Aug 2011
Posts: 1,170 Likes: 1 |
|
|
|
|
Forums57
Topics35,534
Posts298,850
Members8,862
| |
Most Online19,810
Feb 1st, 2026
|
|
|
0 members (),
2,192
guests, and
74
robots. |
|
Key:
Admin,
Global Mod,
Mod
|
|
|
There are no members with birthdays on this day. |
|
|
|


![[Linked Image]](http://lh4.ggpht.com/_VHDcf_V8f1M/TJaYw7duKmI/AAAAAAAANLE/Ibzhl3u5480/s128/DSC02725.JPG)


