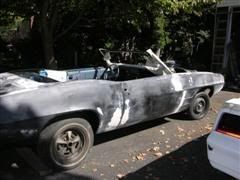
Anyone ever replaced door glass? I just got a hold of a replacement driver's window because mine was busted out when I got the car, and now I'm trying to get it in there. I've got the panel off and I spent the last 5 minutes of sunlight last night looking at it, but it seems to be a bit more difficult than just dropping it in like I thought (for some reason I continue to think any job on this car is going to be easy ). Plus it seems all the info I really need is in the Fisher body manual, not the service manual I have, so I don't have anything to really reference from besides my noodle.
A few questions I've come up with already are how best to remove the plastic moisture barrier without destorying it, or where to go about getting a new one if I must and what kind of adhesive to use when replacing it. I'm just afraid to peel it off and really start to get my hands dirty because rainy season is about here and at least a door without a window is better than a door without a window or moisture barrier/panel.
Sam 1969 Firebucket... I mean Rustbird... I mean... you know. Semper Fi
Your'e a Marine for gods sake! You should LOVE working in the rain!
Just messing with you my friend. We here are all proud as heck that you are trying to get that bird going without the joy of a garage to work in. I'm sure the Camp Pendleton Environment Cops are keeping an eye on you to make sure you don't spill a drop of oil or grease.
Vikki, I know we have the shop manuals on digits, but did we ever do the Fisher book on electrons? If so, we need to email it to our Marine here. hang in there! The door glass swap is a pain. Might be worth it to pay a pro glass shop to do the swap.
'68 428 HO M3 Monster, 4-on-the-floor! Need I say more?
Thanks for the encouragement John, you just have to be quick and smart and park the bird behind a bush and you can get enough time to do a few quick fixes. I'm out of here in about 5 weeks and heading back home, so I'm hoping inside the next 3 months I'll have a garage to call my own back home in Coloardo.
I got impatient and decided to dive in, manual be damned. Wasn't quite as hard as I expected once I got my hands into it. Luckily I opted to get the regulator the guy I got the window from had, because a couple of the rollers on the one in the door were busted off. So it went from a glass drop in, to a regulator swap and drop.
For some reason I decided the best way to do this was to take the rails out, fit them on the window and drop the whole thing in and be done. Well I guess an once of observation would have saved me the trouble of taking the rails out, and putting them right back in. I guess I forgot that a window is about 1/8" thick, and the rails are atleast 1" wide, so they don't fit well down the window slot. Once I got those back in I compared the rolling hardware on my new window with the busted ones I saved from the rails and found a stop or bumper that had to be transplanted, and moved it onto the new window.
Then came the "drop in". Well as stupid as it looks, that darn window felt bar is just thick enough to kill the clearance for the rolling hardware. So I took out the screws and gave the felt a little tug, and walked right into the biggest pain of the whole procedure. I must have spent 10 minutes trying to get the felt to come off without destroying it since it had already started to dry rot. I had maybe 20 minutes of sun left, and then I did what most Marines resort to in such a crisis. I pulled it really hard. Miraculously the first clip gave way (read: broke) and I figured out how to get the rest of it out.
Now for the "drop in". But after getting the back roller in, I found out that the transplanted stop was too big to fit through the slot. AH! Took that off, wiggled and squeezed and hit and prayed and the front dropped in. Lowered the window, lined up the regulator support bar, screwed it in and VOILA, instant window. A few bits of felt later and now I have a functional window.
Except now the rear quarter doesn't line up, and the moisture barrier is in the trunk, and I put a 1/2" hairline scratch in the tint at the front corner, and it's the only tinted window on the bird. BUT, I did manage to "do" the job in about 45 minutes with little more than a 7/16" socket and a little mechanical inclination.
Only thing now is, what type of adhesive should I use to reattach the dust/moisture cover? I'm looking at some double sided scotch tape and it's getting mighty tempting...
Last edited by Luminous; 09/29/0605:50 PM.
Sam 1969 Firebucket... I mean Rustbird... I mean... you know. Semper Fi
Luminous. Why don't you e-mail me and to show my appreciation for what you are doing for our country, I will make you an offer on a Fisher body manual you can't refuse. Barry weber6040@sbcglobal.net
You have some glass in the hole. That's all that really counts. As far as a professional. What possesses people into thinking that a monkey glueing in windsheilds can install that glass? I was a monkey glueing in windsheilds too, and I continued to glue in windsheilds because it went with the teratory, but it didn't take long for me to discover that installing frameless doorglasses was an area that allowed me to shine because most glassmen are at a total loss as to how to install one. In fact, it was the door glasses in the hump back Seville and Alante that put me where I am at today, and if it weren't for them I'd probabally still be ratteling around in an apartment, not living in a mortgage free homme.
The problem you're facing is that the quarter glass aligns with the door glass not vice versa, meaing that the doorglass adjustmet is done first; then, the quarter glass is adjusted to fit the doorglass. It's possible to do it the other way, but the best fitting adjustment will be done by doorglass then quarter.
It's tough to explain the adjustment. As you have found out, there is a fore/aft, in/out, and back/forth on both glasses. You just have to play with it.
The adhesive used is either 1/8" or 1/16" butal. I cannot remember because I have been out of the business for almost 17 years. What you can do is hold the top part of the sheild in place with tape, insert the "insert" areas of the sheilds into the inside bottom of the door. Then you can tape the edges with masking tape.
All I remember is, back in 1979 I tried to replace drivers door glass on my 1968 Camaro.
After two days of not getting it right, I drove back to the dealership (where I had bought the glass) and had them properly install it! A rather humbling experience, even though I was only 19 at the time.
'68 428 HO M3 Monster, 4-on-the-floor! Need I say more?
I guess impatience comes with the training. I love the fact that there are so many knowledgable people here, but when it comes right down to it, I really just want to dive right in. Which probably gets me in more trouble than anything . But I am a wee bit proud of myself having put the glass in without any horrible side-effects. Except for the realization that the rear-quarter doesn't line up right. It's like every job I do just leads to another...
Sam 1969 Firebucket... I mean Rustbird... I mean... you know. Semper Fi
I don't know if it's the discovery of new jobs that gets me, or the "job creep" that happens when I realize how much easier it will be to do a few at the same time, until it seems like I might as well dump the box out and start the puzzle from scratch.
Take for example the engine harness. Almost nothing is hooked up in the engine compartment, and the coil is jumped by a toggle switch in the car. But getting to that wiring harness is rediculously hard with the brake booster in the car. But I'm doing a disc swap anyway, so two birds with one stone, right? And you know what, that freaking steering coupler that doesn't have any rubber left will be about 100x times easier to get to without the master cylinder in. Might as well swap out a new steering column then too, wouldn't want to have to take the new brake booster off, or brake an arm later trying to get the coupler off. And as long as we are on steering, that power steering pressure line just has to be replaced, and lord knows you can't torque it while the master cylinder is in the car. And that front suspension is kind of worn, since the spindles are coming off with the disc swap I guess the coil spring and shocks are a quick change then. Ball joints too, might as well. And I do have a box of polyurathane control arm bushings, and thats just a few bolts away once the coil spring and shocks are off.....
It gets to be that I don't know when to START a job. Oh wait, I guess when I get a garage. It would be so nice.
Sam 1969 Firebucket... I mean Rustbird... I mean... you know. Semper Fi
The garage will help tremendously. Maybe hold off on big projects until then.
Once you do have a place to park and work on the car, recognize that you need to park it for a while. Then come up with a systematic plan to get the car where you want it. You can do that two ways:
One - Total Frame resto, where you know the car will sit for many, many months (or years) as you tear down and rebuild/replace.
Two - Progressive, well planned Phases that focus on specific areas and systems. This will allow you to periodically drive the car and enjoy a bit as each phase is completed.
There IS a Third way - The way you are doing it now, the way many do it. Fix one thing at a time and drive it and see what happens and how far you can drive her!
I prefer #2, as it is safer and can be well documented. I have also done #3, which is alot of fun and mysterious, but could leave you on the side of the road on a regular basis.
'68 428 HO M3 Monster, 4-on-the-floor! Need I say more?
")


![[Linked Image from hosting.photobucket.com]](https://hosting.photobucket.com/albums/ss328/alvey_john/john-alvey-1968-Firebird-oct2012-2.jpg)