|
|
Joined: Feb 2004
Posts: 1,480
Member
|
|
Member
Joined: Feb 2004
Posts: 1,480 |
Another Milestone has been reached with the car. Since I put the front end together I have not been happy with it. The moog springs never settled or would even come down from the bump stops. I didn't put the upper ball joints toghether correctly and one of my A-arm shafts had been tapped to use a corse thread bolt. My SS break lines just sucked and I could never get them to stop leaking. My carb was giving me some fits as well. So.....I riped into the front end, removed the springs, replaced the A-arm shafts, drilled the holes for the Goldstrand mod, re-did my uper ball joint so its now correct, pulled the carb cleaned it and tried to figure out what was causing my car to be such a pain to start and replaced the break lines. I had polygraphit bushing in the A-arms with old shafts. I took them to a shop to have them removed and they said they could not be removed without destroying them. I tried a 3-jaw puller and that did not work. I got out the air chisel, dulled the chisel by rounding it and was able to get them out without damage. The Goldstrand Mod went better then expected. I bought brand new bits and some mystic metal mover and followed the instructions to a tee. A few words of advice. You will throw metal shaving everywhere grinding down the A-arm perches. This sucks. The little metal shavings will melt into your clearcoat and get everywhere. On the passenger side the lower bolt hole you drill will be on a curved spot on the perch and will require a trimed down shim and also trimming of the A-arm.  I replaced the front springs with the Hotchkis BB springs. I don't know if they will settle more but I like my stance with them.  Putting in the new break lines was a pain in the a$$. I got the lines from Inline tube and I will be calling them this morning. A couple of things I was disapointed in was first the front lines were not right and second their were no instructins. The front line that goes across the cross member was really the only bad line to install. I had to remover the lower section of the motor mount to get the line in and in order to do that I had to take the pressure off the lower motor mount.  Lifting the engine.  Without instructions trying to figure out how this all went together was a little confusing. I broke out the 68 manual and looked at some picures in the Inline Tube catalog and figure it out.  Now this is what really makes me mad. The lines don't meet up with the break hose bracket.  The other side.  I can replace the driver side pretty easy but the passenger side will not be easy as you can tell. I already have the motor mounts back together. I checked my other FB and confirmed the front lines are not right. When I pulled the carb I notice a few things. The secondaries were not closing all the way and that something with the choke mechanism was not alowing the primary to close all the way. I did some cleaning and got the secondaries to close and discovered I have just a little slop with the secondaries. This carb was rebuilt by Cliff and has new bushings so I was surprised to find this. Then again this carb was brought back from the dead. This carb was very heavily pitted and was completly frozen up. I still don't know what is going on with the choke mechanisim. Their mus be a fast idle cam that opens the primaries a little more. I can move things around and get idle to come down. This is not working when the car warms up. I didn't mess with to much. I might need to buy cliff's book and do some reading.
Last edited by rohrt; 09/02/08 12:39 PM.
|
|
|
|
|
Joined: Mar 2004
Posts: 11,905
Valued Mentor
|
|
Valued Mentor
Joined: Mar 2004
Posts: 11,905 |
Let's see...you have a drum brake master cylinder, a disc brake holdoff valve, drum brake frame brackets, disc brake front brake lines, and you wonder why the lines don't fit right?
|
|
|
|
|
Joined: Feb 2004
Posts: 1,480
Member
|
|
Member
Joined: Feb 2004
Posts: 1,480 |
The MC is for Drums???? How can you tell? When I ordered it I asked for disc break MC for a 74 Nova. It was a Drum break car orginally. So your saying the brackets are different on a disc break car?
Any one have pics?
Thanks for the heads up Vikki.
|
|
|
|
|
Joined: Mar 2004
Posts: 11,905
Valued Mentor
|
|
Valued Mentor
Joined: Mar 2004
Posts: 11,905 |
It's possible it's correct for a different application, but it's not a Firebird disc brake master. http://thefirstgensite.com/library/brakes/brake3.htmIt's critical that you select the correct master, as the volume needs to be enough to fill the calipers (hence the large chambers on most disc brake master cylinders) and the absence of a residual valve on the disc brake circuit. The part number does not have to be correct, but the specifications do. For example, I currently have a '71 GTO power disc master cylinder on my '69 power disc Firebird. It does not look right, but the specs are identical. Yes, the frame brackets are different on a disc brake car.
|
|
|
|
|
Joined: Feb 2004
Posts: 1,480
Member
|
|
Member
Joined: Feb 2004
Posts: 1,480 |
Thanks Vikki, I will get the # off the MC and do some research. Yes, the frame brackets are different on a disc brake car.
Any one have a correct disc break picure of the bracket and line?
|
|
|
|
|
Joined: Mar 2004
Posts: 11,905
Valued Mentor
|
|
Valued Mentor
Joined: Mar 2004
Posts: 11,905 |
The bends in the lines that you have look correct, though it looks as if the lines have been bent up in an attempt to fit. I don't have a photo of the correct brackets and am currently looking for two sets myself. They are different than the 1969 brackets, and the "disk brake brackets" sold by Inline Tube are totally incorrect. John "Hammered" has a pic of the four piston frame brackets: 
|
|
|
|
|
Joined: Feb 2004
Posts: 1,480
Member
|
|
Member
Joined: Feb 2004
Posts: 1,480 |
Well that answered my next three questions.
I didn't bend anything on the lines or try and make them fit. The driver side pic might make it look like I have but I didn't have the line secured to the frame yet.
So it sounds like Inline has brackets but not correct brackets. I looked at my ames and classic industries catalog and they don't list a 68 bracket.
I wonder if I can just do some drilling and flip the bracket upside down? As much as I like keeping factory appearing I just need to have breaks.
|
|
|
|
|
Joined: Jul 2005
Posts: 3,889
Senior Member
|
|
Senior Member
Joined: Jul 2005
Posts: 3,889 |
The MC is for Drums???? How can you tell? When I ordered it I asked for disc break MC for a 74 Nova. It was a Drum break car orginally. So your saying the brackets are different on a disc break car?
Any one have pics?
Thanks for the heads up Vikki. Here's a pick of the correct factory disk brake master cylinder. In this pic, the brace for the distribution block is missing, since corrected. 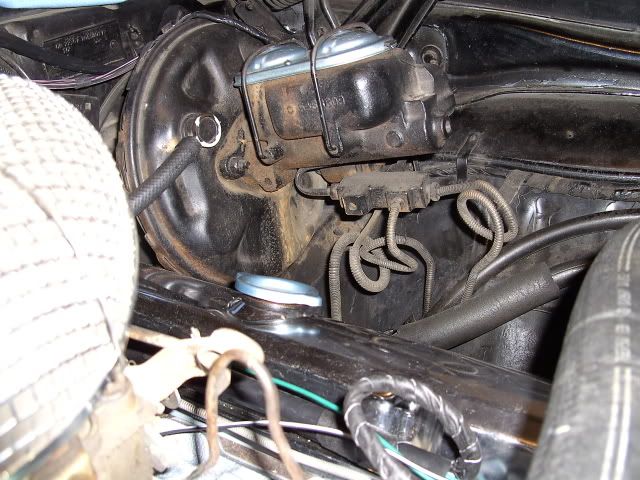 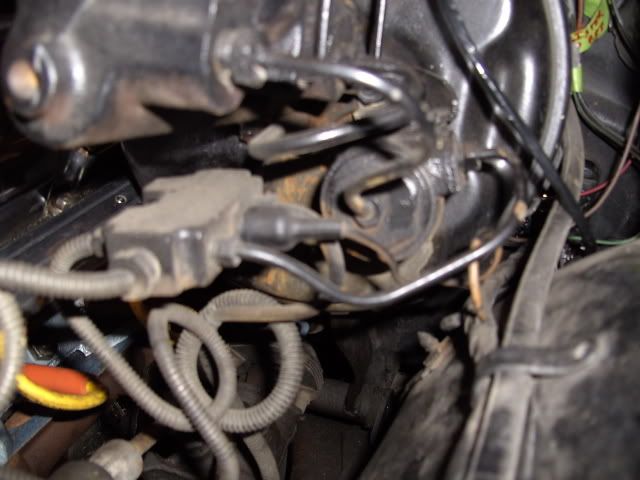 The cylinder you have is for drum. The next pic is the MC from my drum brake cammer. 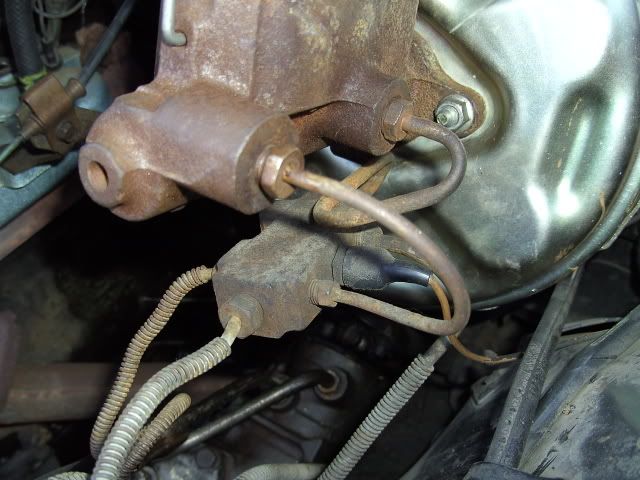 These are the locations for the disk brake line brackets for the caliper hoses. '67-8 might be different. '67-8 are different. I didn't see Vikki's post at first. 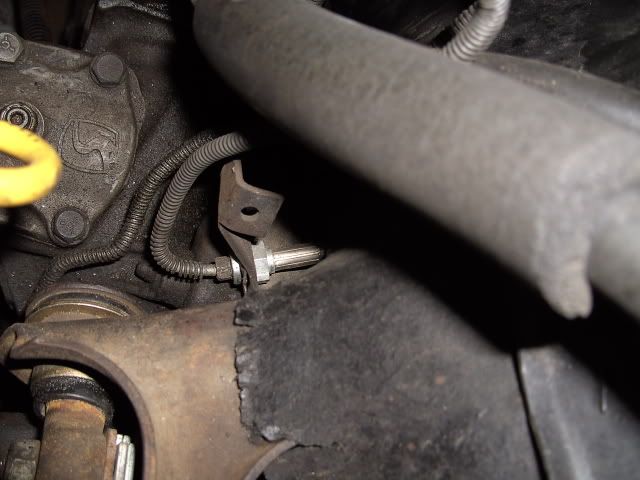 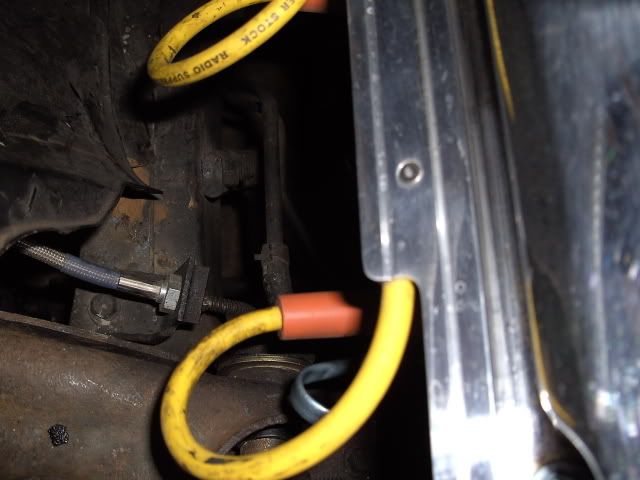
Last edited by if6was9; 09/02/08 05:43 PM.
Tom '69 Firebird 400 4spd conv  
|
|
|
|
|
Joined: Mar 2004
Posts: 11,905
Valued Mentor
|
|
Valued Mentor
Joined: Mar 2004
Posts: 11,905 |
I went back to Inline Tube and the brackets they sold me were for four piston caliper Camaro, and mount to the caliper. They were returned, and the replacement brackets are also Camaro brackets, simple L shape shorter than the originals, but mount on the frame in the correct orientation. I will mount them and post pics if successful.
|
|
|
|
|
Joined: Nov 2004
Posts: 3,114
Senior Member
|
|
Senior Member
Joined: Nov 2004
Posts: 3,114 |
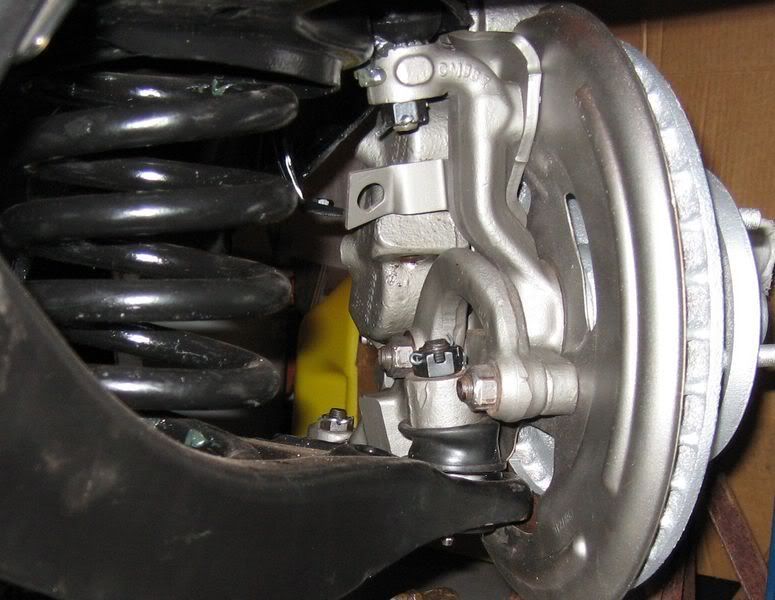
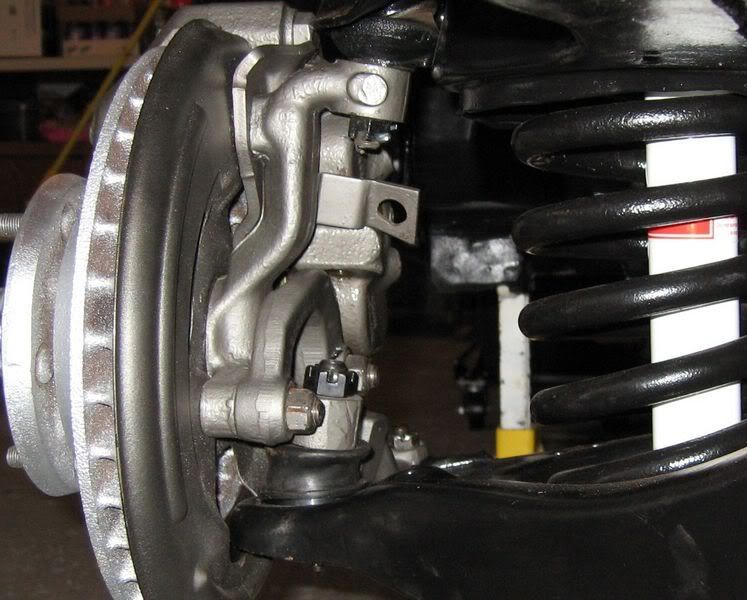
You might as well use the Camaro brackets as the flex hoses are designed for them and would need to be modified in order to work with the Firebird brackets. I had to do this with mine and it took a fair amount of time that should of been unnecessary. From the package: 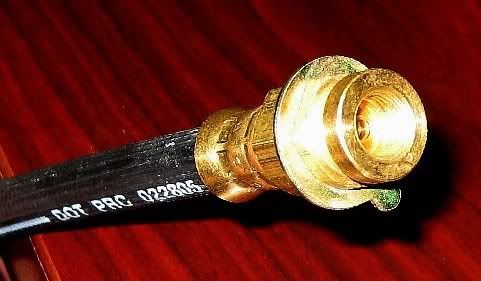 Rounded the hex portion: 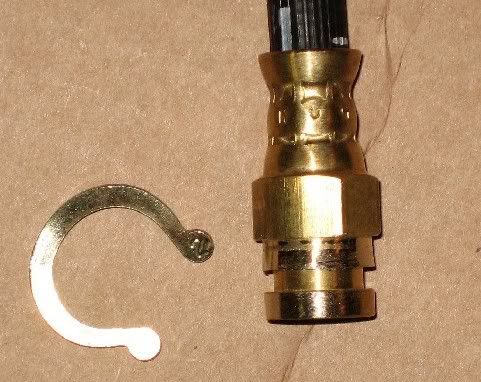 Ground down a flat side:  Re-installed clip: 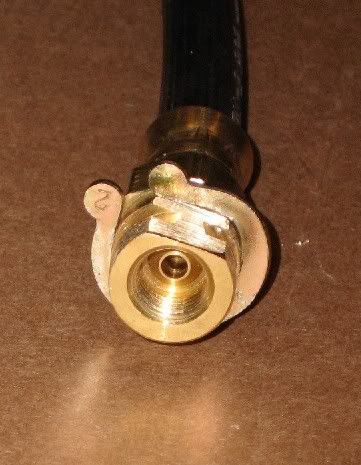 Installed:  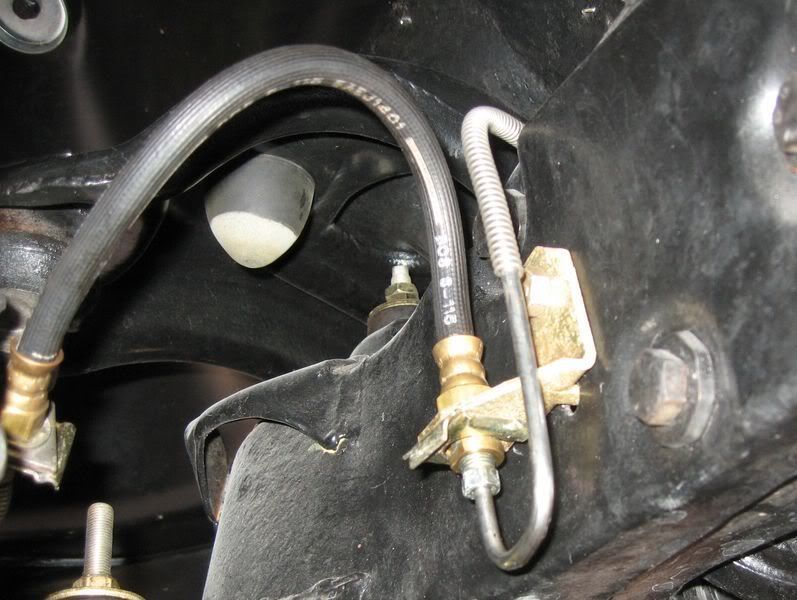
Last edited by catalina; 09/02/08 08:26 PM.
68' Firebird 400 convertible, numbers matching, solar red w/ deluxe parchment interior. 66' Pontiac Ventura Hardtop 66' Pontiac Catalina Convertible
|
|
|
|
|
Joined: Jun 2003
Posts: 1,739
Member
|
|
Member
Joined: Jun 2003
Posts: 1,739 |
Vikki is correct on the brackets and I agree with her that it looks like you've got a drum master. The Camaro brackets won't fit on the Firebird caliper because it is larger than the Camaro caliper: All About 4 Piston Brakes
|
|
|
|
|
Joined: Feb 2004
Posts: 1,480
Member
|
|
Member
Joined: Feb 2004
Posts: 1,480 |
Anyone have comments on this Ebay unit? ebay MC This appears to match the discription>>> 1969 Firebird application: all power front disc brakes/ rear drum Master cylinder casting # 5468309, factory part # 5469357 code: GA primary piston: shallow push rod hole secondary piston identification: 3 rings bore diameter: 1.125" distribution: 69/31 port location/routing=front-front/rear-rear port sizes: front= 1/2"x20, rear= 9/16"x18 line wrench size, front and rear, 9/16"
|
|
|
|
|
Joined: Mar 2004
Posts: 11,905
Valued Mentor
|
|
Valued Mentor
Joined: Mar 2004
Posts: 11,905 |
That's a reproduction of a '69 disc brake master, and will function just fine. Be sure you have the correct master cylinder pushrod, and that you move the pedal link if necessary.
|
|
|
|
|
Joined: Jul 2005
Posts: 3,889
Senior Member
|
|
Senior Member
Joined: Jul 2005
Posts: 3,889 |
That repop looks like a nice copy for '69.
Tom '69 Firebird 400 4spd conv
|
|
|
|
|
Joined: Feb 2004
Posts: 1,480
Member
|
|
Member
Joined: Feb 2004
Posts: 1,480 |
Can anyone tell me if these Disc Hose Brackets look correct? Ebay These don't look like Yellow Birds?
Last edited by rohrt; 09/08/08 12:14 AM.
|
|
|
|
|
Joined: Nov 2004
Posts: 3,114
Senior Member
|
|
Senior Member
Joined: Nov 2004
Posts: 3,114 |
My opinion, for 67-68 4 piston, Firebird, no.
68' Firebird 400 convertible, numbers matching, solar red w/ deluxe parchment interior. 66' Pontiac Ventura Hardtop 66' Pontiac Catalina Convertible
|
|
|
|
|
Joined: Mar 2004
Posts: 11,905
Valued Mentor
|
|
Valued Mentor
Joined: Mar 2004
Posts: 11,905 |
Those are the same items that Inline Tube sold me. They claim they are for four piston '67-68 and mount on the caliper. I cannot comment on that, but I told them I have their disc brake complete kit and those sure as heck would not work with that.
|
|
|
|
|
Joined: Nov 2004
Posts: 3,114
Senior Member
|
|
Senior Member
Joined: Nov 2004
Posts: 3,114 |
68' Firebird 400 convertible, numbers matching, solar red w/ deluxe parchment interior. 66' Pontiac Ventura Hardtop 66' Pontiac Catalina Convertible
|
|
|
|
|
Joined: Mar 2004
Posts: 11,905
Valued Mentor
|
|
Valued Mentor
Joined: Mar 2004
Posts: 11,905 |
Cool, so at least they are "real"...but the key pieces are those frame brackets!
|
|
|
|
|
Joined: Nov 2004
Posts: 3,114
Senior Member
|
|
Senior Member
Joined: Nov 2004
Posts: 3,114 |
My comment still stands. I do not think they are right. The bends and the hole shape are different than the stock ones on my car as shown in the pics. Maybe Terry can confirm? He's probably seen dozens of sets over time.
68' Firebird 400 convertible, numbers matching, solar red w/ deluxe parchment interior. 66' Pontiac Ventura Hardtop 66' Pontiac Catalina Convertible
|
|
|
|
|
Joined: Feb 2004
Posts: 1,480
Member
|
|
Member
Joined: Feb 2004
Posts: 1,480 |
Well I got a chance to do some more work. I swapped the right brake line brakets with the left and fliped them upside down. Before After  Before After  I also got my 69 M/C. I got it all air bubles out and after two trips to town I was able to find the correct cast Iron gray to paint it. It has four coat of paint on it now.  Before After  I got the swaybar connected. I was having trouble getting the nut started so I needed a way to compress the bushings. Those bottle jacks sure come in handy.  I took my sway bar off the back. Recommended by the Pro-touring forum. Its now for sale if anyone is interested.  After all this I decided to start it up again. It fired up once quick and then died. On the second attempt the starter gear stayed engadged. The key was doing nothing. I used a screw driver to pop the gear out. I tried it again and it did the same thing. Not sure if I need a new starter or if it just needs some more shims. Next on the to do list. 1. Bleed the break lines 2. Install the AGR power stearing pump and new lines. 3. exhaust install 4. Install weather stripping.
|
|
|
|
|
Joined: Jul 2005
Posts: 3,889
Senior Member
|
|
Senior Member
Joined: Jul 2005
Posts: 3,889 |
Not sure if I need a new starter or if it just needs some more shims. Try shims first. They're a lot less expensive than a starter. And if ya need a new starter, ya still may need to shim it. Good to see ya got your brakes back in shape!
Tom '69 Firebird 400 4spd conv
|
|
|
|
|
Joined: Feb 2004
Posts: 1,480
Member
|
|
Member
Joined: Feb 2004
Posts: 1,480 |
I finaly got around to bleeding the brakes To shorten up a long story, I found that If I opened the bleeder after the pedal was released it would suck back on me. I pulled the MC back off and put my nicly painted MC in the vice to re-bleed it again. The back resevoir seemed to work and had no air, I could press in the plunger and pinch the bleeder line without the suck back problem. The front resevoir had air in the lines that just wouldn't go away. If I tried to pinch the bleeder line it would still suck back. (Not sure that a proper testing technique) The questions: I assume it must be safe to say that I have somthing wrong with the plunger? Is this somthing that I could fix myself with out sending the whole thing back? Why are there bleed valves on the MC? Are there any special ways of bleeding this type of system that have a hold off valve? The other thing I worked on was the PS pump. I bought an AGR unit from someone on EBay. He said was new and it looked new. No signs of dirt or that it had ever been installed.  I unscrewed the Main hi pressure fitting and found gritty meterial inside. You cant see it from this side of the picture but you can see the difference between the stock and the Hi-performance fitting.  It looked to be caked in the groove of the brass fitting inside. I partally dissasembled it and cleaned it the best I could without tearing the whole pump completley apart. I cleaned the housing and painted it again. It looks like crap compared to the first time I painted it. I also cleaned the power steering lines inside and out and put a new hose on the return line. I would have liked to find someone who could duplicate the wire band compression fit style clamp but didn't find anyone who could.  Over all it was a dissapointing day. I didn't even get a chance to start it.
Last edited by rohrt; 03/22/09 04:48 PM. Reason: Added pictures
|
|
|
|
|
Joined: Feb 2004
Posts: 1,480
Member
|
|
Member
Joined: Feb 2004
Posts: 1,480 |
Well I got to spend another day on the car. Since the last time I finally figured out the breaks and got them working. Now I'm working on keeping the car running and putting on the weather stripping. I found two things with the poor starting and ideling. 1. loose terminal on the coil 2. Timming to retarded. I played around with the choke a little. I wasn't getting enough spring action to close the choke.  I pulled the choke spring housing off and adjusted the tension. I didn't even know that was an option. I had a heck of a time getting it move but I got it loose.   I worked on the weather stripping next. This is a soft seal kit from ames. Some things I like is that it comes with screws and had the fuzzy replacement material. The one on the Left is the original and the one on the right is the replacement. The original had more cusion to it and was more fuzzy.  One questions I would like to know. Do you guys use weather stripping adhesive? The 3M black stuff doesn't work very well and the Yellow stuff, well... Its yellow. I had one driver side where the felt was to long. It stuck out past the door.  The other side was fine but I did have to drill one new hole for the screw.  So I used the Dremel tool and trimed it to size. 
|
|
|
|
|
Joined: Jan 2002
Posts: 7,719
Power Member
|
|
Power Member
Joined: Jan 2002
Posts: 7,719 |
Try the paperclip trick with the starter. Push the starter drive gear out with a screwdriver and try and slip a bent paperclip between the starter drive gear and flywheel teeth. Shim until the paperclip has just a bit of tension on it like a feeler gauge.
Personally I like the black weatherstip glue the best, but it sure takes it a while for it to start to hold.
2012 Mustang Boss 302 #1918, Competition Orange. FGF replacement
2006 Mustang V6 Pony, Vista Blue. Factory ordered.
2019 BMW X3 (Titled to the wife, but I'm always driving it for her. So I'm claiming it)
Old projects, gone but not forgotten:
1967 FB 400, original CA car. After 22 years of work, trashed by the guy who was supposed to paint it. I had to sell it.
1980 Turbo Trans Am
1970 Mustang fastback, 351C 4Bbl, auto
1988 Mustang GT, 5 speed
1983 F-150 4x4, built 302
1994 Chevy K2500 HD 4x4, 454 TBI
|
|
|
|
|
Joined: Feb 2004
Posts: 1,480
Member
|
|
Member
Joined: Feb 2004
Posts: 1,480 |
Thanks salmon,
I'm over that hump. I put in 1 thick shim and now it doesn't get stuck. I do still have a hard start problem. Battery is new, lines are new. Starter is old. I guessing I'm going to have to get a RobMC unit. Sometimes it turns over real good and other times it just can turn over at all. I really question the AC delco batter I put in too.
|
|
|
|
|
Joined: Jan 2002
Posts: 7,719
Power Member
|
|
Power Member
Joined: Jan 2002
Posts: 7,719 |
I got the high torque mini-starter from Ames. Man, it cranks my new (tight) 455 over with no problems.
2012 Mustang Boss 302 #1918, Competition Orange. FGF replacement
2006 Mustang V6 Pony, Vista Blue. Factory ordered.
2019 BMW X3 (Titled to the wife, but I'm always driving it for her. So I'm claiming it)
Old projects, gone but not forgotten:
1967 FB 400, original CA car. After 22 years of work, trashed by the guy who was supposed to paint it. I had to sell it.
1980 Turbo Trans Am
1970 Mustang fastback, 351C 4Bbl, auto
1988 Mustang GT, 5 speed
1983 F-150 4x4, built 302
1994 Chevy K2500 HD 4x4, 454 TBI
|
|
|
|
|
Joined: Feb 2004
Posts: 1,480
Member
|
|
Member
Joined: Feb 2004
Posts: 1,480 |
I gotta vent today. 2 days of work on the car and hardly a thing to show for it. I trid to tackle the exhaust. The system is from RAMAIR restoration. I origanly bought the kit before it was revamped for the convertible. So I bought the 6 pieces for the Convertible. The turn downs and mufflers were on the car already. Nothing went right.  For some dumb reason I thought I could use the factory hangers. This is the old one that I replace. Sorry I din't take a picture of the new ones.  I also replaced these straps with the factory hangers. Sorry I didn't take on this one either.  Well after I messed with it for a few hours I gave up. I just don't see this as a do it yourself kit unless my hybrid kit won't work. I see several differences between what I have and what is shown on their web page. MY pipes from the turndowns to the X crossover were not flared where they would connect to the turndown pipe. My tail pipes are one piece not two. My tail pipes put the muffler at an angle pointing in tword the drive shaft not strait. This may have to do with the factory hangers. My original kit did not have any hangers. The tailpipes I used from the original kit are not mandral bent. No way the x crossover is going to fit under the body brace without spacers. Just frustrating as hell. 
Last edited by rohrt; 05/23/09 01:00 AM.
|
|
|
|
|
Joined: Feb 2008
Posts: 2,157
Member
|
|
Member
Joined: Feb 2008
Posts: 2,157 |
I hear ya!
We spent a week trying to get our exhaust system to fit right. One of the most frustrating things on our restore. I will never use clamps again. Now I'm scheduled to take the car in for a custom bent welded system for $600. I'll toss the kit we bought.
WAPITA
|
|
|
|
|
Joined: Jan 2006
Posts: 9,027
Power Member
|
|
Power Member
Joined: Jan 2006
Posts: 9,027 |
I used RARE's kit without the x-over. Went in well with minor tweaking. after I got it all in I did however take it in and get it welded up. The only comment is that the guys at the shop were mumbling that i should have just had them custom do it...yada yada.
Does RARE not have the flattened crossover now? They had only the one you pictured 2 years ago so I opted to omit it for now.
The other minor PO is that the mufflers I bought thru them are a tad brash under initial acceleration etc. They sound nice at highway speed...but I may change them out for something a bit mellower.
Next time I would have it custom done.
Last edited by Dave's White Rock '68 Droptop; 05/25/09 02:49 PM.
|
|
|
|
|
Joined: Feb 2004
Posts: 1,480
Member
|
|
Member
Joined: Feb 2004
Posts: 1,480 |
I got a chance to speak with Paul at RARE.
They have great support very nice and helpfull.
It does sound like some improvments have been made to the system since the time I bought my original system 5+ years ago. The mufflers, the addition of exhast hangers that weld to the system and tail pipes.
Paul commented that the Convertible system is the most difficult to put in due to the belly pan tolerances and being a multiple piece x system and unless a person has experience putting in a multi piece exhaust system he would recomend a proffesional installer. I have no doubt about the convertible sytem being the most complex, and considering I don't want to use the ball and cones this increased the complexity for myself.
I called a muffler shop that does custome work and explained what I have and they didn't think it would take over 2 hours of work to install. I would be pretty happy with that. I would say this is not a DIY unless your skilled in exhast work.
Dave I found out that i have what is called the texas TA mufflers. RARE doesn't carry them anymore. They suggested their Gorilic xcelerators to me when I asked what the most quiet of the ones they sell. I'm 15 years older now from when I started this car project now that I'm an old fart I would rather have a more quiet system. I'm sure I will change out the mufflers at some point. Got to get the system in first.
|
|
|
|
|
Joined: Jan 2006
Posts: 9,027
Power Member
|
|
Power Member
Joined: Jan 2006
Posts: 9,027 |
I was trying to recall what mine were called but they do not carry them anymore either, perhaps they too are the Texas TA ones, they are black, rectangular, and 3.5 in. deep (that's why I liked them, fit in the step nicely) The mp4 clip he had did not sound so bad....
Is this what yours look like?
|
|
|
|
|
Joined: Jan 2006
Posts: 9,027
Power Member
|
|
Power Member
Joined: Jan 2006
Posts: 9,027 |
just looked online, yep, thats them, and the soundclip sounds the same....may try the Gorlicks...when do you think you will have yours fired up?
|
|
|
|
|
Joined: Jan 2006
Posts: 9,027
Power Member
|
|
Power Member
Joined: Jan 2006
Posts: 9,027 |
If you are talking again to Paul at RARE, ask him the depth of the recommended Goerlichs...I went to their (Goerlichs) website and it indicates either 4.25 x 9 or 5.5 x 11. The T/As are 3.5" which I liked as the did not drop beyond the step. 5.5" is too much IMHO.
|
|
|
|
|
Joined: Feb 2004
Posts: 1,480
Member
|
|
Member
Joined: Feb 2004
Posts: 1,480 |
|
|
|
|
|
Joined: Dec 2007
Posts: 10,338 Likes: 3
Premium Member
|
|
Premium Member
Joined: Dec 2007
Posts: 10,338 Likes: 3 |
Looks very nice. Well done!
I used to be indecisive. Now I'm not sure. I feel like I am diagonally parked in a parallel universe. 1968 400 convertible (Scarlet) 1976 T/A - 455 LE (No Burt) 1976 T/A New baby, starting full restoration. 1968 350 - 4 speed 'vert - 400 clone (the Beast!) 1968 350 convertible - Wife's car now- 400 clone (Aleutian Blue) (Blue Angel) 2008 Durango - DD 2008 GXP - New one from NH is AWESOME! 2017 Durango Citadel - Modern is nice! HEMI is amazing! 1998 Silverado Z71 - Father-daughter project 1968 400 coupe - R/A clone (Blue Pearl) (sold) 1967 326 convertible - Sold  1980 T/A SE Bandit - Sold
|
|
|
|
|
Joined: Jan 2006
Posts: 9,027
Power Member
|
|
Power Member
Joined: Jan 2006
Posts: 9,027 |
Those are the same mufflers I have.....personally, I will be changing them out one of these days for something mellower...they can be pretty brash on acceleration, but do smooth out at highway speeds...
|
|
|
|
|
Joined: Feb 2004
Posts: 1,480
Member
|
|
Member
Joined: Feb 2004
Posts: 1,480 |
Put in the tail light harness. Put in new bulbs 1157 on the outside, 1156 in the middle. Attached the rear harness to the Main harness. No lights. Hmmm. Ah! No fuses. This is a brand new main harness. I Pull out the old main harness. Almost every fuse is wrong. I buy a box of 10, 20 and 25 amp fuses. This is a pic of the new main harness fuse box.  Hear is a good tip for anyone doing a long term restoration. Don't put the wipers blads on until you can power on/off wiper motor and find the resting position of the posts. Hear is a good tip for anyone doing a long term restoration. Don't put the wipers blads on until you can power on/off wiper motor and find the resting position of the posts.I had the whole thing apart years ago and didnt think much about putting the blads on. When I put the wiper motor fuse in and turned them on. It worked! I shut them off and found the wipers stopped on the cowl and took a couple of nice chips in the paint. I pulled them off and re-adjusted them and touched up the paint. I finally was able to get the ignition cylinder out and change the bezel. The trick was this. *Insert key turn to 11 O'clock position *Insert wire into small hole (Should be able to feel the spring loaded plunger) * I then had to keep turning the key CCW 9 O'clock position. * I then slowly turn it back CW while pulling on the key and it poped out. You have no idea how much trouble I had getting this out. The new bezel looks nice. With the fuses in the tail lights were finally on. Now how to shut them off. I got the break switch and put it in. Hmm To Short! No way to bend the bracket either. Is there a diffrence between the manual drum switch and the power disc?I pulled the switch out again and came up with a solution.  I was having some fits with my rear side marker light. My other Bird has U shaped grounding pieces that attach to the bottem of the side marker light attached by the sheet metal nut. I would like to get some for this bird if any one has a deal on them let me know. For the mean time I came up with a ring terminal and a grounding point. I change out a few of the lights around the dash too. Low Beam head light was dead. Replaced with another T3 I had. Heater control bulb 1895 Shifter bulb 1445 Under Dash light97 What is the glove box bulb?Then I started on the Ralley Gauge cluster. I bought this used on Ebay and cleaned it up. New lens, new printed circut board and new bulbs and sockets.  This was a True PITA to get in and wired up. The throttle gave me even more problems to the point where I had to pull the gauges back out to see why the cable wouldn't screw on. This is a pic of the cable inside the throttle cable.  I had the side with the disc on the gauge side and this didn't work. I pulled the inside cable out and changed it around. I don't know if thats right but everything went together. After hanging upside down and getting the hi beam light and Gaug pod plug connected I started up the car. *Fuel gauge goes past "F". Didn't think I filled it that much. Not sure if it right or not. *Oil sits on 20lbs doesn't move. *Gen gauge doesn't move *Temp seems to work  My first guess is the two/three gauges are bad. Not sure where to even start to try and trouble shoot it. Almost every wire and sensor are new. It sounds like a another long weekend to try and figure that one out. One other mystery for me is how does the horn work? With the wheel off I see there is a little plunger. What do I have to short to get the horn to work? I do have some pluger and spring kit for the horn that needs to be installed. 
|
|
|
|
|
Joined: Feb 2004
Posts: 1,480
Member
|
|
Member
Joined: Feb 2004
Posts: 1,480 |
|
|
|
|
|
Joined: Feb 2004
Posts: 1,480
Member
|
|
Member
Joined: Feb 2004
Posts: 1,480 |
|
|
|
|
Forums57
Topics35,546
Posts298,900
Members8,865
| |
Most Online19,810
Feb 1st, 2026
|
|
|
2 members (Rus, Jimc2002),
175
guests, and
27
robots. |
|
Key:
Admin,
Global Mod,
Mod
|
|
|
There are no members with birthdays on this day. |
|
|
|